Title here
Summary here
February 20, 20239 minutes
안녕하세요?
지난 시간에 이어 Nodejs, Expressjs를 이용한 백엔드 API 강좌를 이어 나가도록 하겠습니다.
지난 시간에는 Authetication 부분인데요.
가입, 로그인, 로그아웃 등을 해결했습니다.
2편에서는 글을 적을 수 있는 Post와 글에 댓글을 달 수 있는 Comment에 대해 추가해 보도록 하겠습니다.
Post와 Comment에 대한 DB를 작성해야 하는데요.
기존 prisma 스키마 파일에서 아래와 같이 수정하면 됩니다.
model User {
    id           String    @id @default(uuid())
    firstName    String
    lastName     String?
    email        String    @unique
    password     String
    gender       String    @default("MALE") // MALE, FEMALE
    coverImage   String?
    profileImage String?
    status       String    @default("LOGOUT") // ACTIVE, IDLE, LOGOUT
    createdAt    DateTime  @default(now())
    updatedAt    DateTime  @updatedAt
    posts        Post[]
    comments     Comment[]
}

model Post {
    id        String    @id @default(uuid())
    content   String?
    user      User      @relation(fields: [userId], references: [id], onDelete: Cascade)
    userId    String
    image     String?
    createdAt DateTime  @default(now())
    updatedAt DateTime  @updatedAt
    comments  Comment[]
}

model Comment {
    id        String   @id @default(uuid())
    createdAt DateTime @default(now())
    content   String
    user      User     @relation(fields: [userId], references: [id], onDelete: Cascade)
    userId    String
    post      Post     @relation(fields: [postId], references: [id], onDelete: Cascade)
    postId    String
}
Post와 Comment 모델을 추가했는데요.
각각 User와 관계형 모델로 설정했습니다.
prisma에서는 relation이라고 하는데요.
Post에는 comments라고 Comment 모델을 보유하고 있고,
User에는 posts라고 Post 모델을 보유하고 있습니다.
관계형 모델에서는 상위 모델의 데이터가 삭제되면 그에 따라 하위 모델의 데이터도 삭제되는 Cascade 기능을 설정할 수 있습니다.
위에서 보듯이 Comment 모델에서 user와 post가 각각 onDelete: Cascade라고 되어 있는게 바로 그 기능입니다.
Prisma DB의 스키마를 바꾸면 꼭 “db push"를 해야 적용됩니다.
npx prisma db pushPost와 Comment의 라우팅을 만들어야 하니까 src/routes 폴더에 몇 가지 추가할 게 있습니다.
일단 index.js에서 라우팅을 추가합시다.
// src/routes/index.js

const authRoutes = require('./auth.route')
const postRoutes = require('./post.route')
const commentsRoutes = require('./comments.route')

exports.registerRoutes = app => {
  app.use('/api/auth', authRoutes)
  app.use('/api/comments', commentsRoutes)
  app.use('/api/posts', postRoutes)
}
위 코드를 보면 필요한 파일이 두 개가 되겠네요.
각각 post.route.js 파일과 comments.route.js 파일입니다.
// src/route/post.route.js

const { Router } = require("express");
const router = Router();
const { body } = require("express-validator");

const checkAuth = require("../middlewares/auth.middleware");

const {
  createPost,
  fetchMyPosts,
  fetchPostDetails,
  deletePost,
} = require("../controllers/post");

const createValidation = [
  body("content").not().isEmpty().withMessage("Content must be required"),
];

router.post("/", [checkAuth, createValidation], createPost);
router.get("/my_posts", checkAuth, fetchMyPosts);
router.get("/:postId", checkAuth, fetchPostDetails);
router.delete("/:postId", checkAuth, deletePost);

module.exports = router;
// src/route/comments.route.js
const { Router } = require("express");
const router = Router();
const { body } = require("express-validator");
const checkAuth = require("../middlewares/auth.middleware");
const {
createComment,
fetchComments,
deleteComment,
} = require("../controllers/comments");
const createValidation = [
body("content").not().isEmpty().withMessage("Content must be required"),
];
router.post("/:postId", [checkAuth, createValidation], createComment);
router.delete("/:commentId", checkAuth, deleteComment);
router.get("/:postId", checkAuth, fetchComments);
module.exports = router;미들웨어로는 checkAuth를 모두 넣었는데요.
checkAuth는 로그인되어 있다고 체크해 주는 미들웨어입니다.
로그인되어 있지 않으면 글을 작성할 수 없기 때문입니다.
그리고 express-validator 미들웨어와 checkAuth 미들웨어를 동시에 적용하려면 미들웨어 들어가는 위치에 배열을 넣어주면 됩니다.
그리고 라우팅 주소는 /api/post와 /api/comments로 시작하고,
createValidation은 지난 시간에서 배웠듯이 express-validator에 의해 content 항목은 꼭 있어야 한다는 뜻입니다.
그럼, Post, Comments 라우팅에 필요한 컨트롤러를 만들어야 합니다.
Post 쪽에는 createPost, fetchMyPosts, fetchPostDetails, deletePost라고 이렇게 4가지가 필요하고,
Comments 쪽에는 createComment, fetchComments, deleteComment라고 총 3가지가 필요합니다.
먼저, src/controllers 폴더에 post라는 폴더를 만들고 index.js 파일을 만듭시다.
// src/controllers/post/index.js

const { createPost } = require("./createPost");
const { fetchMyPosts } = require("./fetchMyPosts");
const { fetchPostDetails } = require("./fetchPostDetails");
const { deletePost } = require("./deletePost");

module.exports = {
  createPost,
  fetchMyPosts,
  fetchPostDetails,
  deletePost,
};
먼저, createPost 컨트롤러입니다.
// src/controllers/post/createPost.js

const { db } = require("../../utils/db");
const { validationResult } = require("express-validator");

exports.createPost = async (req, res, next) => {
  const errors = validationResult(req);
  if (!errors.isEmpty()) {
    return next({
      status: 422,
      message: "Post create error",
      data: errors.mapped(),
    });
  }

  const currentUser = res.locals.user;
  const { content, image } = req.body;

  try {
    const post = await db.post.create({
      data: {
        content,
        image,
        user: {
          connect: {
            id: currentUser.id,
          },
        },
      },
    });

    res.status(200).json({
      type: "success",
      message: " Post created successfully",
      data: {
        post,
      },
    });
  } catch (error) {
    next(error);
  }
};
createPost 컨트롤러의 전체적인 로직은 아래와 같습니다.
먼저, express-validator에 의해 validationResult 값을 얻어서 content 값이 비었는지 체크하고,
두 번째, Response의 locals 객체에서 우리가 로그인했을 때 저장했던 user 객체를 currentUser라는 변수에 저장합니다.
세 번째, post를 생성하는 prisma 명령어를 실행합니다.
근데, 여기서는 user 부분을 관계형 모델로 설정했습니다.
즉, post를 만들 때 post의 주인인 user를 넣으면 나중에 관리가 정말 편해집니다.
이제, createPost 컨트롤러를 테스트해 볼까요?
’npm run dev’ 실행시키면 아직 작성하지 못한 컨트롤러가 있다고 하는데 그거 모두 코멘트 처리하면 현재까지 만든 createPost 컨트롤러는 작동할 겁니다.
위 그림처럼 createPost 기능이 정상 작동합니다.
우리가 만든 express-validator도 테스트해 봐야 하는데요, 만약 content 부분이 비었다면 어떻게 될까요?
위 그림과 같이 에러가 나오면서 “Content must be required"라고 명확한 메시지가 나옵니다.
이제 createPost 컨트롤러는 확실히 작성한 거 같습니다.
아래와 같이 작성하시면 됩니다.
// src/controllers/post/fetchMyPosts.js

const { db } = require("../../utils/db");

exports.fetchMyPosts = async (req, res, next) => {
  try {
    const currentUser = res.locals.user;
    const posts = await db.post.findMany({
      where: {
        userId: currentUser.id,
      },
      include: {
        user: {
          select: {
            id: true,
            firstName: true,
            profileImage: true,
          },
        },
        comments: {
          select: {
            id: true,
            content: true,
          },
        },
        _count: {
          select: {
            comments: true,
          },
        },
      },
      orderBy: {
        createdAt: "desc",
      },
    });

    return res.status(200).json({
      type: "success",
      message: "Fetch my posts",
      data: {
        posts,
      },
    });
  } catch (error) {
    next(error);
  }
};
위 코드를 한번 자세히 천천히 살펴볼까요?
아까와 마찬가지로 현재 로그인되어 있는 currentUser를 res.locals.user 객체에서 확보했고,
두 번째는 post 테이블에서 userId가 currentUser.id 인 모든 post를 찾고 있습니다.
그런데, 자료를 뽑을 때 user 부분과 comments 부분과 그리고 comments의 개수까지 같이 뽑아내고 있죠.
마지막으로 db에서 찾은 모든 post를 Response를 리턴해 주고 있습니다.
이것도 테스트해 볼까요?
post를 한 개 더 만들고 fetchMyPosts 컨트롤러를 실행해 봅시다.
라우팅 주소는 router.get("/my_posts", checkAuth, fetchMyPosts); 코드처럼 /my_posts이며 GET 메소드를 사용하면 됩니다.
위 그림처럼 여러 개의 post가 보입니다.
fetchMyPosts 컨트롤러도 잘 작동하고 있네요.
이제 개별 Post를 볼 수 있는 것도 만들어야 합니다.
라우팅 주소는 router.get("/:postId", checkAuth, fetchPostDetails); 코드에서처럼 GET 메소드로 postId를 req.params.postId로 전달하면 됩니다.
// src/controllers/post/fetchPostDetails.js

const { db } = require("../../utils/db");

exports.fetchPostDetails = async (req, res, next) => {
  try {
    const post = await db.post.findUnique({
      where: {
        id: req.params.postId,
      },
      include: {
        user: {
          select: {
            id: true,
            firstName: true,
            profileImage: true,
          },
        },
        comments: {
          select: {
            id: true,
            content: true,
          },
        },
        _count: {
          select: {
            comments: true,
          },
        },
      },
    });

    if (!post) {
      return next({
        status: 404,
        message: "Post not found",
      });
    }

    return res.status(200).json({
      type: "success",
      message: "Fetch post details",
      data: {
        post,
      },
    });
  } catch (error) {
    next(error);
  }
};
여기도 크게 어려운 게 없습니다.
다만 router.get("/:postId", checkAuth, fetchPostDetails) 이렇게 postId 앞에 콜론이 있다는 뜻은 다이내믹 라우팅이라고 하는데요.
express에서는 Request에서 params 객체에 postId라는 이름으로 저장됩니다.
그래서 우리가 브라우저 주소창에 /api/post/11231231231231이라고 치면 /api/post/다음에 나오는 숫자나 문자가 바로 params에 들어가게 됩니다.
그런데 express 라우팅에서 GET 메소드로 “/:postId"라고 지정했기 때문에 req.params.postId 라는 이름으로 저장됩니다.
이걸 가지고 DB에서 원하는 값을 얻을 수 있는 거죠.
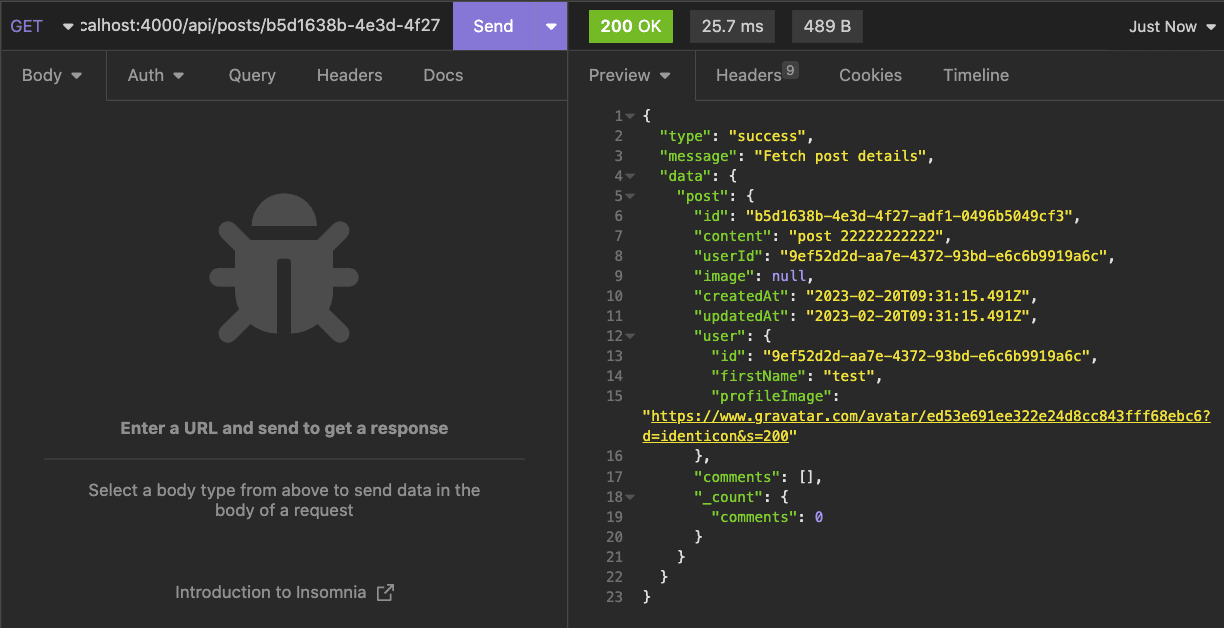
한번 테스트해 볼까요?
아까 테스트했던 postId 한 개를 복사하고,
위 그림처럼 한 개의 Post에 대한 세부정보가 아주 잘 나오네요.
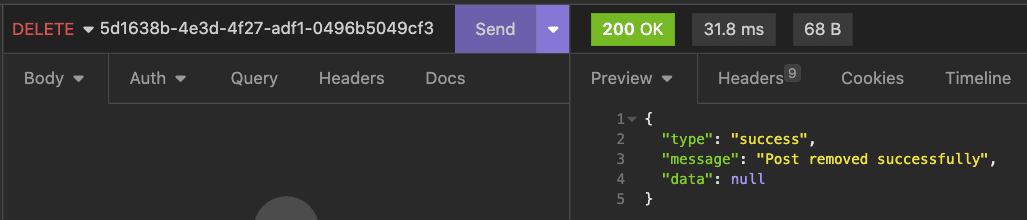
마지막으로 Post를 삭제하는 deletePost 컨트롤러를 만들어 봅시다.
라우팅 주소는 router.delete("/:postId", checkAuth, deletePost); 코드에서처럼 DELETE 메소드를 이용하고 postId만 전달하면 삭제가 됩니다.
// src/controllers/post/deletePost.js

const { db } = require("../../utils/db");

exports.deletePost = async (req, res, next) => {
  const userId = res.locals.user.id;
  const postId = req.params.postId;

  try {
    const post = await db.post.findUnique({
      where: {
        id: postId,
      },
      select: {
        userId: true,
      },
    });

    if (!post) {
      return next({ status: 404, message: "Post not found" });
    }

    if (post.userId !== userId) {
      return next({ status: 401, message: "Unauthorized access denied" });
    }

    await db.post.delete({
      where: {
        id: postId,
      },
    });

    return res.status(200).json({
      type: "success",
      message: "Post removed successfully",
      data: null,
    });
  } catch (error) {
    next(error);
  }
};
deletePost 컨트롤러는 처음에 지우려는 Post가 있는지 확인하고 있다면 삭제해 버립니다.
테스트 결과는 아래와 같습니다.
지금까지 Post 관련 코드는 모두 완성했는데요.
Comment 관련 코드도 거의 똑같습니다.
여기 부분은 Post 부분이랑 기능적으로 거의 똑같기 때문에 코드만 보여드립니다.
// src/controllers/comments/index.js

const { createComment } = require("./createComment");
const { deleteComment } = require("./deleteComment");
const { fetchComments } = require("./fetchComments");

module.exports = {
  createComment,
  deleteComment,
  fetchComments,
};
// src/controllers/comments/createComment.js
const { db } = require("../../utils/db");
const { validationResult } = require("express-validator");
exports.createComment = async (req, res, next) => {
const errors = validationResult(req);
if (!errors.isEmpty()) {
return next({
status: 422,
message: "Comment create error",
data: errors.mapped(),
});
}
try {
const userId = res.locals.user.id;
const postId = req.params.postId;
const { content } = req.body;
const comment = await db.comment.create({
data: {
content,
postId,
userId,
},
});
return res.status(200).json({
type: "success",
message: "Comments added",
data: {
comment,
},
});
} catch (error) {
next(error);
}
};// src/controllers/comments/deleteComment.js
const { db } = require("../../utils/db");
exports.deleteComment = async (req, res, next) => {
try {
const commentId = req.params.commentId;
await db.comment.delete({
where: {
id: commentId,
},
});
return res.status(200).json({
type: "success",
message: "Comment deleted",
data: null,
});
} catch (error) {
next(error);
}
};// src/controllers/comments/fetchComments.js
const { db } = require("../../utils/db");
exports.fetchComments = async (req, res, next) => {
try {
const postId = req.params.postId;
const comments = await db.comment.findMany({
where: {
postId,
},
include: {
user: {
select: {
id: true,
firstName: true,
profileImage: true,
},
},
},
orderBy: {
createdAt: "desc",
},
});
return res.status(200).json({
type: "success",
message: " fetch post comments",
data: {
comments,
},
});
} catch (error) {
next(error);
}
};테스트 결과를 볼까요?
위와 같이 Comment 생성도 잘 되고,
위 그림과 같이 Comments 정보도 얻을 수 있고,
위 그림처럼 삭제도 잘 됩니다.
지금까지 작성한 코드 트리 구조입니다.
참고 바랍니다.
➜  nodejs-api-test tree --du -h src
[ 19K]  src
├── [ 403]  config
│   └── [ 307]  env.config.js
├── [ 11K]  controllers
│   ├── [5.1K]  auth
│   │   ├── [ 547]  fetchCurrentUser.js
│   │   ├── [ 249]  index.js
│   │   ├── [1.9K]  login.js
│   │   ├── [ 814]  logout.js
│   │   └── [1.5K]  signup.js
│   ├── [2.2K]  comments
│   │   ├── [ 766]  createComment.js
│   │   ├── [ 395]  deleteComment.js
│   │   ├── [ 650]  fetchComments.js
│   │   └── [ 236]  index.js
│   └── [3.7K]  post
│       ├── [ 801]  createPost.js
│       ├── [ 772]  deletePost.js
│       ├── [ 856]  fetchMyPosts.js
│       ├── [ 879]  fetchPostDetails.js
│       └── [ 295]  index.js
├── [1.5K]  middlewares
│   ├── [ 961]  auth.middleware.js
│   └── [ 442]  error.middleware.js
├── [2.6K]  routes
│   ├── [1007]  auth.route.js
│   ├── [ 582]  comments.route.js
│   ├── [ 297]  index.js
│   └── [ 629]  post.route.js
├── [1.3K]  server.js
└── [1.5K]  utils
    ├── [  85]  db.js
    ├── [ 363]  generateImage.js
    ├── [ 399]  password.util.js
    └── [ 500]  token.util.js

  45K used in 9 directories, 26 files
다음에는 ADMIN 화면을 구성해 볼까요?
유저 삭제 및 Admin Dashboard 화면 작성 같은 거 말입니다.
그럼.