Title here
Summary here
May 21, 20235 minutes
안녕하세요?
오늘은 Cloudflare의 Workers를 살펴볼 예정인데요.
Workers는 이름에서 알 수 있듯이 Serverless 상태로 뭔가를 수행할 수 있는 서비스인데요.
최근 AWS lambda와 비교되어 아주 좋은 평을 받는 Cloudflare의 서비스인데요.
무료로 여러 가지 나만의 Workers는 만들어서 여러 가지를 할 수 있습니다.
API를 만들 수 있고, Static 웹 사이트를 호스팅 할 수 도 있고, 또, 접속된 주소가 어느 나라인지 알아볼 수 있는 Redirect 코드도 만들 수 있고, 심지어 QR코드, 바코드도 생성할 수 있습니다.
그래서 앞으로 Workers에 대해 계속 공부해 보겠습니다.
아래 그림처럼 대시보드에서 보면 Workers와 Pages를 같은 곳에 놨는데요.
그리고 workers는 그 자체로 API로 사용될 수 있어 아래 그림처럼 하위도메인이란 걸 설정해야 합니다.
저는 제 아이디를 지정했는데요.
그래서 cpro95.workers.dev 주소가 되었고, 만약에 geolocation이란 새로운 workers를 만들었다면 이 workers의 주소는 “https://geolocation.cpro95.workers.dev” 가 됩니다.
이제 터미널상에서 Workers를 설치해 볼까요?
Cloudflare는 Wrangler이란 프로그램을 사용하는데요.
먼저, npm을 이용해서 전역으로 설치해줘야 합니다.
npm i wrangler -g향후 버전에서는 wrangler init 대신 npm create cloudflare@2 명령어를 사용한다고 합니다.
➜  wrangler login
➜  wrangler init
 ⛅️ wrangler 3.0.0
------------------
Using npm as package manager.
▲ [WARNING] The `init` command is no longer supported. Please use `npm create cloudflare@2` instead.

  The `init` command will be removed in a future version.


Running `npm create cloudflare@2`...

using create-cloudflare version 2.0.7

╭ Create an application with Cloudflare Step 1 of 3
│
╰ Where do you want to create your application? also used as application name
--geolocation-test
위와 같이 wrangler login 명령어로 Cloudflare에 로그인해야 합니다.
그리고 wrangler init 명령어를 실행하면 위와 같이 나옵니다.
먼저, 이름을 지정하라고 하는데요.
저는 geolocation-test라는 이름으로 지정했습니다.
╰ What type of application do you want to create?
--○ Website or web app
--● "Hello World" script
--○ Common Worker functions
--○ ChatGPT plugin (Typescript)
두 번째로 애플리케이션의 형태를 고르는 건데요.
저는 2번째 “Hello World” script를 고르겠습니다.
이게 가장 기본적인 Workers 템플릿입니다.
그다음으로는 Typescript 또는 Javascript 인지 선택하면 됩니다.
그리고 마지막으로 Deploy 하겠냐고 합니다.
Do you want to deploy your application? (y/n)
--Yes / No
배포하면 좋습니다. 나중에 할 수 있는데요.
일단 Yes를 선택합니다.
일단 배포를 선택하면 실제 Cloudflare에 업로드되는데요.
Cloudflare 대시보드에서 보면 아래 그림처럼 나와 있습니다.
다 실행되면 아까 만들었던 geolocation-test 폴더로 이동하면 아래와 같이 프로젝트가 완성되었을 겁니다.
➜  cd geolocation-test
➜  geolocation-test tree --du -h -L 1
[ 72K]  .
├── [3.4K]  node_modules
├── [ 56K]  package-lock.json
├── [ 286]  package.json
├── [  96]  src
├── [ 10K]  tsconfig.json
└── [1.2K]  wrangler.toml

  72K used in 3 directories, 4 files
➜  geolocation-test
이제 src 폴더에 들어가 볼까요?
workers.ts 파일이 있는데요.
/**
 * Welcome to Cloudflare Workers! This is your first worker.
 *
 * - Run `npm run dev` in your terminal to start a development server
 * - Open a browser tab at http://localhost:8787/ to see your worker in action
 * - Run `npm run deploy` to publish your worker
 *
 * Learn more at https://developers.cloudflare.com/workers/
 */

export interface Env {
  // Example binding to KV. Learn more at https://developers.cloudflare.com/workers/runtime-apis/kv/
  // MY_KV_NAMESPACE: KVNamespace;
  //
  // Example binding to Durable Object. Learn more at https://developers.cloudflare.com/workers/runtime-apis/durable-objects/
  // MY_DURABLE_OBJECT: DurableObjectNamespace;
  //
  // Example binding to R2. Learn more at https://developers.cloudflare.com/workers/runtime-apis/r2/
  // MY_BUCKET: R2Bucket;
  //
  // Example binding to a Service. Learn more at https://developers.cloudflare.com/workers/runtime-apis/service-bindings/
  // MY_SERVICE: Fetcher;
  //
  // Example binding to a Queue. Learn more at https://developers.cloudflare.com/queues/javascript-apis/
  // MY_QUEUE: Queue;
}

export default {
  async fetch(
    request: Request,
    env: Env,
    ctx: ExecutionContext,
  ): Promise<Response> {
    return new Response('Hello World!')
  },
}
위와 같이 되어 있습니다.
위 코드를 보시면 마지막에 export default 부분이 보이는데요.
여기가 일종의 웹 서버 같은 겁니다.
NodeJS로 따지면 ExpressJS 같은 거죠.
대신 NodeJS API가 아닌 순수 Web API를 이용해야 합니다.
fetch 함수를 이용해서 Response를 리턴 해 주고 있습니다.
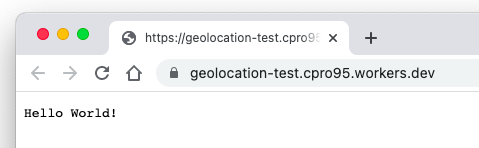
이제 이 주소로 “https://geolocation-test.cpro95.workers.dev” 접속하면 아래와 같이 나올 겁니다.
Workers가 정상적으로 작동되고 있습니다.
이제 Hello World! 프로그램대신 Workers를 이용해서 멋진 걸 만들어 볼까 하는데요.
먼저, 개발 서버를 돌려볼까요?
➜  geolocation-test npm start

> geolocation-test@0.0.0 start
> wrangler dev

 ⛅️ wrangler 3.0.0
------------------
wrangler dev now uses local mode by default, powered by 🔥 Miniflare and 👷 workerd.
To run an edge preview session for your Worker, use wrangler dev --remote
⎔ Starting local server...
[mf:wrn] The latest compatibility date supported by the installed Cloudflare Workers Runtime is "2023-05-12",
but you've requested "2023-05-21". Falling back to "2023-05-12"...
[mf:inf] Ready on http://127.0.0.1:8787/
[mf:inf] GET / 200 OK (36ms)
[mf:inf] GET /favicon.ico 200 OK (1ms)
그러면 8787 포트로 개발 창이 뜹니다.
이제 본격적인 개발로 들어가 볼까요?
아까 src/workers.ts 내용을 아래와 같이 바꾸어 줍시다.
아래 코드는 cloudflare 정식 예제에 있는 겁니다.
export default {
  async fetch(request: any) {
    let html_content = ''
    let html_style =
      'body{padding:6em; font-family: sans-serif;} h1{color:#f6821f;}'
    html_content += '<p> Colo: ' + request.cf.colo + '</p>'
    html_content += '<p> Country: ' + request.cf.country + '</p>'
    html_content += '<p> City: ' + request.cf.city + '</p>'
    html_content += '<p> Continent: ' + request.cf.continent + '</p>'
    html_content += '<p> Latitude: ' + request.cf.latitude + '</p>'
    html_content += '<p> Longitude: ' + request.cf.longitude + '</p>'
    html_content += '<p> PostalCode: ' + request.cf.postalCode + '</p>'
    html_content += '<p> MetroCode: ' + request.cf.metroCode + '</p>'
    html_content += '<p> Region: ' + request.cf.region + '</p>'
    html_content += '<p> RegionCode: ' + request.cf.regionCode + '</p>'
    html_content += '<p> Timezone: ' + request.cf.timezone + '</p>'
    let html = `<!DOCTYPE html>
	  <head>
	  <title> Geolocation: Hello World </title>
		  <style> ${html_style} </style>
	  </head>
	  <body>
		  <h1>Geolocation: Hello World!</h1>
		  <p>You now have access to geolocation data about where your user is visiting from.</p>
		  ${html_content}
	  </body>`

    return new Response(html, {
      headers: {
        'content-type': 'text/html;charset=UTF-8',
      },
    })
  },
}
위 코드는 request 객체에 있는 cf 라는 객체를 이용해서 접속자의 위치를 확인할 수 있는 코드입니다.
cf가 바로 cloudflare 객체 인거죠.
그래서 브라우저에서 geolocation-test.cpro95.workers.dev 사이트로 접속하면 cloudflare CDN에 의해 cf 정보가 전달되고 그 cf 객체에 각종 위치 정보가 전달되게 됩니다.
실행 결과는 위 그림처럼 나옵니다.
이제 배포해 볼까요?
➜  npm run deploy

> geolocation-test@0.0.0 deploy
> wrangler publish

 ⛅️ wrangler 3.0.0
------------------
▲ [WARNING] `wrangler publish` is deprecated and will be removed in the next major version.

  Please use `wrangler deploy` instead, which accepts exactly the same arguments.


Total Upload: 1.40 KiB / gzip: 0.54 KiB
Uploaded geolocation-test (0.98 sec)
Published geolocation-test (0.33 sec)
  https://geolocation-test.cpro95.workers.dev
Current Deployment ID: e.......................
이제 cloudflare 대시보드를 보시면 새로 업데이트가 됐다고 나올 겁니다.
지금까지 Cloudflare Workers를 이용해서 간단한 사용자 위치 정보를 확인하는 API를 만들어 봤는데요.
정말 속도도 빠르고 괜찮은 거 같네요.
다음 시간에는 좀 더 Workers에 대해 심도 있게 살펴볼까 합니다.
그럼.