Title here
Summary here
June 1, 20236 minutes
안녕하세요?
지난 시간에 이어 NextAuth와 Next.js 13 버전의 App Router를 이용해서 Auth관련 풀스택 개발을 이어 나가 보도록 하겠습니다.
이번 시간에는 Prisma 관련 강좌인데요.
Prisma는 Node.js backend 쪽에서는 아주 유명한 데이터베이스 ORM 인데요.
Prisma로 DB 관련 코드를 작성하면 아주 여러 DB에 거의 똑같은 코드로 연결할 수 있습니다.
그럼, 먼저, Prisma를 설치해 볼까요?
➜  next-auth-test git:(main) ✗ npm i prisma -D

added 2 packages, and audited 367 packages in 11s

140 packages are looking for funding
  run `npm fund` for details

found 0 vulnerabilities
Prisma를 설치했으면 초기화를 해야 하는데요. 아래처럼 하시면 됩니다.
DB로 저는 가장 쉬운 sqlite를 사용하겠습니다.
➜  next-auth-test git:(main) ✗ npx prisma init --datasource-provider sqlite

✔ Your Prisma schema was created at prisma/schema.prisma
  You can now open it in your favorite editor.

warn You already have a .gitignore file. Don't forget to add `.env` in it to not commit any private information.

Next steps:
1. Set the DATABASE_URL in the .env file to point to your existing database. If your database has no tables yet, read https://pris.ly/d/getting-started
2. Run prisma db pull to turn your database schema into a Prisma schema.
3. Run prisma generate to generate the Prisma Client. You can then start querying your database.

More information in our documentation:
https://pris.ly/d/getting-started
터미널에서 위 명령어를 실행시키면 Prisma는 몇 가지 기본적인 설정을 만드는데요.
먼저, prisma 폴더에 있는 schema.prisma 파일입니다.
이 파일은 가장 기본이 되는 DB의 뼈대를 만드는 파일입니다.
Prisma에서는 Model(모델)이라고 하는데요.
이게 sqlite, PostgreSql, MySql 등에서는 테이블로 전환됩니다.
물론 DB가 지원하면 관계형 모델로도 작성할 수 있습니다.
두 번째로 Prisma가 만드는 파일이 바로 .env 파일인데요.
저는 지난 시간에 만들어놔서, 아마 이 파일에 DATABASE_URL 부분만 추가되었을 겁니다.
그럼 스크마 파일을 살펴볼까요?
// This is your Prisma schema file,
// learn more about it in the docs: https://pris.ly/d/prisma-schema

generator client {
  provider = "prisma-client-js"
}

datasource db {
  provider = "sqlite"
  url      = env("DATABASE_URL")
}
Prisma는 백엔드쪽이기 때문에 Next.js 같은 Client쪽에서 Prisma DB를 연결하려면 prisma-client가 필요합니다.
첫 번째 줄은 그걸 얘기한 거고요.
두 번째 줄에 있는 datasource 부분이 바로 어떤 종류의 DB를 쓰는지와 해당 파일에 대한 url 부분을 적어둔 모양새입니다.
아까 우리는 .env 파일에 DATABASE_URL=“file:./dev.db” 이렇게 적혀있는 걸 보았는데요.
dev.db 파일로 sqlite 파일을 저장한다는 뜻입니다.
Prisma 홈페이지에 가면 QuickStart 쪽에 가장 기본이 되는 User와 Post 모델에 대한 예제가 나옵니다.
이 코드를 schema.prisma 파일에 추가해 보겠습니다.
// This is your Prisma schema file,
// learn more about it in the docs: https://pris.ly/d/prisma-schema

generator client {
  provider = "prisma-client-js"
}

datasource db {
  provider = "sqlite"
  url      = env("DATABASE_URL")
}

model User {
  id       Int     @id @default(autoincrement())
  email    String  @unique
  name     String?
  password String
  posts    Post[]
}

model Post {
  id        Int     @id @default(autoincrement())
  title     String
  content   String?
  published Boolean @default(false)
  author    User    @relation(fields: [authorId], references: [id])
  authorId  Int
}
Prisma에서는 테이블을 model로 정의하는데요.
모델은 보통 대문자로 씁니다.(실제 코드에서는 소문자로 참조합니다.)
모든 SQL 테이블에는 id가 들어가야 됩니다.
그래서 Prisma에서도 id 부분을 Int로 지정해 주는데요.
@default(autoincrement())
이 명령어가 id를 자동으로 하나씩 증가시켜 줍니다.
그래서 데이터를 만들 때는 id 부분은 신경 쓰지 않아도 됩니다.
자동으로 부여되기 때문이죠.
Post 모델은 간단한 게시물 작성할 때 쓸 수 있는 모델입니다.
여기서 중요하게 보셔야 할 게 바로 Post와 User의 관계인데요.
User 모델에는 posts라는 항목이 있는데, 이와 함께 Post 모델에는 author이란 User 모델이 있습니다.
즉, 서로 연결된다는 의미고요, 관계형 데이터베이스의 가장 일반적인 모형입니다.
author가 User를 나타내기 때문에 실제 어떤 User인지를 보관하기 위해서는 authorId 같은 실질적인 데이터가 있어야 합니다.
그래서 Post 모델의 마지막에 authorId가 있고 이 authorId가 바로 @relation 방식으로 연결되고 있습니다.
Prisma 홈페이지에 있는 User 모델에는 password가 없는데요.
우리가 하고자 하는 NextAuth 로그인 부분에서 password가 꼭 있어야 하기에 위와 같이 String 형식으로 추가했습니다.
Prisma 스키마를 작성했으면 이걸 코드와 연결해야 하는데요.
즉, sqlite 파일도 만들고 그 파일 안에 테이블도 만들어야 합니다.
Prisma에서는 다음과 같이 하면 됩니다.
➜  next-auth-test git:(main) ✗ npx prisma migrate dev --name init
Environment variables loaded from .env
Prisma schema loaded from prisma/schema.prisma
Datasource "db": SQLite database "dev.db" at "file:./dev.db"

SQLite database dev.db created at file:./dev.db

Applying migration `20230601125918_init`

The following migration(s) have been created and applied from new schema changes:

migrations/
  └─ 20230601125918_init/
    └─ migration.sql

Your database is now in sync with your schema.

Running generate... (Use --skip-generate to skip the generators)
이제 prisma 폴더로 가시면 dev.db 파일과 migrations 폴더도 보이는데요.
migrations 폴더를 뒤져보시면 실제 SQL 내용이 있습니다.
그러면 실제로 이 dev.db 파일을 열어볼까요?
➜  prisma git:(main) ✗ sqlite3 dev.db
SQLite version 3.37.0 2021-12-09 01:34:53
Enter ".help" for usage hints.
sqlite> .tables
Post                User                _prisma_migrations
sqlite> .schema
CREATE TABLE IF NOT EXISTS "_prisma_migrations" (
    "id"                    TEXT PRIMARY KEY NOT NULL,
    "checksum"              TEXT NOT NULL,
    "finished_at"           DATETIME,
    "migration_name"        TEXT NOT NULL,
    "logs"                  TEXT,
    "rolled_back_at"        DATETIME,
    "started_at"            DATETIME NOT NULL DEFAULT current_timestamp,
    "applied_steps_count"   INTEGER UNSIGNED NOT NULL DEFAULT 0
);
CREATE TABLE IF NOT EXISTS "User" (
    "id" INTEGER NOT NULL PRIMARY KEY AUTOINCREMENT,
    "email" TEXT NOT NULL,
    "name" TEXT,
    "password" TEXT NOT NULL
);
CREATE TABLE sqlite_sequence(name,seq);
CREATE TABLE IF NOT EXISTS "Post" (
    "id" INTEGER NOT NULL PRIMARY KEY AUTOINCREMENT,
    "title" TEXT NOT NULL,
    "content" TEXT,
    "published" BOOLEAN NOT NULL DEFAULT false,
    "authorId" INTEGER NOT NULL,
    CONSTRAINT "Post_authorId_fkey" FOREIGN KEY ("authorId") REFERENCES "User" ("id") ON DELETE RESTRICT ON UPDATE CASCADE
);
CREATE UNIQUE INDEX "User_email_key" ON "User"("email");
sqlite> select * from User;
sqlite3 명령어를 이용해서 살펴보았는데요.
User와 Post의 관계형 SQL 문구가 상당히 어렵네요.
sqlite3 명령어를 이용해서 실제 insert into 방식으로 수작업으로 데이터를 넣는다는 게 쉽지 않을 거 같네요.
그래서 Prisma에서는 Studio라는걸 제공해 주는데요.
바로 웹상에서 데이터를 수동으로 조작할 수 있는 툴을 제공해 줍니다.
Prisma만의 가장 강력한 기능 중에 하나죠.
➜ next-auth-test git:(main) ✗ npx prisma studio
Environment variables loaded from .env
Prisma schema loaded from prisma/schema.prisma
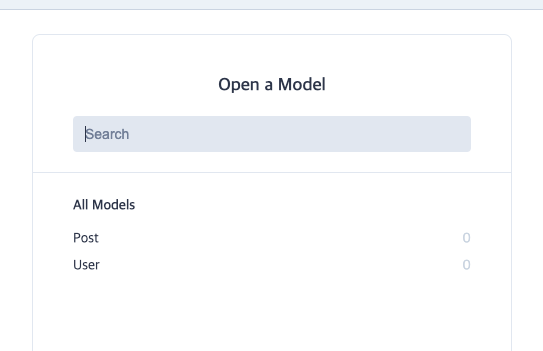
Prisma Studio is up on http://localhost:5555위 그림처럼 웹상에서 쉽게 데이터를 조작할 수 있습니다.
오른쪽에 “Add record” 버튼을 누르면 해당 모델의 데이터를 아래처럼 입력하고 저장할 수 있습니다.
위 그림에서 “Save 1 change” 버튼을 누르면 저장됩니다.
이제 Prisma 설치가 끝났는데요, 이제 Next.js에서 Prisma를 사용할 수 있게 하는 SDK 같은 걸 설치해야 합니다.
Prisma Client라고 하는데요. 다음과 같이 설치하면 됩니다.
➜  next-auth-test npm i @prisma/client

up to date, audited 369 packages in 2s

140 packages are looking for funding
  run `npm fund` for details

found 0 vulnerabilities
Prisma Client 설치가 끝났으면 Next.js에서 Prisma Client를 불러오는 모듈을 하나 작성해야 합니다.
app 폴더 밑에 lib 폴더를 만들고 그 밑에 prisma.ts 파일을 만듭시다.
// /app/lib/prisma.ts

import { PrismaClient } from "@prisma/client";

const globalForPrisma = global as unknown as { prisma: PrismaClient };

export const prisma = globalForPrisma.prisma || new PrismaClient();

if (process.env.NODE_ENV !== "production") globalForPrisma.prisma = prisma;

export default prisma;
이 파일은 Prisma Client를 쓸 때 사용하시면 좋습니다.
코드 내용은 쉽게 말해서 Prisma Client를 꼭 한 개만 메모리에 불러오는 로직입니다.
다음 시간에는 본격적으로 Prisma를 이용해서 NextAuth의 login 로직과 signup 로직 등에 대해 알아보겠습니다.
그럼.