Title here
Summary here
September 4, 20238 minutes
안녕하세요?
오늘부터 새롭게 연재할 시리즈는 최근 빠져있는 Rust 언어 관련인데요.
웹 개발을 Next.js, Remix Framework, SvelteKit으로 다양하게 만들어 봤는데요.
좀 더 가볍고 빠른 웹 서버를 개발하고자 이번에는 그 어렵다는 Rust 언어로 도전해 봤습니다.
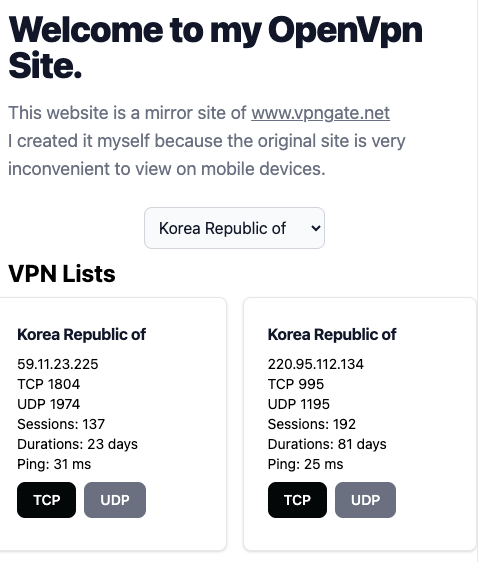
최종적으로 만들 웹 서버는 바로 아래와 같습니다.
이 사이트는 vpngate.net 사이트의 내용을 Rust scraper 크레이트로 웹 스크랩해서 서버로 뿌려주는 앱입니다.
백엔드에서 웹 스크래핑을 하므로 기존 NodeJS 보다는 빠른 Rust를 선택했습니다.
최종적으로 위와 같은 사이트를 만들건대요.
UI는 SvelteKit으로 Static 사이트로 만들었습니다.
Actix Web이 최근 Rust에서 뜨는 프레임워크인데요.
기존 Rocket 보다 훨씬 빠르고 가볍다고 합니다.
그래서 Actix로 선택했습니다.
먼저, 빈 Rust 프로그램을 만듭니다.
cargo new rust-fly-test
cd rust-fly-test
cargo add actix-web
아래와 같이 actix-web을 설치가 정상적으로 되면 됩니다.
Updating crates.io index
      Adding actix-web v4.4.0 to dependencies.
             Features:
             + __compress
             + actix-macros
             + actix-web-codegen
             + compress-brotli
             + compress-gzip
             + compress-zstd
             + cookie
             + cookies
             + http2
             + macros
             - actix-tls
             - experimental-io-uring
             - openssl
             - rustls
             - rustls-0_20
             - rustls-0_21
             - secure-cookies
    Updating crates.io index
이제 가장 기본적인 Actix 웹 서버를 만들 건대요.
Actix 홈페이지에 있는 Tutorial을 그대로 베낀 겁니다.
일단 오늘의 목표는 Fly.io 서버에 Deploy해서 원격 서버에서 제대로 작동되는지만 테스트해 보는 게 목적이거든요.
저는 항상 실제 Deploy 해보고 앱 진행을 합니다.
개발 서버에서만 작동하는 앱은 의미가 없고, 그래서 저는 제가 만든 앱이 모든 인터넷에서 작동하는지 꼭 체크하고 앱 개발을 진행해 나갑니다.
그러면, src 폴더의 main.rs 파일을 열어서 아래와 같이 바꿔 줍니다.
use actix_web::{get, post, web, App, HttpResponse, HttpServer, Responder};

#[get("/")]
async fn hello() -> impl Responder {
    HttpResponse::Ok().body("Hello world!")
}

#[post("/echo")]
async fn echo(req_body: String) -> impl Responder {
    HttpResponse::Ok().body(req_body)
}

async fn manual_hello() -> impl Responder {
    HttpResponse::Ok().body("Hey there!")
}

#[get("/healthcheck")]
async fn healthcheck() -> impl Responder {
    HttpResponse::Ok().body("Health Check Completed!")
}

#[actix_web::main]
async fn main() -> std::io::Result<()> {
    println!("Rust Actix-web server started at 127.0.0.1:8080");

    HttpServer::new(|| {
        App::new()
            .service(hello)
            .service(echo)
            .service(healthcheck)
            .route("/hey", web::get().to(manual_hello))
    })
    .bind(("127.0.0.1", 8080))?
    .run()
    .await
}
일단 여러 가지를 만들었습니다.
테스트를 위해 cargo run을 실행해 볼까요?
➜  rust-fly-test git:(master) ✗ cargo run


   Compiling actix-server v2.3.0
   Compiling actix-macros v0.2.4
   Compiling actix-web-codegen v4.2.2
   Compiling zstd v0.12.4
   Compiling actix-http v3.4.0
   Compiling actix-web v4.4.0
   Compiling rust-fly-test v0.1.0 (/Users/cpro95/Codings/Rust/imsi/rust-fly-test)
    Finished dev [unoptimized + debuginfo] target(s) in 1m 41s
     Running `target/debug/rust-fly-test`
Rust Actix-web server started at 127.0.0.1:8080
위와 같이 처음 컴파일하는 거라 상당히 긴 시간이 걸립니다.
그리고 println! 문으로 작성한 문구가 보이면서 서버가 시작되었다고 합니다.
이제 테스트해 볼까요?
➜  rust-fly-test git:(master) ✗ curl http://127.0.0.1:8080
Hello world!%
➜  rust-fly-test git:(master) ✗ curl http://127.0.0.1:8080/hey
Hey there!%
➜  rust-fly-test git:(master) ✗ curl http://127.0.0.1:8080/healthcheck
Health Check Completed!%
➜  rust-fly-test git:(master) ✗ curl http://127.0.0.1:8080/echo -X POST -d "data"
data%
➜  rust-fly-test git:(master) ✗ curl http://127.0.0.1:8080/echo -X POST -d "{"id":"1", "name":"cpro95"}"
{id:1, name:cpro95}%
➜  rust-fly-test git:(master) ✗
위와 같이 커맨드 라인상에서 curl 명령어를 이용해서 작업한 request가 제대로 작동하고 있습니다.
심지어, POST 메서드에서 데이터를 JSON을 전달해도 정상 작동됩니다.
이제 Fly.io에 배포하기 위한 준비는 끝났습니다.
➜  rust-fly-test git:(master) ✗ flyctl auth login
Opening https://fly.io/app/auth/cli/c5886b873cd561dc35f147ff0211775d ...

Waiting for session... Done
successfully logged in as cpro95@gmail.com
먼저, flyctl 명령어를 이용해서 커맨드 라인상에서 login을 합시다.
그러면 웹페이지가 뜨면서 로그인하라고 합니다.
로그인하시면 다시 터미널에 로그인됐다고 나옵니다.
이제 fly launch 명령어를 입력해서 fly 앱 설정을 시작합니다.
➜  rust-fly-test git:(master) ✗ fly launch
Creating app in /Users/cpro95/Codings/Rust/rust-fly-test
Scanning source code
Could not find a Dockerfile, nor detect a runtime or framework from source code. Continuing with a blank app.
? Choose an app name (leave blank to generate one):rust-web-app-tutorial
위와 같이 앱 이름을 넣으면 아래와 같이 서버 위치를 정하라고 나오는데요.
Fly.io는 아쉽게도 Seoul이 없습니다.
가장 가까운 Tokyo를 선택하면 그나마 빠릅니다.
automatically selected personal organization: cpro95
Some regions require a paid plan (bom, fra, maa).
See https://fly.io/plans to set up a plan.

? Choose a region for deployment:  [Use arrows to move, type to filter]
  Hong Kong, Hong Kong (hkg)
  Ashburn, Virginia (US) (iad)
  Johannesburg, South Africa (jnb)
  Los Angeles, California (US) (lax)
  London, United Kingdom (lhr)
  Madrid, Spain (mad)
  Miami, Florida (US) (mia)
> Tokyo, Japan (nrt)
  Chicago, Illinois (US) (ord)
  Bucharest, Romania (otp)
  Phoenix, Arizona (US) (phx)
  Querétaro, Mexico (qro)
  Santiago, Chile (scl)
  Seattle, Washington (US) (sea)
  Singapore, Singapore (sin)

  App will use 'nrt' region as primary

Created app 'rust-fly-test1' in organization 'personal'
Admin URL: https://fly.io/apps/rust-web-app-tutorial
Hostname: rust-web-app-tutorial.fly.dev
? Create .dockerignore from 1 .gitignore files? (y/N) y
Created /Users/cpro95/Codings/Rust/rust-fly-test/.dockerignore from 1 .gitignore files.
Wrote config file fly.toml
위와 같이 Hostname도 지정해서 줍니다.
앱 이름이 Hostname이기 때문에 기존에 누군가 사용하는 앱 이름과 겹치지 않도록 잘 선택하시면 됩니다.
마지막으로 .dockerignore 관련해서 물어보면 y라고 입력하면 됩니다.
그러면, 생기는 파일이 fly.toml 파일인데요.
app = "rust-web-app-tutorial"
primary_region = "nrt"

[http_service]
  internal_port = 8080
  force_https = true
  auto_stop_machines = true
  auto_start_machines = true
  min_machines_running = 0
  processes = ["app"]
primary_region에서 “nrt"가 tokyo를 뜻합니다.
그리고 내부 포트가 8080이라고 지정했네요.
fly.toml에서 http_service 부분이 가장 중요한데요.
Fly 가상 머신이 V2로 오면서 자동으로 http, https 포트에 대응해 줍니다.
http는 80으로 https는 443 포트로 매칭시켜 줍니다.
즉, 가상머신 내부적으로 Rust 웹 앱은 8080으로 작동하지만, 외부적으로는 http 80 포트, https 443 포트로 매칭시켜 줍니다.
그 명령어가 바로 http_service 설정입니다.
일단 healthcheck을 위해 아래와 같은 http_service.checks 부분을 추가합시다.
[[http_service.checks]]
  grace_period = "10s"
  interval = "30s"
  method = "GET"
  timeout = "5s"
  path = "/healthcheck"
이 서비스는 주기적으로 사이트에 접속해서 정상 작동하는지 체크하는 건데요.
그래서 앱이 잠들지 않게 됩니다.
이제, fly.toml 파일을 완성했으니 Dockerfile을 만들겠습니다.
Fly.io는 deploy하면 Docker를 만들어서 실행하게 됩니다.
루트 폴더에 Dockerfile이라는 이름으로 아래와 같이 작성합니다.
FROM rust:latest as builder

WORKDIR /usr/src/app
COPY . .

# Will build and cache the binary and dependent crates in release mode
RUN --mount=type=cache,target=/usr/local/cargo,from=rust:latest,source=/usr/local/cargo \
    --mount=type=cache,target=target \
    cargo build --release && mv ./target/release/rust-fly-test ./rust-fly-test

# Runtime image
FROM ubuntu:22.04

# Run as "app" user
RUN useradd -ms /bin/bash app

USER app
WORKDIR /app

# Get compiled binaries from builder's cargo install directory
COPY --from=builder /usr/src/app/rust-fly-test /app/rust-fly-test

# Run the app
CMD ./rust-fly-test
보통 도커 이미지는 debian bullseye를 많이 쓰는데요.
debian bullseye로는 actix 최신버전이랑 rust 최신버전에서 GLIBC 버전이 맞지 않아 계속 에러가 나더라고요.
그래서 ubuntu:22.04 버전을 넣은 겁니다.
Dockerfile을 잘 보시면 cargo로 빌드했을 때 실행파일을 루트로 이동하는 명령어가 있습니다.
그리고 최종적으로 그 파일을 실행하는 건데요.
➜  rust-fly-test git:(master) ✗ fly deploy
==> Verifying app config
Validating /Users/cpro95/Codings/Rust/rust-fly-test/fly.toml
Platform: machines
✓ Configuration is valid
--> Verified app config
==> Building image
Remote builder fly-builder-snowy-sun-1195 ready
==> Building image with Docker
--> docker host: 20.10.12 linux x86_64
[+] Building 10.7s (15/15) FINISHED
 => [internal] load build definition from Dockerfile                                              1.0s
 => => transferring dockerfile: 651B                                                              1.0s
 => [internal] load .dockerignore                                                                 1.0s
 => => transferring context: 94B                                                                  1.0s
 => [internal] load metadata for docker.io/library/rust:latest                                    0.5s
 => [internal] load metadata for docker.io/library/ubuntu:22.04                                   0.6s
 => [internal] load build context                                                                 0.8s
 => => transferring context: 33.67kB                                                              0.7s
 => FROM docker.io/library/rust:latest                                                            0.2s
 => => resolve docker.io/library/rust:latest                                                      0.2s
 => CACHED [builder 1/4] FROM docker.io/library/rust:latest@sha256:94530b7512eddf3207e50801c1ecb  0.0s
 => [stage-1 1/4] FROM docker.io/library/ubuntu:22.04@sha256:aabed3296a3d45cede1dc866a24476c4d7e  0.0s
 => CACHED [builder 2/4] WORKDIR /usr/src/app                                                     0.0s
 => [builder 3/4] COPY . .                                                                        0.0s
 => [builder 4/4] RUN --mount=type=cache,target=/usr/local/cargo,from=rust:latest,source=/usr/lo  8.5s
 => CACHED [stage-1 2/4] RUN useradd -ms /bin/bash app                                            0.0s
 => CACHED [stage-1 3/4] WORKDIR /app                                                             0.0s
 => [stage-1 4/4] COPY --from=builder /usr/src/app/rust-fly-test /app/rust-fly-test               0.1s
 => exporting to image                                                                            0.1s
 => => exporting layers                                                                           0.1s
 => => writing image sha256:28dffd3b2f5bf993b6cb677e392c0dfb2e0c9c258c201ed6ee252996a6772fcc      0.0s
 => => naming to registry.fly.io/rust-web-app-tutorial:deployment-01H9FE9WM2CMKKGRSXB1D8CBR8      0.0s
--> Building image done
...
...
...
...

No machines in group app, launching a new machine
  [1/1] Waiting for 6e82775c243987 [app] to become healthy: 0/1
위와 같이 나오는데요.
마지막에 healthy 부분에서 진행이 안 됩니다.
실제, fly.io 대시보드로 가서 Monitoring 부분에 보면 아래와 같이 나오는데요.
2023-09-04T06:33:33.875 app[6e82775c243987] nrt [info] Rust Actix-web server started at 127.0.0.1:8080

2023-09-04T06:33:57.570 health[6e82775c243987] nrt [error] Health check on port 8080 has failed. Your app is not responding properly. Services exposed on ports [80, 443] will have intermittent failures until the health check passes.
이에 실제 앱의 로그 내용인데요.
로그 내용을 잘 보시면 Actix-web이 127.0.0.1:8080으로 시작했다고 분명히 나옵니다.
이 문구가 출력되는 걸로 봐서 우리가 만든 Rust 프로그램이 컴파일이 제대로 됐고, 실행도 됐다는 얘기인데요.
마지막 문구를 보시면 Health check이 에러가 납니다.
왜 그런 걸까요?
저도 이걸로 고생했는데요.
우리가 Rust main.rs에서 주소를 127.0.0.1:8080으로 줬었는데요.
이건 개발 서버를 돌릴 때 주는 주소입니다.
실제 배포할 때는 특히, fly.io에서는 0.0.0.0:8080이라는 주소를 줘야 합니다.
다시 main.rs 파일을 아래와 같이 바꾸고 다시 fly deploy 해보겠습니다.
#[actix_web::main]
async fn main() -> std::io::Result<()> {
    println!("Rust Actix-web server started at 127.0.0.1:8080");

    HttpServer::new(|| {
        App::new()
            .service(hello)
            .service(echo)
            .service(healthcheck)
            .route("/hey", web::get().to(manual_hello))
    })
    // .bind(("127.0.0.1", 8080))?
    .bind(("0.0.0.0", 8080))?
    .run()
    .await
}
이제 다시 fly deploy 해보겠습니다.
아까 만들었던 Docker 이미지라서 금발 끝날 겁니다.
--> Pushing image done
image: registry.fly.io/rust-web-app-tutorial:deployment-01H9FEPA8SMVGFMY73PW583SVP
image size: 90 MB

Watch your deployment at https://fly.io/apps/rust-web-app-tutorial/monitoring

Updating existing machines in 'rust-web-app-tutorial' with rolling strategy
  [1/1] Machine 6e82775c243987 [app] update finished: success
  Finished deploying

Visit your newly deployed app at https://rust-web-app-tutorial.fly.dev/
위와 같이 success 라고 나오네요.
다시 아래와 같이 fly.io 대시보드에서도 Health check이 passing이라고 나옵니다.
2023-09-04T06:40:12.619 app[6e82775c243987] nrt [info] Rust Actix-web server started at 127.0.0.1:8080

2023-09-04T06:40:41.718 health[6e82775c243987] nrt [info] Health check on port 8080 is now passing.이제 우리의 Rust 웹 앱이 서버에 배포가 완료되었습니다.
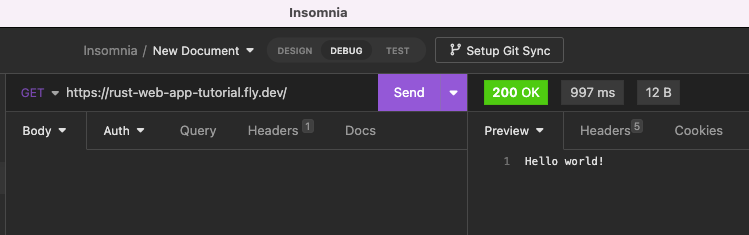
테스트만 남았는데요.
위 그림을 보시면 GET, POST 메서드 모두 정상 작동합니다.
그리고 실제 Fly.io 대시보드에 가서 앱의 메모리 사용량을 볼까요?
Rust 앱이 43MB이고 예전에 SvelteKit으로 만든 앱이 106MB입니다.
확실히 Rust가 가볍고 빠르네요.
그럼, 다음 시간에는 본격적인 Rust 웹 서버 개발에 들어가 보도록 하겠습니다.