Title here
Summary here
October 29, 202311 minutes
안녕하세요?
astrojs 강좌가 벌써 6번째네요.
지난 시간 강좌 목록입니다.
전체 astrojs 강좌 목록입니다.
** 목차 **
AstroJS는 컨텐츠를 정적 사이트로 만드는 가장 최적의 프레임워크인데요.
AstroJS에서는 컨텐츠를 모아두는 폴더는 예약되어 있는데요.
바로 src 폴더의 content 폴더입니다.
이 폴더에 여러 가지 컨텐츠를 넣을 수 있는데요.
예를 들어 블로그 마크다운 컨텐츠를 모아두고 싶으면 content 폴더에 blog라는 폴더를 만들고, 그 밑에 mdx 파일을 모아 두면 됩니다.
content 폴더 밑에 여려 개의 폴더를 만들 수 있는데요.
컨텐츠로는 mdx 파일 같은 마크다운 파일과 함께 json 파일 또는 yaml 파일도 가능합니다.
일단 블로그 개발을 위한 마크다운에 대해 알아보겠습니다.
AstroJS는 버전업이 되면서 Content Collection을 좀 더 쉽게 해주는 유틸리티 함수가 생겼습니다.
바로 getCollection 함수가 그것인데요.
실전 테스트를 위해 아래와 같이 더미 마크다운 파일을 3개 만들도록 합시다.
src/content/blog/test-1-file.mdx
---
title: 'test-1'
year: '2023'
intro: 'intro test 1'
---

# Test 1

H1

## Test 1

H2

### Test 1

H3
src/content/blog/test-2-file.mdx
---
title: 'test-2'
year: '2023'
intro: 'intro test 2'
---

# Test 2

H1

## Test 2

H2

### Test 2

H3
src/content/blog/test-3-file.mdx
---
title: 'test-3'
year: '2024'
intro: 'intro test 3'
---

# Test 3

H1

## Test 3

H2

### Test 3

H3
더미 파일을 만들었으면 체계적인 관리를 위해 컨텐츠에 대한 스키마를 구성해야 하는데요.
src/content/blog 폴더에 config.ts 파일을 만듭니다.
import { z, defineCollection } from 'astro:content'

const blogCollection = defineCollection({
  type: 'content',
  schema: z.object({
    title: z.string(),
    year: z.string(),
    intro: z.string(),
  }),
})

export const collection = {
  blog: blogCollection,
}
astro:content에서 제공해 주는 z와 defineCollection 함수를 이용해서 우리가 만들었던 마크다운의 스키마를 작성하고 collection을 export 하면 됩니다.
collection을 export 했는데요.
우리의 collection에서는 blog 항목 하나만 있습니다.
blog 항목의 이름이 ‘blog’인 이유는 현재 우리가 src/content 폴더에 blog 폴더밖에 없기 때문이죠.
만약에, src/content 폴더 밑에 blog 폴더와 data 폴더가 또 있다면 dataCollection 항목을 defineCollection 함수로 작성해서 collection 항목에 아래와 같이 추가해서 export 해주면 끝입니다.
import { z, defineCollection } from 'astro:content'

const blogCollection = defineCollection({
  type: 'content',
  schema: z.object({
    title: z.string(),
    year: z.string(),
    intro: z.string(),
  }),
})

const dataCollection = defineCollection({
  type: 'data',
  schema: z.object({
    year: z.string(),
  }),
})

export const collection = {
  blog: blogCollection,
  data: dataCollection,
}
dataCollection 의 defineCollection 함수에서 보시면 type 항목이 ‘data’라고 되어 있습니다.
왜냐하면 JSON, YAML 파일을 직접 로드할 경우 type에 ‘content’가 아닌 ‘data’라고 넣으면 됩니다.
일단, blogCollection만 collection에서 export 하도록 하죠.
이제, Content Collection을 사용하기 위한 준비가 끝났습니다.
이제, 우리가 만든 마크다운 3개의 파일의 정보를 가져오기 위한 Astro 컴포넌트를 만들어 볼까요?
일단 src/pages 폴더 밑에 blog라는 폴더를 만들고 그 밑에 index.astro 파일을 만듭시다.
그러면 브라우저에서의 주소는 ‘http://localhost:4321/blog’가 되는거죠.
---
import { getCollection } from "astro:content";
import Main from "../../layouts/Main.astro";

const blogPosts = await getCollection("blog");
console.log(blogPosts);
---

<Main title="Blog Page">
  <h1>Blog Page</h1>
</Main>
여기서 주의하실 게 바로 getCollection 함수는 await 방식으로 즉, 비동기 방식으로 작성해야 합니다.
그러면 async 문구가 안 보이는데요.
그건 걱정 없습니다.
Astro 컴포넌트 자체가 async 즉, 비동기로 작동되기 때문이죠.
그래서 await 문구만 적어도 됩니다.
위와 같이 코드를 작성하고 브라우저에서 blog 경로로 접속하면 아래와 같이 브라우저와 콘솔 창에 나올겁니다.
blogPosts 라는 배열은 우리가 만든 모든 blog 컨텐츠 콜렉션을 가지고 있습니다.
즉, getCollection 함수를 이용해서 “blog"라는 인자만 전달하면 우리가 아까 defineCollection에서 구현한 collection에 접근할 수 있는데요.
그러면 블로그 목록을 보여주는 코드를 작성해 볼까요?
<Main title='Blog Page'>
  <h1>Blog Page</h1>
  <ul>
    {blogPosts &&
      blogPosts.map(b => (
        <li>
          <a href={`blog/${b.slug}`}>{b.data.title}</a>
        </li>
      ))}
  </ul>
</Main>
위와 같이 작성했으면 브라우저에서 아래와 같이 보일 겁니다.
블로그 한개를 클릭해 볼까요?
아래와 같이 없는 페이지라고 나옵니다.
왜냐하면 src/pages/blog 폴더 밑에는 index.astro 파일만 있기 때문입니다.
여기서 필요한 게 지난 시간에 배운 다이내믹 라우팅이죠.
다이내믹 라우팅에 들어가기 전에 getCollection 함수를 좀 더 깊게 다루어 보겠습니다.
우리가 만든 마크다운에서 year 부분이 2023인 것만 가져오려면 어떻게 해야 할까요?
blogPosts 배열을 필터링해도 되는데요.
getCollection 함수 내에서 두 번째 인자로 전달할 콜백에서 지정할 수 있습니다.
import { getCollection } from 'astro:content'
import Main from '../../layouts/Main.astro'

const blogPosts = await getCollection('blog')
// console.log(blogPosts);

const BlogPosts_2023 = await getCollection('blog', ({ data }) => {
  return data.year === '2023'
})
console.log(BlogPosts_2023)
위 코드를 보시면 getCollection의 두 번째 인자로 콜백함 수를 넣었고, data라는 이름을 디스트럭쳐링해서 바로 data.year의 값을 비교해서 리턴 했습니다.
이제 결과를 볼까요?
[
{
id: 'test-1-file.mdx',
slug: 'test-1-file',
body: '\n# Test 1\nH1\n## Test 1\nH2\n### Test 1\nH3\n\n\n',
collection: 'blog',
data: { title: 'test-1', year: '2023', intro: 'intro test 1' },
render: [AsyncFunction: render]
},
{
id: 'test-2-file.mdx',
slug: 'test-2-file',
body: '\n# Test 2\nH1\n## Test 2\nH2\n### Test 2\nH3',
collection: 'blog',
data: { title: 'test-2', year: '2023', intro: 'intro test 2' },
render: [AsyncFunction: render]
}
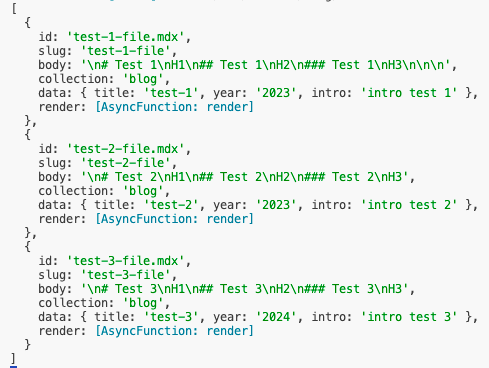
]위와 같이 data 항목의 year가 2023 인것만 나왔네요.
getCollection 함수의 기능이 막강한데요.
만약 한 개의 마크다운만 불러오려면 어떻게 해야 할까요?
getEntry 함수를 이용하면 됩니다.
import { getCollection, getEntry } from 'astro:content'
import Main from '../../layouts/Main.astro'

const blogPosts = await getCollection('blog')
// console.log(blogPosts);

const BlogPosts_2023 = await getCollection('blog', ({ data }) => {
  return data.year === '2023'
})
// console.log(BlogPosts_2023);

const onePost = await getEntry('blog', 'test-3-file')
console.log(onePost)
위와 같이 getEntry 함수에 두 번째 인자로 slug를 넣으면 됩니다.
slug는 바로 마크다운 파일명에서 확장자 부분만 뺀 겁니다.
실행 결과는 다음과 같습니다.
{
  id: 'test-3-file.mdx',
  slug: 'test-3-file',
  body: '\n# Test 3\nH1\n## Test 3\nH2\n### Test 3\nH3',
  collection: 'blog',
  data: { title: 'test-3', year: '2024', intro: 'intro test 3' },
  render: [AsyncFunction: render]
}아까 우리가 앵커 태그로 이용한 href 주소가 바로 blog/${b.slug}인데요.
즉, blog 경로 밑에 마크다운의 slug를 이용해서 URL 주소를 만들었습니다.
그러면 이 URL 주소를 클릭했을 경우 원하는 마크다운이 렌더링 되게 해야 하는데요.
먼저, 첫 번째 단계는 뭐가 될까요?
바로 blog 폴더 밑에 blog/[slug].astro 파일을 만드는 겁니다.
위와 같이 다이내믹 라우팅이 되는 astro 컴포넌트를 만들어야 하는데요.
왜냐하면 ‘blog/test-1-file’이라는 경로가 우리가 원하는 URL이고, ’test-1-file’ 이 부분이 파일의 slug이기 때문이죠
그럼, 이 파일을 만들어 볼까요?
---
import { getCollection } from "astro:content";
import Main from "../../layouts/Main.astro";

export const getStaticPaths = async () => {
  const blogs = await getCollection("blog");

  return blogs.map((blogEntry) => ({
    params: {
      slug: blogEntry.slug,
    }
  }));
};

const { slug } = Astro.params;
---

<Main>
  {slug}
</Main>
지난 시간에 배웠던 getStaticPaths 함수를 async로 작동시키고 export 했습니다.
다이내믹 라우팅에서 중요한 게 바로 getStaticPaths에서 params 항목에 대한 경우의 수를 지정해야 하는 건데요.
위와 같이 하면 모든 blog 콜렉션의 slug를 모두 대응할 수 있어 완벽하게 작동하죠.
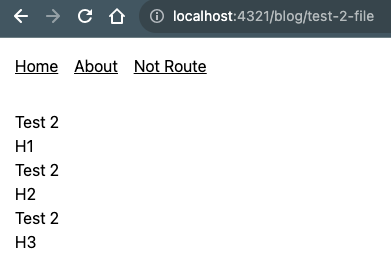
이제 페이지를 볼까요?
위와 같이 나오는데요.
그런데, 우리가 원하는 작동방식은 이게 아닙니다.
마크다운의 내용이 표시돼야 하는데요.
이 부분에 대해서는 AstroJS에서 아주 간단하게 해결할 수 있습니다.
아까 코드에서는 params 항목에 slug 값의 모든 경우의 수를 제공해서 다이내믹 라우팅을 해결했는데요.
여기서 지난 시간 마지막에 배웠듯이 props 항목도 같이 전달할 수 있습니다.
이 props 항목에 blogEntry 객체를 그냥 전달하고 이 blogEntry 객체를 렌더링하면 바로 astrojs에서 마크다운을 렌더링하는 방법이 됩니다.
---
import { getCollection } from "astro:content";
import Main from "../../layouts/Main.astro";
import type { CollectionEntry } from "astro:content";

type Props = {
  blogEntry: CollectionEntry<"blog">;
};

export const getStaticPaths = async () => {
  const blogs = await getCollection("blog");

  return blogs.map((blogEntry) => ({
    params: {
      slug: blogEntry.slug,
    },
    props: {
      blogEntry,
    },
  }));
};

const { slug } = Astro.params;
console.log(slug);

const { blogEntry } = Astro.props;

const { Content } = await blogEntry.render();
---

<Main>
  <Content />
</Main>
위 코드를 보시면 getStaticPaths 함수에서 props 항목으로 blogEntry라는 콜렉션 엔트리 한 개를 리턴했습니다.
그리고 Astro.props 항목에서 디스트럭쳐링해서 blogEntry를 가져오고 다시 그걸 render 함수로 돌리면 Content 컴포넌트가 나오는데요.
Content 컴포넌트를 보여주면 끝입니다.
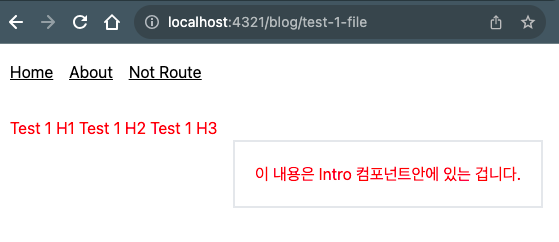
실행 결과를 볼까요?
어떤가요?
마크다운이 온전한 HTML 파일로 변환되어 브라우저에서 잘 보여지고 있습니다.
이로써 blog 컨텐츠 콜렉션을 이용한 다이내믹 라우팅도 성공했네요.
아까 마크다운을 렌더링해서 얻은 Content 컴포넌트는 기본적으로 Astro에서 제공하는 마크다운컴포넌트를 이용해서 화면에 보이는데요.
Content에 건내 줄 props를 이용해서 커스텀하게 렌더링 할 수 있습니다.
이건 그냥 이런 게 있다고 알아 두시면 되시고 직접 만드시는 건 비추입니다.
일단 아래와 같은 형식으로 Content에 components props를 전달합니다.
---
import { getCollection } from "astro:content";
import Main from "../../layouts/Main.astro";
import type { CollectionEntry } from "astro:content";
import Span from "../../components/Span.astro";

...
...
...

const mdxComponents = {
  h1: Span,
  h2: Span,
  h3: Span,
  p: Span,
};
---

<Main>
  <Content components={mdxComponents} />
</Main>
mdxComponents라고 직접 만든 마크다운 컴포넌트가 있는데요.
마크다운은 ‘#’ 표시가 바로 ‘h1’ 태그입니다.
‘##‘는 ‘h2’ 태그가 되는 거죠.
그래서 mdxComponents에는 h1, h2, h3 태그와 마지막으로 p 태그까지 Span이라는 Astro 컴포넌트로 지정했습니다.
테스트를 위해 Span이라는 Astro 컴포넌트는 아래와 같이 작성했는데요.
<span style='color: red;'>
  <slot />
</span>
일부로 span이라는 태그로 사용했습니다.
span 태그는 가로 방향으로 나열되기 때문이죠.
h1, p 태그는 기본적으로 세로 방향으로 나열되고요.
이제 실행 결과를 볼까요?
위와 같이 모든 텍스트가 가로 방향으로 나열되었네요.
h1, h2, h3, p 태그 모두 제가 만든 커스텀 마크다운 렌더링 방식에 따라 span으로 렌더링 되는거죠.
Astro에서 마크다운 파일은 아주 강력한 기능을 가지는데요.
Astro 컴포넌트를 직접 넣을 수 있습니다.
테스트를 위해 components 폴더에 Intro.astro 파일을 만듭시다.
<section class='flex items-center justify-center'>
  <div class='border-2 p-5'>
    <slot />
  </div>
</section>
Intro 컴포넌트는 그냥 TailwindCSS로 테투리 만 준겁니다.
그리고 화면 한가운데 위치하도록 했죠.
이제, blog 폴더 밑에 있는 test-1-file.mdx 파일을 열어 아래와 같이 바꿔 줍시다.
---
title: 'test-1'
year: '2023'
intro: 'intro test 1'
---

# Test 1
H1
## Test 1
H2
### Test 1
H3


import Intro from '../../components/Intro.astro';

<Intro>
    이 내용은 Intro 컴포넌트안에 있는 겁니다.
</Intro>
위와 같이 MDX 파일 중간에 그냥 import도 가능하고 Intro 컴포넌트 삽입도 가능합니다.
실행 결과를 볼까요?
어떤가요?
정말 강력한 기능이네요.
astro-embed 패키지가 있는데요.
Youtube나 Vimeo, Tweet 같은 여러 가지 내용을 마크다운에 넣어줄 수 있습니다.
당연히 다른 Astro 컴포넌트에도 넣을 수 있죠.
npm i astro-embed이제 아까 마크다운에 아래와 같이 작성해 봅시다.
---
title: 'test-1'
year: '2023'
intro: 'intro test 1'
---

# Test 1
H1
## Test 1
H2
### Test 1
H3


import Intro from '../../components/Intro.astro';

<Intro>
    이 내용은 Intro 컴포넌트안에 있는 겁니다.
</Intro>

import { Tweet, Vimeo, YouTube } from 'astro-embed';

<Tweet id="https://twitter.com/astrodotbuild/status/1512144306898976768" />

<Vimeo id="https://vimeo.com/32001208" />

<YouTube id="https://youtu.be/xtTy5nKay_Y" />
실행 결과는 아래와 같습니다.
Astro는 자체 기능이 아주 많은데요.
컴포넌트에 직접 Code Snippet 같은 걸 넣을 수 있습니다.
당연히 Syntax 하이라이트도 적용되는데요.
바로 shiki Syntax 하이라이트가 자체적으로 내장되어 있어서 그럽니다.
아래와 같이 하시면 되는데요.
---
import { Code } from "astro:components";
import Main from "../layouts/Main.astro";
---
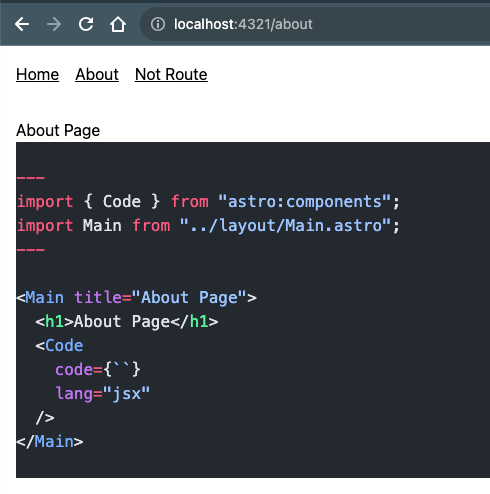
<Main title="About Page">
<h1>About Page</h1>
<Code
code={`
---
import { Code } from "astro:components";
import Main from "../layout/Main.astro";
---
<Main title="About Page">
<h1>About Page</h1>
<Code
code={\`\`}
lang="jsx"
/>
</Main>
`}
lang="jsx"
theme="github-dark"
/>
</Main>위와 같이 ‘github-dark’ 테마가 적용된 상태로 코드 스니펫이 깔끔하게 나옵니다.
적용할 수 있는 themes는 여기를 누르시면 볼 수 있습니다.
본인만의 커스텀 Syntax 하이라이트 테마를 만들 수 있는데요.
일단 NightOwl이라는 유명한 Syntax 테마를 다운받고 src 폴더 밑에 my-theme.json 파일로 저장합시다.
그리고 components 폴더에 Shiki.astro 파일을 아래와 같이 만듭니다.
---
import type { Lang } from "shiki";

import shiki, { getHighlighter } from "shiki";

type Props = {
  lang: Lang;
  code: string;
};

const { code = "", lang = "jsx" } = Astro.props;

const theme = await shiki.loadTheme("../../src/my-theme.json");

const highlighter = await getHighlighter({
  theme,
  langs: [lang],
});
---

<Fragment set:html={highlighter.codeToHtml(code, { lang })} />
이제 Astro 컴포넌트에서 코드 스니펫은 Shiki 컴포넌트로 작성하면 됩니다.
---
import Shiki from "../components/Shiki.astro";
import Main from "../layouts/Main.astro";
---

<Main title="About Page">
  <h1>About Page</h1>
<Shiki
    code={`
---
import { Code } from "astro:components";
import Main from "../layout/Main.astro";
---

<Main title="About Page">
  <h1>About Page</h1>
  <Code
    code={\`\`}
    lang="jsx"
  />
</Main>
    `}
    lang="jsx"
  />
</Main>
실행결과는 아래와 같이 nightowl 테마가 적용된 화면이 보일겁니다.
Shiki 내장된 테마를 바꿔주면 다크모드에 적용할 수 있는데요.
NanoState 같은 글로벌 스테이트로 다크모드 상태를 관리해서 Code 컴포넌트에서 theme 항목에 알맞게 적용하면 Syntax 하이라이트에 다크모드를 적용할 수 있는데요.
여기서 알아볼 방법은 css-variables 방식으로 알아봅시다.
먼저, css-variables의 변수를 Main 컴포넌트에 글로벌하게 style 지정해야 합니다.
<style is:global>
  @media (prefers-color-scheme: dark) {
    :root {
      --astro-code-color-text: #ffffff;
      --astro-code-color-background: black;
      --astro-code-token-constant: #86d9ca;
      --astro-code-token-string: #977cdc;
      --astro-code-token-comment: #757575;
      --astro-code-token-keyword: #77b7d7;
      --astro-code-token-parameter: #ffffff;
      --astro-code-token-function: #86d9ca;
      --astro-code-token-string-expression: #c64640;
      --astro-code-token-punctuation: #ffffff;
      --astro-code-token-link: #977cdc;
    }
  }
  @media (prefers-color-scheme: light) {
    :root {
      --astro-code-color-text: #24292e;
      --astro-code-color-background: #ffffff;
      --astro-code-token-constant: #032f62;
      --astro-code-token-string: #032f62;
      --astro-code-token-comment: #6a737d;
      --astro-code-token-keyword: #d73a49;
      --astro-code-token-parameter: #24292e;
      --astro-code-token-function: #6f42c1;
      --astro-code-token-string-expression: #c64640;
      --astro-code-token-punctuation: #ffffff;
      --astro-code-token-link: #977cdc;
    }
  }
</style>
위 style 태그를 보시면 media 쿼리를 이용해서 다크모드와 라이트 모드를 구분했는데요.
꼭, 위와 같이 media 쿼리에 prefers-color-scheme 항목을 다크모드와 라이트 모드로 구분 지어 작성해야 합니다.
보통 light 부분은 디폴트 값으로 prefers-color-scheme 항목을 지정하지 않는데요.
이럴 경우 정상 작동되지 않을 수 있습니다.
그래서 위와 같이 prefers-color-scheme : light 부분도 작성해주셔야 합니다.
그럼, 이제 Code 컴포넌트에 theme 부분을 css-variables 이라고 지정하면 끝입니다.
<Code
    code={`
---
import { Code } from "astro:components";
import Main from "../layout/Main.astro";
---

<Main title="About Page">
  <h1>About Page</h1>
  <Code
    code={\`\`}
    lang="jsx"
  />
</Main>
  `}
    lang="jsx"
    theme="css-variables"
  />
prefers-color-scheme 이 방식은 시스템의 다크모드 방식에 따른다는 뜻인데요.
아래 그림과 같이 시스템 세팅을 다크모드로 바꿔보았습니다.
아래 그림은 시스템 세팅을 라이트 모드로 했을 때입니다.
어떤가요? 정상 작동되네요.
지금까지 AstroJS에 대해 알아보았는데요.
많은 도움이 되셨으면 합니다.
그럼.