Title here
Summary here
March 24, 20248 minutes
안녕하세요?
오늘은 Astro DB를 살펴볼 예정인데요.
Todo 앱을 만들어 보면서 Astro DB의 사용법을 맛보기로 잠깐 살펴보겠습니다.
** 목 차 **
npm create astro@latest
Need to install the following packages:
create-astro@4.7.5
Ok to proceed? (y)
astro Launch sequence initiated.
dir Where should we create your new project?
./astro-todo
tmpl How would you like to start your new project?
Empty
ts Do you plan to write TypeScript?
Yes
use How strict should TypeScript be?
Strict
deps Install dependencies?
Yes
git Initialize a new git repository?
Yes
✔ Project initialized!
■ Template copied
■ TypeScript customized
■ Dependencies installed
■ Git initialized
next Liftoff confirmed. Explore your project!
Enter your project directory using cd ./astro-todo
Run npm run dev to start the dev server. CTRL+C to stop.
Add frameworks like react or tailwind using astro add.
Stuck? Join us at https://astro.build/chat
╭─────╮ Houston:
│ ◠ ◡ ◠ Good luck out there, astronaut! 🚀
╰─────╯
~/C/J/astro-test cd astro-todo이제 개발 서버를 돌려봅시다.
큰 문제가 없으면 브라우저에 “Astro” 글자가 크게 잘 보일겁니다.
Astro DB를 설치하려면 터미널에서 아래와 같이 입력하면 됩니다.
npx astro add dbnpx astro add db
✔ Resolving packages...
Astro will run the following command:
If you skip this step, you can always run it yourself later
╭─────────────────────────────────╮
│ npm install @astrojs/db@^0.9.4 │
╰─────────────────────────────────╯
✔ Continue? … yes
✔ Installing dependencies...
Astro will scaffold ./db/config.ts and ./db/seed.ts files.
✔ Continue? … yes
Astro will make the following changes to your config file:
╭ astro.config.mjs ─────────────────────────────╮
│ import { defineConfig } from 'astro/config'; │
│ │
│ import db from "@astrojs/db"; │
│ │
│ // https://astro.build/config │
│ export default defineConfig({ │
│ integrations: [db()] │
│ }); │
╰───────────────────────────────────────────────╯
✔ Continue? … yes
success Added the following integration to your project:@astrojs/db 패키지를 인스톨해주고 있고, db/config.ts 파일과 db/seed.ts 파일까지 만들어 줍니다.
astro.config.mjs 파일에 db 관련 세팅값도 넣어주고 있네요.
이제 db/config.ts 파일을 먼저 살펴보겠습니다.
이 파일에서 테이블을 설정할 수 있는데요.
import { defineDb } from 'astro:db';

// https://astro.build/db/config
export default defineDb({
  tables: {}
});
초기 상태는 위와 같이 나옵니다.
Sqlite DB는 여러개의 테이블을 가지고 있는데요.
Astro DB도 sqlite이기 때문에 테이블을 가장 기본적으로 세팅해야 합니다.
오늘 우리는 Todo 앱을 만들기로 했으니까 가장 기본적인 컬럼을 갖는 Todos 테이블을 만들어 보겠습니다.
db/config.ts 파일을 아래와 같이 수정하십시요.
import { column, defineDb, defineTable } from 'astro:db';

const Todos = defineTable({
  columns: {
    id: column.number({ primaryKey: true }),
    name: column.text(),
    completed: column.boolean()
  }
})

// https://astro.build/db/config
export default defineDb({
  tables: {
    Todos
  }
});
Astro DB에서 테이블을 정의하는 함수는 defineTable입니다.
그리고 컬럼을 정의하는 부분도 column 함수를 이용하고 있는데요.
약간 Zod 라이브러리 보는것 같네요.
가장 기본이 id 부분인데요.
SQL의 기본인 primaryKey 부분을 꼭 설정해 줘야 합니다.
그리고 나머지 부분은 name과 completed 부분인데요.
원래 Sqlite는 boolean 타입을 지원해 주지 않습니다.
위 코드에서는 column.boolean()와 같이 boolean 타입을 자체적으로 구현해서 지원해 주고 있네요.
Astro DB가 처음 만들었던게 db/config.ts 파일과 함께 db/seed.ts 파일인데요.
db/seed.ts 파일은 시드 데이터라고 합니다.
import { db } from 'astro:db';

// https://astro.build/db/seed
export default async function seed() {
	// TODO
}
왜냐하면 DB의 틀만 있지 아무 데이터도 없으면 Todo 앱에서 아무런 작업도 할 수 없기 때문이죠.
그래서 초기 값을 세팅하는 용도로 사용하는데요.
앱을 배포할 때 관리자 아이디를 설정하거나 기타 중요한 일을 할 수 있는게 db/seed.ts파일입니다.
우리는 조금 쉬운 Todo 앱이기 때문에 그냥 Todo 값을 몇개 넣어 보겠습니다.
import { db, Todos } from "astro:db";

// https://astro.build/db/seed
export default async function seed() {
  await db.insert(Todos).values([
    { id: 1, name: "첫번째 Todo", completed: false },
    { id: 2, name: "두번째 Todo", completed: true },
  ]);
}
아주 간단한 값만 넣었습니다.
이제 DB 설정은 끝이네요.
Todo 앱은 추가 삭제 같은 기능이 있어야 하는데요.
그래서 서버측의 기능이 필요합니다.
렌더링을 SSR로 변경할 필요가 있습니다.
즉, SSR로 변경하면 Nodejs가 처리해 준다는 얘기입니다.
현재 Astro 앱을 SSR로 변경하는 방법은 astro.config.mjs 파일에서 output 부분을 server로 변경하면 됩니다.
import { defineConfig } from 'astro/config';

import db from "@astrojs/db";

// https://astro.build/config
export default defineConfig({
  integrations: [db()],
  output: 'server',
});
이제 설정이 모두 끝났네요.
Astro의 index 페이지는 바로 src/pages/index.astro 파일인데요.
이 파일을 변경해서 Astro DB 데이터를 화면에 표시해 보겠습니다.
---
import { db, Todos } from "astro:db";
const todos = await db.select().from(Todos);
---
<html lang="en">
<head>
<meta charset="utf-8" />
<link rel="icon" type="image/svg+xml" href="/favicon.svg" />
<meta name="viewport" content="width=device-width" />
<meta name="generator" content={Astro.generator} />
<title>Astro</title>
</head>
<body>
<h1>Astro</h1>
<ul>
{
todos.map(({ name, completed }) => (
<li>
<input type="checkbox" checked={completed} />
{name}
</li>
))
}
</ul>
</body>
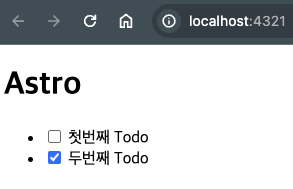
</html>정말 간단하게 DB에서 데이터를 가져오네요.
약간 Drizzle ORM과 비슷한 부분이 많습니다.
왜냐하면 Astro DB안에 빌트인으로 Drizzle ORM의 클라이언트가 들어가 있기 때문입니다.
실행 결과를 볼까요?
아주 잘 작동되고 있습니다.
이제 데이터를 추가하는 로직을 구현해 볼까요?
먼저, Astro가 제공하는 API 엔드포인트를 구현해서 사용자의 Form을 처리하게 할 작정입니다.
API 엔드포인트를 아래와 같은 파일로 만들겠습니다.
src/pages/api/todos/index.ts 파일입니다.
import type { APIRoute } from "astro";
import { db, Todos } from "astro:db";

export const POST: APIRoute = async ({ request, redirect }) => {
  const formData = await request.formData();
  const name = formData.get("name");
  if (typeof name === "string") {
    await db.insert(Todos).values({ name, completed: false });
  }

  return redirect("/");
};
API 로직은 아주 간단합니다.
formData에서 ’name’ 부분을 가져오고 그게 ‘string’ 타입이면 DB에 추가하는 겁니다.
db.insert(Todos).values() 같은 형식으로 insert를 하면 됩니다.
Drizzle ORM client가 들어가 있어 저는 이해하기가 아주 쉬운데요.
제가 예전에 강의한 Drizzle ORM 글은 아래 링크에 있으니 꼭 한 번 읽어 보시기 바랍니다.
이제 API 로직을 완성했으니까 Form UI를 작성해야 합니다.
당연히 src/pages/index.astro 파일 아래 부분에 작성하겠습니다.
---
import { db, Todos } from "astro:db";
const todos = await db.select().from(Todos);
---

<html lang="en">
  <head>
    <meta charset="utf-8" />
    <link rel="icon" type="image/svg+xml" href="/favicon.svg" />
    <meta name="viewport" content="width=device-width" />
    <meta name="generator" content={Astro.generator} />
    <title>Astro</title>
  </head>
  <body>
    <h1>Astro</h1>
    <ul>
      {
        todos.map(({ name, completed }) => (
          <li>
            <input type="checkbox" checked={completed} />
            {name}
          </li>
        ))
      }
    </ul>

    <form method="POST" action="/api/todos">
      <label>Todo
        <input name="name" />
      </label>
      <button>추가</button>
    </form>
  </body>
</html>
실행결과를 볼까요?
위와 같이 Todos 추가하기가 아주 잘 작동하고 있습니다.
지금까지 만든 앱은 추가하기까지는 완벽하게 작동하는데요.
체크박스를 누르면 아무 변화도 없습니다.
그래서 이제 추가하기가 끝났으니 편집하기 즉, Update 부분을 작성해 보겠습니다.
UI부분에서 input checkbox 부분에 만약 클릭시 해당 Todos의 id를 form으로 전송하는 부분을 추가해 보겠습니다.
<ul>
    {
    todos.map(({ id, name, completed }) => (
        <li>
        <form method="POST" action={`/api/todos/${id}`}>
            <input type="checkbox" checked={completed} name="completed" />
            {name}
            <button>변경</button>
        </form>
        </li>
    ))
    }
</ul>
보통 React 코드에서는 onClick, onChange 같은 클라이언트 사이드 렌더링 로직을 많이 사용하는데요.
우리가 하는 Todos 앱은 서버사이드렌더링입니다.
서버사이드렌더링은 form을 전송하고 전송된 폼 데이터를 처리하고 다시 UI를 그려주는 로직으로 작성됩니다.
그래서 위와 같이 input 박스의 checkbox를 클릭하면 자동으로 form이 작동하게 됩니다.
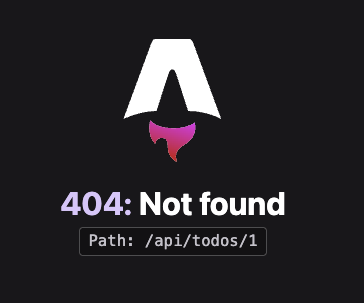
변경 버튼을 눌러볼까요?
위와 같이 에러가 나옵니다.
아직 해당 API 엔드포인트는 작성되지 않았기 때문인데요.
API 엔드포인트는 api/todos/{id} 인데요.
다이내믹 라우팅이네요.
이걸 구현해 보겠습니다.
Astro에서의 다이내믹 라우팅은 []을 사용합니다.
src/pages/api/todos/[id].ts 파일을 만들면 됩니다.
import type { APIRoute } from "astro";
import { db, Todos, eq } from "astro:db";

export const POST: APIRoute = async ({ params, request, redirect }) => {
  const formData = await request.formData();
  const completed = formData.get("completed");

  await db
    .update(Todos)
    .set({ completed: completed === "on" })
    .where(eq(Todos.id, Number(params.id)));

  return redirect("/");
};
이제 완성이 되었네요.
이제 체크박스를 변경해 봅시다.
변경은 잘 되는데요.
체크박스를 선택하고 ‘변경’ 버튼을 눌러야하는게 조금은 번거로운데요.
React의 경우 절대 이렇게 하지 않습니다.
그럼 자바스크립트 코드로 onChange 로직을 구현해 볼까요?
src/pages/index.astro 파일에서 <script>태그를 추가해서 클라이언트 사이드에서 자바스크립트가 작동되도록 하겠습니다.
아래와 같이 body 태그가 끝나는 앞쪽에 script 태그를 넣어두고요.
이제 ‘변경’ 버튼은 지워도 됩니다.
    <li>
        <form method="POST" action={`/api/todos/${id}`}>
            <input type="checkbox" checked={completed} name="completed" />
            {name}
        </form>
    </li>

    ...
    ...
    생략
    ...
    ...

    <script>
        const updateTriggers = document.querySelectorAll(
        "input[type='checkbox']"
        );
        updateTriggers.forEach((trigger) => {
        trigger.addEventListener("change", (e) => {
            const currentTarget = e.currentTarget as HTMLInputElement;
            const targetForm = currentTarget.parentElement as HTMLFormElement;
            targetForm.submit();
        });
        });
    </script>
</body>
이제 테스트해보십시요.
체크박스를 누를때마다 DB가 작동하게 될겁니다.
너무 빨라 보이지 않을 경우 체크박스 한번 누르고 새로고침 버튼을 누르면 그 차이를 이해할 수 있을 겁니다.
이제 Delete 로직을 구현해 봅시다.
로직 구현을 쉽게하기 위해 우리가 아까 만들었던 src/pages/api/todos/[id].ts파일을 조금 수저하겠습니다.
src/pages/api/todos/[id].ts 파일에는 POST 요청을 처리하는 로직이 있는데요.
여기에 GET 요청이 오면 해당 id를 삭제하는 코드를 추가하겠습니다.
원래는 src/pages/api/todos/delete/[id].ts 같은 걸 만들어야 겠죠.
저는 별로 큰 앱도 아니니까 간단한 GET 요청 즉, <a> 앵커만으로도 삭제하게끔 로직을 구현하겠습니다.
먼저, UI를 업데이트 하겠습니다.
<form method="POST" action={`/api/todos/${id}`}>
    <input type="checkbox" checked={completed} name="completed" />
    {name}
    <a href={`/api/todos/${id}`}>삭제</a>
</form>
위와 같이 <a> 태그로 GET 요청을 보내는 방식입니다.
이제 src/pages/api/todos/delete/[id].ts 파일에 GET 요청을 처리하는 코드를 추가하겠습니다.
export const GET: APIRoute = async ({ params, redirect }) => {
  await db.delete(Todos).where(eq(Todos.id, Number(params.id)));
  return redirect("/");
};
위와 같이 아주 쉬운 코드를 작성하면 됩니다.
이제 테스트해 볼까요?
삭제 버튼을 누르면 잘 작동될겁니다.
이제 완성되었네요.
소제목 같은 질문을 할 수 있는데요.
.astro 폴더 밑에 보면 content.db 파일이 있습니다.
이 파일을 열어보면 우리가 만든 Todos 테이블이 보일겁니다.
sqlite3 content.db                      일  3/24 10:09:00 2024
SQLite version 3.43.2 2023-10-10 13:08:14
Enter ".help" for usage hints.
sqlite> .schema
CREATE TABLE IF NOT EXISTS "Todos" ("id" integer PRIMARY KEY, "name" text NOT NULL, "completed" integer NOT NULL);
sqlite> sqlite> select Todos;
1|첫번째 Todo|0
2|두번째 Todo|1
sqlite> .exit
그리고 .astro 폴더에 보시면 db-types.d.ts 파일도 보이실 건데요.
// This file is generated by Astro DB
declare module 'astro:db' {
	export const Todos: import("@astrojs/db/runtime").Table<
		"Todos",
		{"id":{"type":"number","schema":{"unique":false,"deprecated":false,"name":"id","collection":"Todos","primaryKey":true}},"name":{"type":"text","schema":{"unique":false,"deprecated":false,"name":"name","collection":"Todos","primaryKey":false,"optional":false}},"completed":{"type":"boolean","schema":{"optional":false,"unique":false,"deprecated":false,"name":"completed","collection":"Todos"}}}
	>;
}
우리가 만들었던 테이블에 대한 타입스크립트 타입도 잘 지정해 주고 있습니다.
그럼.