Title here
Summary here
August 19, 202410 minutes
안녕하세요?
지난 시간에는 간단하게 Next.js상에서 Lucia Auth를 이용해서 세션 정보를 Cloudflare D1 DB상에 저장해서 유저 로그인을 구현했었습니다.
이번 시간에는 useFormState와 Next.js 미들웨어를 적용해서 좀 더 코드를 완성시켜 나가 보겠습니다.
지난 시간 강의 링크입니다.
먼저, 테스트를 위해 헤더 Navbar 링크 부분과 메인 페이지 내용을 조금 바꾸겠습니다.
먼저, layout.tsx 파일을 아래와 같이 수정합시다.
import type { Metadata } from "next";
import "./globals.css";
import Link from "next/link";

export const metadata: Metadata = {
  title: "Create Next App",
  description: "Generated by create next app",
};

export default function RootLayout({
  children,
}: Readonly<{
  children: React.ReactNode;
}>) {
  return (
    <html lang="en">
      <body className="max-w-xl p-4">
        <header className="flex space-x-4 py-4 underline">
          <Link href="/">Home</Link>
          <Link href="/signup">Sign up</Link>
          <Link href="/login">Log in</Link>
          <Link href="/admin">Admin</Link>
          <Link href="/dashboard">Dashboard</Link>
          <Link href="/open">Open</Link>
        </header>
        <main>{children}</main>
      </body>
    </html>
  );
}
a 태그가 아니라 Next.js에서 제공해 주는 Link 컴포넌트를 사용했습니다.
그리고 Auth 테스트를 위해 “/admin”, “/dashboard”, “/open” 라우팅 주소를 추가했습니다.
이제 메인 페이지를 구성해 보겠습니다.
import { logoutAction } from "@/actions/logoutAction";
import { validateSession } from "@/lib/auth";

export const runtime = "edge";

export default async function Home() {
  const { user } = await validateSession();

  return (
    <section className="p-4">
      <h1>Welcome to Next.js Lucia Test</h1>
      {user ? (
        <>
          <pre>{JSON.stringify(user, null, 2)}</pre>
          <form action={logoutAction}>
            <button
              type="submit"
              className="px-3 py-2 rounded-lg border bg-gray-700 text-white"
            >
              Log out
            </button>
          </form>
        </>
      ) : (
        <a className="underline" href="/login">
          Please Login
        </a>
      )}
    </section>
  );
}
메인 페이지를 보시면 validateSession 함수를 이용해서 유저 로그인 여부를 확인할 수 있습니다.
validateSession 함수는 지난 시간에도 만들었으니 지난 링크를 참고 바랍니다.
지난 시간에는 lib.ts 파일에 모든 서버 관련 함수를 넣었는데, validateSession 함수만 남기고 그 파일을 auth.ts로 바꾸었습니다.
그리고 아래 그림은 로그인 후의 메인 화면입니다.
이제 React 최신 기술인 userFormState 훅을 이용해서 Sign Up 페이지를 다시 만들어 보겠습니다.
일단 app 폴더 밑에 signup 폴더를 만들었으니 그 밑에 page.tsx 파일을 아래와 같이 만들겠습니다.
import { logoutAction } from "@/actions/logoutAction";
import { SignupForm } from "./SignupForm";
import { validateSession } from "@/lib/auth";

export const runtime = "edge";

export default async function SignUp() {
  const { user } = await validateSession();

  return (
    <div className="flex flex-col gap-5">
      <h1 className="p-4 text-2xl font-bold">Sign Up</h1>
      {user ? (
        <div className="flex gap-4 p-4">
          <div className="px-3 py-2 rounded-lg border bg-slate-100">
            {user.email}
          </div>
          <form action={logoutAction}>
            <button
              type="submit"
              className="px-3 py-2 rounded-lg border bg-gray-700 text-white"
            >
              Log out
            </button>
          </form>
        </div>
      ) : (
        <div className="flex flex-col gap-4 p-4">
          <div className="px-3 py-2 rounded-lg border bg-slate-100">
            Not Logged
          </div>
          <SignupForm />
        </div>
      )}
    </div>
  );
}
항상 validateSession 함수를 이용해서 유저가 로그인 되어 있는지 체크하고 되어 있으면 유저 이메일을 보여주면서 로그아웃 버튼을 표시해 두면 됩니다.
로그아웃 버튼은 form 방식의 서버 액션을 이용해서 구현했는데요.
서버 액션 관련 함수는 app 폴더 밑에 actions 폴더를 만들었고 그 밑에 logoutAction.ts 파일을 만들었습니다.
"use server";

import { initializeLucia } from "@/db/lucia";
import { validateSession } from "@/lib/auth";
import { getRequestContext } from "@cloudflare/next-on-pages";
import { cookies } from "next/headers";

export async function logoutAction() {
  const { session } = await validateSession();
  if (!session) {
    return { success: false };
  }

  const DB = getRequestContext().env.DB;

  const lucia = initializeLucia(DB);

  await lucia.invalidateSession(session.id);
  const sessionCookie = lucia.createBlankSessionCookie();
  cookies().set(
    sessionCookie.name,
    sessionCookie.value,
    sessionCookie.attributes
  );
  return { success: true };
}
위 코드는 Next.js의 서버 액션 파일입니다.
이렇게 만들어 놓으면 언제든지 Next.js 서버 액션 코드를 삽입할 수 있게 됩니다.
이제 다시 signup 페이지로 돌아가 보면 Form 부분을 SignupForm 컴포넌트로 분할 했습니다.
왜냐하면 지금 보시는 signup 메인 페이지는 서버 컴포넌트고 우리가 만들 SignupForm 컴포넌트는 클라이언트 컴포넌트이기 때문입니다.
useFormState와 useFormStatus 훅을 사용하려면 클라이언트 컴포넌트에서 사용해야 하기 때문입니다.
이제 SignupForm.tsx 파일을 살펴보겠습니다.
"use client";

import { useFormState, useFormStatus } from "react-dom";
import { signupAction } from "@/actions/signupAction";

export function SignupForm() {
  const [state, formAction] = useFormState(signupAction, null);

  return (
    <section className="flex gap-4 p-4">
      <form action={formAction} className="flex flex-1 flex-col  sm:w-1/2">
        <input
          className="rounded-lg px-2 py-4 border"
          type="email"
          name="email"
          placeholder="Email"
        />
        {state?.errors &&
          state?.errors?.email?.map((msg, i) => (
            <span key={i} className="text-red-500 ml-4">
              {msg}
            </span>
          ))}

        <br />
        <input
          className="rounded-lg px-2 py-4 border"
          type="password"
          name="password"
          placeholder="password"
        />
        {state?.errors &&
          state?.errors?.password?.map((msg, i) => (
            <span key={i} className="text-red-500 ml-4">
              {msg}
            </span>
          ))}
        <br />
        <SubmitButton />
        {state?.error && <p className="text-red-500 ml-4">{state?.error}</p>}
      </form>
      <div className="flex-1 rounded-lg bg-cyan-600 p-8 text-white">
        <pre>{JSON.stringify(state, null, 2)}</pre>
      </div>
    </section>
  );
}

function SubmitButton() {
  const { pending } = useFormStatus();
  return (
    <button
      className="bg-cyan-600 rounded-lg px-2 py-4 border"
      type="submit"
      disabled={pending}
    >
      {pending ? "Processing" : "Signup"}
    </button>
  );
}
위 코드를 보시면 useFormState, useFormStatus 훅을 ‘react-dom’에서 가장 먼저 import 했습니다.
당연히 ‘use client’ 디렉티브로 이 파일이 클라이언트 컴포넌트라고 지정했고요.
useFormState는 React 19가 나오면 useActionState로 대체될 거 지만 React 18에서는 위와 같이 useFormState와 useFormStatus를 위해 sumit 버튼을 별도의 컴포넌트로 구분해야 합니다.
위 코드는 useFormState로 리턴되는 state의 에러 값에 따라 여러 가지를 보여주게 됩니다.
그러면 signupAction 서버 코드를 보겠습니다.
app/actions/signupAction.ts
"use server";

import { initializeLucia } from "@/db/lucia";
import { usersTable } from "@/db/schema";
import { getRequestContext } from "@cloudflare/next-on-pages";
import { eq } from "drizzle-orm";
import { drizzle } from "drizzle-orm/d1";
import { Scrypt } from "lucia";
import { revalidatePath } from "next/cache";
import { cookies } from "next/headers";
import { z } from "zod";

const signupFormSchema = z.object({
  email: z.string().email().min(4, "email is required"),
  password: z.string().min(4, "password is required"),
});

export async function signupAction(state: any, formData: FormData) {
  const result = signupFormSchema.safeParse({
    email: formData.get("email"),
    password: formData.get("password"),
  });
  console.log(result);

  // when FormData parsing success
  if (result.success) {
    const email = result.data?.email;
    const password = result.data?.password;

    const DB = getRequestContext().env.DB;

    const db = drizzle(DB);

    const existingUser = await db
      .select()
      .from(usersTable)
      .where(eq(usersTable.email, email));
    // console.log(`existingUser : ${JSON.stringify(user, null, 2)}`);

    if (existingUser.length !== 0) {
      revalidatePath("/signup");
      return { error: "Email already exists.", success: false };
    }

    const passwordHash = await new Scrypt().hash(password);
    const user = await db
      .insert(usersTable)
      .values({ email, password: passwordHash })
      .returning({ id: usersTable.id, email: usersTable.email });

    if (!user || user.length === 0) {
      return {
        error: "An error occured during sign up.Email already exists.",
        success: false,
      };
    }

    const lucia = initializeLucia(DB);
    const session = await lucia.createSession(user[0].id, {});

    const cookie = lucia.createSessionCookie(session.id);

    cookies().set(cookie.name, cookie.value, cookie.attributes);

    revalidatePath("/signup");
    return { success: true };
  }

  // Error handling
  if (!result.success) {
    revalidatePath("/signup");
    return { errors: result.error.flatten().fieldErrors };
  }
}
코드가 길지만 지난 시간에 배웠던 로직과 비슷합니다.
다만 zod를 이용해서 formData 값을 검증했고, 여러 경웨 따라 에러 값을 리턴해 주고 있습니다.
성공하면 간단하게 success 항목이 true인 객체를 리턴해주고 있습니다.
여기서 서버 액션은 뭘 리턴해야하는데요.
왜냐하면 useFormState에서 state값을 사용해야 하기 때문입니다.
그리고 revalidatePath 함수를 이용해서 모든 작업이 완료되면 현재 페이지를 새로고침해주고 있습니다.
revalidatePath 함수를 잊어버리지 않도록 하시기 바랍니다.
아니면 여기서 redirect로 보통 다른 곳으로 이동하는데 우리는 테스트를 위해 같은 라우팅으로 revalidatePath 함수를 이용해서 새로고침을 시도하고 있습니다.
마지막으로 useFormStatus 훅을 이용하려면 아까처럼 submit 버튼을 따로 빼내서 한개의 컴포넌트로 만들어야 합니다.
이제 테스트를 해볼까요?
위와 같은 화면이 나옵니다.
여기서 그냥 Signup 버튼을 누르면 아래와 같이 에러값이 표시될겁니다.
위 그림을 보시면 useFormState 훅으로 리턴되는 state 값이 제대로 작동하고 있습니다.
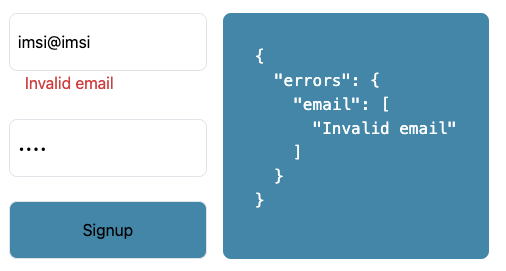
이제는 이메일에 잘못된 형식의 이메일을 넣어 보겠습니다.
어떤가요?
위와 같이 Zod가 완벽하게 잡아내고 있습니다.
마지막으로 이미 가입된 이메일을 넣어 보겠습니다.
위 그림과 같이 이메일이 이미 존재한다고 완벽하게 표시해 주고 있습니다.
이제 signup 라우팅은 완벽하게 구현되었습니다.
signup 라우팅을 구현했으니 login 라우팅 구현하는 거는 아주 쉬운데요.
signup과 로직이 거의 비슷하기 때문입니다.
login 폴더의 page.tsx 파일입니다.
import { validateSession } from "@/lib/auth";
import { LoginForm } from "./LoginForm";
import { logoutAction } from "@/actions/logoutAction";

export const runtime = "edge";

export default async function SignUp() {
  const { user } = await validateSession();

  return (
    <div className="flex flex-col gap-5">
      <h1 className="p-4 text-2xl font-bold">Log In</h1>
      {user ? (
        <div className="flex gap-4 p-4">
          <div className="px-3 py-2 rounded-lg border bg-slate-100">
            {user.email}
          </div>
          <form action={logoutAction}>
            <button
              type="submit"
              className="px-3 py-2 rounded-lg border bg-gray-700 text-white"
            >
              Log out
            </button>
          </form>
        </div>
      ) : (
        <div className="flex flex-col gap-4 p-4">
          <div className="px-3 py-2 rounded-lg border bg-slate-100">
            Not Logged
          </div>
          <LoginForm />
        </div>
      )}
    </div>
  );
}
아까 signup 페이지가 아주 똑같습니다.
이제 LoginForm 컴포넌트만 살펴보면 됩니다.
"use client";

import { loginAction } from "@/actions/loginAction";
import { useFormState, useFormStatus } from "react-dom";

export function LoginForm() {
  const [state, formAction] = useFormState(loginAction, null);

  return (
    <section className="flex gap-4 p-4">
      <form action={formAction} className="flex flex-1 flex-col  sm:w-1/2">
        <input
          className="rounded-lg px-2 py-4 border"
          type="email"
          name="email"
          placeholder="Email"
        />
        {state?.errors &&
          state?.errors?.email?.map((msg, i) => (
            <span key={i} className="text-red-500 ml-4">
              {msg}
            </span>
          ))}

        <br />
        <input
          className="rounded-lg px-2 py-4 border"
          type="password"
          name="password"
          placeholder="password"
        />
        {state?.errors &&
          state?.errors?.password?.map((msg, i) => (
            <span key={i} className="text-red-500 ml-4">
              {msg}
            </span>
          ))}
        <br />
        <SubmitButton />
        {state?.error && <p className="text-red-500 ml-4">{state?.error}</p>}
      </form>
      <div className="flex-1 rounded-lg bg-cyan-600 p-8 text-white">
        <pre>{JSON.stringify(state, null, 2)}</pre>
      </div>
    </section>
  );
}

function SubmitButton() {
  const { pending } = useFormStatus();
  return (
    <button
      className="bg-cyan-600 rounded-lg px-2 py-4 border"
      type="submit"
      disabled={pending}
    >
      {pending ? "Processing" : "Login"}
    </button>
  );
}
위 코드도 SignupForm과 아주 비슷합니다.
마지막으로 서버 액션 코드입니다.
"use server";

import { eq } from "drizzle-orm";
import { usersTable } from "@/db/schema";
import { getRequestContext } from "@cloudflare/next-on-pages";
import { drizzle } from "drizzle-orm/d1";
import { Scrypt } from "lucia";
import { initializeLucia } from "@/db/lucia";
import { cookies } from "next/headers";
import { z } from "zod";
import { revalidatePath } from "next/cache";

const loginFormSchema = z.object({
  email: z.string().email().min(4, "email is required"),
  password: z.string().min(4, "password is required"),
});

export async function loginAction(state: any, formData: FormData) {
  const result = loginFormSchema.safeParse({
    email: formData.get("email"),
    password: formData.get("password"),
  });

  // when FormData parsing success
  if (result.success) {
    const email = result.data?.email;
    const password = result.data?.password;

    const DB = getRequestContext().env.DB;

    const db = drizzle(DB);

    const user = await db
      .select()
      .from(usersTable)
      .where(eq(usersTable.email, email));
    // console.log(`user : ${JSON.stringify(user, null, 2)}`);

    if (user.length === 0) {
      console.log("user length === 0");
      revalidatePath("/login");
      return { error: "Email does not exist!", success: false };
    }

    const isValidPassword = await new Scrypt().verify(
      user[0].password,
      password
    );

    if (!isValidPassword) {
      //   throw new Error("Invalid password.");
      console.log("Invalid password!");
      revalidatePath("/login");
      return { error: "Incorrect password!", success: false };
    }

    const lucia = initializeLucia(DB);
    const session = await lucia.createSession(user[0].id, {});
    const cookie = lucia.createSessionCookie(session.id);
    console.log(`session : ${JSON.stringify(session, null, 2)}`);

    cookies().set(cookie.name, cookie.value, cookie.attributes);

    revalidatePath("/login");
    return { success: true };
  }

  // Error handling
  if (!result.success) {
    revalidatePath("/login");
    return { errors: result.error.flatten().fieldErrors };
  }
}
login 서버 액션 함수입니다.
signup 함수와 아주 유사한데요.
마지막으로 테스트를 위해 잘못된 패스워드를 넣어 보겠습니다.
위와 같이 패스워드가 틀렸다고 잘 표시되고 있습니다.
똑같이 이메일에 잘못된 형식을 넣어도 아래 그림처럼 Zod가 제대로 작동하고 있습니다.
이제 유저 로그인 여부에 따라 보여줘야할 곳과 보여주지 말아야 할 곳을 구분할 수 있어야 하는데요.
단순하게 모든 컴포넌트를 서버 컴포넌트로 작성하고 그리고 나서 validateSession 함수를 통해서 유저 로그인 여부를 찾는 것도 꽤 단순하고 좋은 방법이지만 Next.js는 미들웨어라는 걸 제공해주고 있는데, 이 걸 이용해서 구현해 보겠습니다.
Next.js의 미들웨어파일은 app 폴더와 같은 레벨에 middleware.ts 파일로 작성하면 됩니다.
import { NextRequest, NextResponse } from "next/server";
import { getRequestContext } from "@cloudflare/next-on-pages";
import { initializeLucia } from "./db/lucia";

export async function middleware(request: NextRequest) {
  const DB = getRequestContext().env.DB;
  const lucia = initializeLucia(DB);
  const sessionId = request.cookies.get(lucia.sessionCookieName)?.value ?? null;

  if (!sessionId) {
    console.log("No sessionId");
    return NextResponse.redirect(new URL("/login", request.url));
  }

  try {
    const result = await lucia.validateSession(sessionId);
    // console.log(result);

    if (result?.session && result.session.fresh) {
      const sessionCookie = lucia.createSessionCookie(result.session.id);
      // 여기서 cookies는 NextRequest가 아니라 NextResponse를 사용해야 함
      const response = NextResponse.next();
      response.cookies.set(
        sessionCookie.name,
        sessionCookie.value,
        sessionCookie.attributes
      );
      return response;
    }

    if (!result?.session) {
      const sessionCookie = lucia.createBlankSessionCookie();
      const response = NextResponse.next();
      response.cookies.set(
        sessionCookie.name,
        sessionCookie.value,
        sessionCookie.attributes
      );
      return response;
    }
  } catch (error) {
    console.error("Error in session validation:", error);
    return NextResponse.redirect(new URL("/login", request.url));
  }

  return NextResponse.next();
}

export const config = {
  // matcher: "/admin",
  matcher: ["/admin", "/dashboard"],
};
위와 같이 작성했습니다.
마지막에 보시면 config 객체를 export 했는데요.
config 객체에 matcher 항목을 잘 보시면 라우팅이 몇개 있습니다.
이런 방식으로 미들웨어가 작동하는 라우팅을 지정할 수 있습니다.
즉, 위 코드에서는 ‘/admin’, ‘/dashboard’ 라우팅으로 가면 미들웨어가 작동한다는 뜻입니다.
미들웨어는 validateSession 함수와 동일한데요.
대신 validateSession 함수는 NodeJS 서버 환경에서 실행하는 거라 cookies 함수는 ’next/headers’에서 가져왔지만 미들웨어 함수는 Edge Runtime에서 작동되기 때문에 위 코드처럼 직접 Request나 Response 객체에서 cookies 값을 가져와서 쿠키값을 set해야 합니다.
그 부분만 다르고 나머지는 validateSession 함수와 똑같다고 보면 됩니다.
이제 테스트를 위해 ‘/open’, ‘/admin’, ‘/dashboard’ 링크를 눌러보면 미들웨어가 작동되는 걸 볼 수 있을 겁니다.
지금까지 Next.js를 이용해서 유저 로그인 구현과 세션 유지 그리고 유저별 라우팅 구분을 미들웨어로 구현했는데요.
또, useFormState, useFormStatus 훅으로 UI도 멋지게 구현했습니다.
이제 Cloudflare에 배포해서 실행해 보셔도 제대로 작동되는걸 볼 수 있을 겁니다.
그럼.