Title here
Summary here
December 17, 202318 minutes
안녕하세요?
오늘은 Draft.js를 이용해서 React로 에디터 구현하는 방법에 대해 알아보겠습니다.
비슷한 라이브러리로는 Quill, TinyMCE 등이 있는데요.
TinyMCE는 예전에 써봤는데 Draft.js는 처음이라 이번 기회에 사용법을 익혀볼까 합니다.
Draft.js는 React를 만든 Facebook에서 만들었습니다.
위지위그 에티딩이 되는데요.
위지위그(WYSIWYG)는 (WYSIWYG: What You See Is What You Get, “보는 대로 얻는다”)라는 뜻으로 문서 편집 과정에서 화면에 포맷된 낱말, 문장이 출력물과 동일하게 나오는 방식을 말합니다.
TinyMCE에 비해 세팅해야 할게 많다고 하는데요.
그렇지만 그만큼 가볍고 좋다는 얘기도 많습니다.
** 목 차 **
React는 create-react-app이 아닌 Vite로 설치하겠습니다.
npm create vite@latest draftjs-test

✔ Select a framework: › React
✔ Select a variant: › JavaScript

Scaffolding project in /Users/cpro95/Codings/Javascript/blog/draftjs-test...

Done. Now run:

  cd draftjs-test
  npm install
  npm run dev
draft.js를 설치해야겠죠.
cd draftjs-test

npm install

npm insatll draft-js
이제 준비가 끝났는데요.
Draft.js를 사용할 기본적인 컴포넌트를 만들어 보겠습니다.
components 폴더에 DraftEditor.js 파일을 아래와 같이 만들고 App.jsx에서 불러오면 됩니다.
// components/DraftEditor.jsx

const DraftEditor = () => {
  return <div>Draft Editor</div>
}

export default DraftEditor
// src/App.jsx
import DraftEditor from './components/DraftEditor'
function App() {
return (
<>
<h1>Draft.js 테스트</h1>
<DraftEditor />
</>
)
}
export default App이제 테스트해 볼까요?
App.css와 index.css 파일의 내용은 다 지웠습니다.
위와 같이 나오면 이제 Draft.js 라이브러리를 적용해 볼까요?
Draft.js 공식 문서에 나오는 세팅 방법인데요.
아래와 같이 draft-js 패키지에서 Editor 객체와 EditorState 객체를 불러옵니다.
이름에서도 알 수 있듯이 Editor는 에디터이고, EditorState는 사용자가 뭔가를 입력할 때마다 상태관리를 해주는 겁니다.
// components/DraftEditor.jsx

import { useState } from 'react'
import { Editor, EditorState } from 'draft-js'
import 'draft-js/dist/Draft.css'

function DraftEditor() {
  const [editorState, setEditorState] = useState(() =>
    EditorState.createEmpty(),
  )

  return <Editor editorState={editorState} onChange={setEditorState} />
}
export default DraftEditor
위와 같이 Editor 컴포넌트에 onChange도 해주고 editorState도 지정해 주면 됩니다.
실행해 보면 아래와 같이 에러가 나는데요.
create-react-app말고 vite로 react앱을 설치하면 vite는 기본적으로 global 세팅을 하지 않는데요.
이걸 해결하는 방법은 두 가지 방법이 있습니다.
첫 번째 방법이 가장 좋을 듯한데요.
index.html 파일을 열어 아래와 같이 script 태그를 추가해 주면 됩니다.
// index.html

<body>
  <div id="root"></div>
  <script type="module" src="/src/main.jsx"></script>
  <script>
    window.global ||= window
  </script>
</body>
window.global 값을 설정해 주면 됩니다.
두 번째 방법은 vite.config.js 파일에서 global 값을 세팅해 주면 되는데요.
export default defineConfig({
  plugins: [react()],
  define: {
    global: 'window',
  },
})
StackOverflow에서는 첫 번째 방법을 추천합니다.
이제 다시 실행 결과를 볼까요?
위와 같이 정상적으로 나오는데요.
Draft.js의 에디터 같은 거는 안 보입니다.
사실 “Draft.js 테스트” 글자 밑에 마우스를 갖다 대면 커서키로 바뀌고 글자를 입력할 수 있게 되는데요.
Draft.js 기본 CSS 세팅이 Border가 없기 때문입니다.
조금 보기 안 좋으니까 DraftEditor 컴포넌트를 div로 감싸면서 Border를 조금 주겠습니다.
// src/App.jsx

import DraftEditor from './components/DraftEditor'

function App() {
  return (
    <>
      <h1>Draft.js 테스트</h1>
      <div style={{ border: '0.1rem solid' }}>
        <DraftEditor />
      </div>
    </>
  )
}

export default App
위와 같이 Border를 주니까 조금은 보기가 좋네요.
이제 Draft.js 에디터에 직접 글자를 입력해 보시기 바랍니다.
엔터키를 치면 밑으로 개행되면서 아주 긴 문단까지 작성할 수 있을 겁니다.
그리고 크롬 개발자 도구로 들어가서 “요소” 칸에서 직접 HTML 태그를 아래와 같이 확인해 보면 많은 걸 볼 수 있는데요.
여기서 중요한 게 바로 “contenteditable=true"입니다.
이 값을 false로 해보면 에디터에서 더 이상 입력이 안 될 겁니다.
Editor에 placeholder를 설정할 수 있습니다.
<Editor
  editorState={editorState}
  onChange={setEditorState}
  placeholder='여기에 입력하십시요...'
/>
위와 같이 나오네요.
그러면 이제 입력한 값을 저장하고 불러오는 방법을 알아야 하는데요.
Editor 컴포넌트 위에 버튼을 만들어서 ‘saveContent’ 함수를 지정하겠습니다.
import { useState } from 'react'
import { Editor, EditorState } from 'draft-js'
import 'draft-js/dist/Draft.css'

function DraftEditor() {
  const [editorState, setEditorState] = useState(() =>
    EditorState.createEmpty(),
  )

  const saveContent = () => {
    console.log(editorState)
  }

  return (
    <div>
      <button onClick={saveContent}>저장</button>
      <hr />
      <Editor
        editorState={editorState}
        onChange={setEditorState}
        placeholder='여기에 입력하십시요...'
      />
    </div>
  )
}
export default DraftEditor
그러면 saveContent가 실제 Draft.js 에디터가 현재 가지고 있는 값을 저장하게 해야 하는데요.
먼저, console.log 위주로 진행하겠습니다.
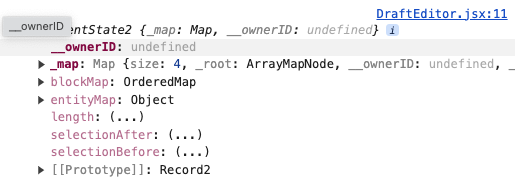
Draft.js가 제공해 주는 editorState의 값을 콘솔 창에서 확인해 보면 아래와 같은데요.
위와 같이 너무 어려운 객체가 나옵니다.
우리가 필요로 하는 값이 아닌데요.
우리가 필요로 하는 거는 Content입니다.
Draft.js는 getCurrentContent 메서드를 제공해 주는데요.
const saveContent = () => {
  console.log(editorState.getCurrentContent())
}
getCurrentContent 메서드를 이용해 보아도 아래 그림처럼 어려운 것만 나오는데요.
우리가 입력한 값은 어디에 있을까요?
사실 blockMap에 있습니다.
콘솔 창에서 blockMap을 확장해서 아무리 뒤져보아도 우리가 입력한 값은 안 나오는데요.
그래서 Draft.js에서는 자바스크립트 데이터로 변환하는 convertToRaw 메서드를 제공해 줍니다.
다시 코드를 바꿔볼까요?
import { Editor, EditorState, convertToRaw } from "draft-js";
...
...
...
const saveContent = () => {
const contentState = editorState.getCurrentContent();
const raw = convertToRaw(contentState);
console.log(raw);
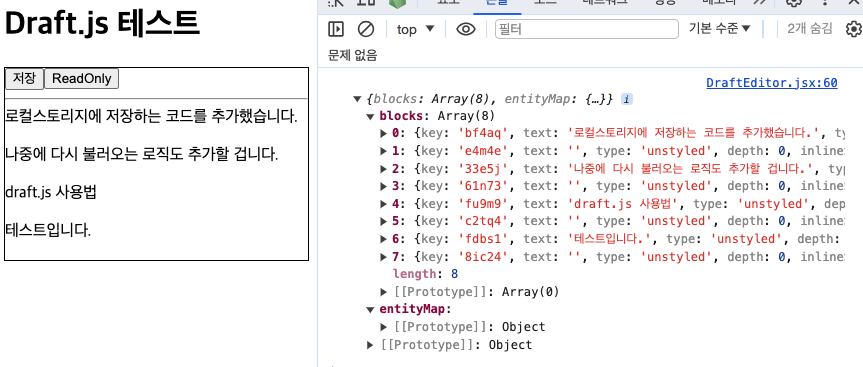
};위와 같이 blocks 객체를 보시면 blocks 배열이 있고 각 배열의 행에는 우리가 입력한 텍스트가 text 항목으로 나옵니다.
여기서 중요한 게 blocks와 함께 entityMap 항목인데요.
entityMap 항목은 이 글의 끝에서 다시 다룰 예정이니 여기서는 그냥 지나가겠습니다.
우리가 자바스크립트 객체 항목으로 현재 에디터 상태를 출력할 수 있었는데요.
JSON.stringify 함수를 이용하면 자바스크립트 객체를 완벽하게 텍스트로 변환할 수 있습니다.
이제, 브라우저가 “새로고침” 되어도 현재 입력한 텍스트 값이 사라지지 않게 만들어 볼까요?
보통 브라우저에서 작업 중인 에디터 같은 경우 실시간으로 데이터베이스에 저장할 수도 있는데요.
우리는 이렇게까지 하지는 않고 localStorage에 저장해 보겠습니다.
const saveContent = () => {
const contentState = editorState.getCurrentContent()
const raw = convertToRaw(contentState)
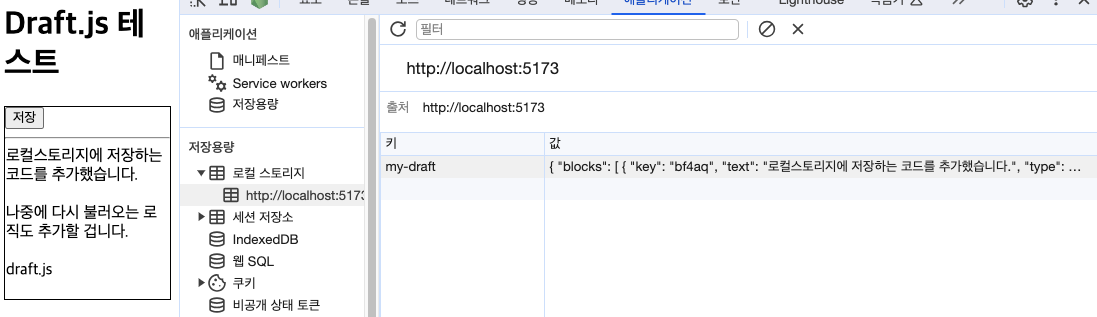
localStorage.setItem('my-draft', JSON.stringify(raw, null, 2))
}아주 간단합니다.
localStorage.setItem 항목을 이용하면 되니까요?
저장할 때 이름은 ‘my-draft’라고 지정했습니다.
이제 ‘저장’ 버튼을 누르면 아래와 같이 로컬스토리지에 저장됩니다.
로컬스토리지에 저장하는 코드는 완성되었네요.
그러면 반대로 브라우저가 새로고침되었을 때 불러오는 코드를 만들어 보겠습니다.
당연히 useEffect 훅을 사용해야겠죠.
import { Editor, EditorState, convertToRaw, convertFromRaw } from "draft-js";
import "draft-js/dist/Draft.css";

...
...
...

  useEffect(() => {
    const raw = localStorage.getItem("my-draft");
    if (raw) {
      const contentState = convertFromRaw(JSON.parse(raw));
      const newEditorState = EditorState.createWithContent(contentState);
      setEditorState(newEditorState);
    }
  }, []);
일단 localStorage.getItem을 이용해서 raw 파일을 가지고 왔습니다.
그리고 우리가 convertToRaw 메서드로 Draft.js 객체를 일반 자바스크립트 객체로 만들었는데요.
불러오는 코드에서는 먼저, JSON.parse 메서드로 텍스트를 자바스크립트 객체로 파싱하고, 그다음 convertFromRaw 메서드로 contentState로 만들어야 합니다.
그리고 그걸 EditorState.createWithContent 메서드를 이용해서 Draft.js의 EditorState로 만들고 그걸 현재 상태에 저장하면 끝입니다.
이제 페이지를 “새로고침"해도 아까 저장한 문서가 바로 화면에 적용될 겁니다.
이제 입력까지는 완성했는데요.
기본적으로 텍스트 에디터는 스타일 변경까지 지원해야 합니다.
당연히 Draft.js도 스타일 변경을 지원하는데요.
어떻게 하는지 살펴보겠습니다.
먼저, ‘BOLD’로 바꾸는 방법입니다.
Darft.js에서 제공해 주는 RichUtils의 toggleInlineStyle 메서드를 이용해서 토글하는 방식인데요.
import {
  Editor,
  EditorState,
  convertToRaw,
  convertFromRaw,
  RichUtils,
} from 'draft-js'
위와 같이 RichUtils 객체를 import 해야 합니다.
그리고 Bold로 만드는 버튼을 아래와 같이 만들겠습니다.
const toggleBold = event => {
  event.preventDefault()
  setEditorState(RichUtils.toggleInlineStyle(editorState, 'BOLD'))
}

return (
  <div>
    <button onClick={saveContent}>저장</button>
    <button onClick={toggleBold}>BOLD</button>
    <hr />
    <Editor
      editorState={editorState}
      onChange={setEditorState}
      placeholder='여기에 입력하십시요...'
    />
  </div>
)
위와 같이 간단하게 HTML UI를 꾸몄습니다.
그리고 toggleBold 함수도 만들었습니다.
이제 BOLD 버튼을 누르면 되는데요.
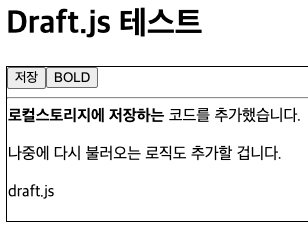
볼드체로 바꾸고 싶은 텍스트의 범위를 지정하고 난 다음에 BOLD 버튼을 눌러볼까요?
위와 같이 정상적으로 작동됩니다.
토글방식이기 때문에 다시 버튼을 클릭하면 볼드체가 적용해제될 겁니다.
RichUtils.toggleInlineStyle(editorState, "BOLD") 처럼 toggleInlineStyle 함수에 들어갈 서식은 실제 코드를 뒤져보면 아래와 같습니다.
type DraftInlineStyleType =
  | 'BOLD'
  | 'CODE'
  | 'ITALIC'
  | 'STRIKETHROUGH'
  | 'UNDERLINE'
5가지를 지원하네요.
Draft.js는 단축키로 스타일을 변경하게끔 해주는데요.
Ctrl + B는 볼드체로 바꾸는 거고, Ctrl + L 의 경우에는 이탤릭체로 바꾸는 거가 되겠네요.
맥에서는 Ctrl 대신에 Command 키를 누르면 됩니다.
기본적으로 단축키를 지원하는 거는 아닙니다.
handleKeyCommand prop을 지정해야 하는데요.
const handleKeyCommand = (command, editorState) => {
  const newState = RichUtils.handleKeyCommand(editorState, command);

  if (newState) {
    setEditorState(newState);
    return "handled";
  }

  return "not-handled";
};

  ...
  ...
  ...

  <Editor
    editorState={editorState}
    onChange={setEditorState}
    placeholder="여기에 입력하십시요..."
    handleKeyCommand={handleKeyCommand}
  />
위와 같이 Editor 컴포넌트에 props로 handleKeyCommand 값을 지정해야 하며, 사용자가 직접 handleKeyCommand 함수도 작성해 줘야 합니다.
이렇게 기본 단축키도 제공해 주는데요.
아예 사용자가 직접 단축키를 설정할 수 있습니다.
일단 handleKeyCommand 함수를 지우고 다시 아래와 같이 작성해 봅시다.
import {
  Editor,
  EditorState,
  convertToRaw,
  convertFromRaw,
  RichUtils,
  getDefaultKeyBinding,
  KeyBindingUtil,
} from 'draft-js'

...
...
...

const customKeyBindingFunction = e => {
  if (e.keyCode === 83 && KeyBindingUtil.hasCommandModifier(e)) {
    return 'drafteditor-save'
  }
  return getDefaultKeyBinding(e)
}

const handleKeyCommand = command => {
  if (command === 'drafteditor-save') {
    saveContent()
    return 'handled'
  }
  return 'not-handled'
}

...
...
...

<Editor
  editorState={editorState}
  onChange={setEditorState}
  placeholder='여기에 입력하십시요...'
  handleKeyCommand={handleKeyCommand}
  keyBindingFn={customKeyBindingFunction}
/>
customKeyBindingFunction 함수를 보시면 keyCode 값으로 83이 나오는데요.
바로 ’s’ 키보드 값입니다.
그리고 hasCommandModifier 메서드가 있는데요.
맥에서는 Command 키를 누를 때입니다.
윈도우나 리눅스에서 사용하시려면 isCtrlKeyCommand 메세드를 이용하시면 됩니다.
또 isOptionKeyCommand 메서드도 있으니 참고 바랍니다.
customKeyBindingFunction 함수에서 리턴되는 게 문자열인데요.
이게 바로 handleKeyCommand 함수에서의 command가 됩니다.
이제 커맨드+s 키를 누르면 저장버튼을 누른 것과 같이 작동할 겁니다.
다시 Draft.js의 작동원리로 돌아가겠습니다.
아까 에디터 State를 convertToRaw 메서드로 자바스크립트 객체로 변환해서 console.log 했었는데요.
아래처럼 blocks 배열이 있는데, 각 행이 에디터의 한 줄이 됩니다.
위 그림에서는 0에서 3까지니까 총 4개의 행이 있다는 뜻입니다.
여기서 text 항목이 입력한 값이고, 그다음 type 항목이 있는데요.
이 항목은 지금 ‘unstyled’로 되어 있습니다.
이 type 항목은 HTML로 따지면 h1, h2, h3 같은 겁니다.
이제 스타일 변경 버튼 중에 H1 태그로 변경하는 태그를 만들어 볼까요?
RichUtils의 toggleBlockType 함수를 이용할 겁니다.
const toggleHeaderOne = (event) => {
  event.preventDefault();
  setEditorState(RichUtils.toggleBlockType(editorState, "header-one"));
};

...
...
...

<button onClick={saveContent}>저장</button>
<button onClick={toggleBold}>BOLD</button>
<button onClick={toggleHeaderOne}>H1</button>
위와 같이 toggleHeaderOne 함수를 지정하고 버튼도 추가했습니다.
테스트해 볼까요?
위와 같이 첫번째 줄을 선택하고 H1 버튼을 누르면 HTML의 H1 태그같이 변했습니다.
그리고 실제 HTML 코드를 보시면 아래와 같이 div 태그가 h1 태그로 변한 게 보일 겁니다.
RichUtils.toggleBlockType(editorState, "header-one") 함수에 들어갈 block 타입으로는 아래와 같은 게 있습니다.
"header-one": 대제목
"header-two": 소제목
"header-three": 세 번째 수준의 제목
"header-four": 네 번째 수준의 제목
"header-five": 다섯 번째 수준의 제목
"header-six": 여섯 번째 수준의 제목
"unstyled": 기본 스타일이 없는 일반 텍스트
"blockquote": 인용문
"unordered-list-item": 비순서형 목록 항목
"ordered-list-item": 순서형 목록 항목
"code-block": 코드 블록지금까지는 스타일 변경을 위한 버튼을 직접 만들었는데요.
Draft.js는 플러그인 방식으로 인라인 툴바를 제공해 줍니다.
여기 가시면 다양한 플러그인을 확인하실 수 있을 겁니다.
일단 플러그인과 인라인툴바를 설치해 보겠습니다.
npm install @draft-js-plugins/editor @draft-js-plugins/inline-toolbar플러그인 테스트를 위해 코드를 아래와 같이 불필요한 코드를 삭제하고 축소하겠습니다.
import { useState, useEffect, useMemo } from 'react'
import { EditorState, convertToRaw, convertFromRaw } from 'draft-js'
import Editor from '@draft-js-plugins/editor'
import createInlineToolbarPlugin from '@draft-js-plugins/inline-toolbar'
import '@draft-js-plugins/inline-toolbar/lib/plugin.css'

function DraftEditor() {
  const [plugins, InlineToolbar] = useMemo(() => {
    const inlineToolbarPlugin = createInlineToolbarPlugin()
    return [[inlineToolbarPlugin], inlineToolbarPlugin.InlineToolbar]
  }, [])

  const [editorState, setEditorState] = useState(() =>
    EditorState.createEmpty(),
  )

  useEffect(() => {
    const raw = localStorage.getItem('my-draft')
    if (raw) {
      const contentState = convertFromRaw(JSON.parse(raw))
      const newEditorState = EditorState.createWithContent(contentState)
      setEditorState(newEditorState)
    }
  }, [])

  const saveContent = () => {
    const contentState = editorState.getCurrentContent()
    const raw = convertToRaw(contentState)
    localStorage.setItem('my-draft', JSON.stringify(raw, null, 2))
  }

  return (
    <div>
      <button onClick={saveContent}>저장</button>
      <hr />
      <Editor
        editorState={editorState}
        onChange={setEditorState}
        placeholder='여기에 입력하십시요...'
        plugins={plugins}
      />
      <InlineToolbar />
    </div>
  )
}
export default DraftEditor
Editor 컴포넌트를 기존 ‘draft-js’에서 import 하지 않고 플러그인에서 제공하는 Editor를 불러왔습니다.
그리고 useMemo 훅을 이용해서 createInlineToolbarPlugin 함수를 실행했는데요.
왜냐하면 createInlineToolbarPlugin 함수를 매번 불러오면 과부하가 걸리기 때문에 useMemo를 이용하는 게 좋습니다.
이제 아래 그림처럼 범위만 선택해도 인라인 툴바가 뜹니다.
위 그림에서는 인라인툴바에 이탤릭체, 볼드체, 언더라인 그리고 마지막으로 코드블록 스타일이 있네요.
이게 기본 인라인 툴바 세팅인데요.
사용자가 지정할 수 도 있습니다.
일단 아래와 같이 필요한 객체를 불러옵시다.
import createInlineToolbarPlugin, {
  Separator,
} from '@draft-js-plugins/inline-toolbar'

import {
  ItalicButton,
  BoldButton,
  UnderlineButton,
  HeadlineOneButton,
  HeadlineTwoButton,
  HeadlineThreeButton,
} from '@draft-js-plugins/buttons'
그리고 Editor와 InlineToolbar 부분을 아래와 같이 바꾸면 됩니다.
<Editor
  editorState={editorState}
  onChange={setEditorState}
  placeholder="여기에 입력하십시요..."
  plugins={plugins}
/>
<InlineToolbar>
  {(externalProps) => (
    <>
      <ItalicButton {...externalProps} />
      <BoldButton {...externalProps} />
      <UnderlineButton {...externalProps} />
      <Separator {...externalProps} />
      <HeadlineOneButton {...externalProps} />
      <HeadlineTwoButton {...externalProps} />
      <HeadlineThreeButton {...externalProps} />
    </>
  )}
</InlineToolbar>
실행 결과를 볼까요?
위와 같이 H1, H2, H3 태그로 변경하는 것도 추가가 되었네요.
“@draft-js-plugins/buttons” 중에 ‘CodeBlockButton’도 있으니까 직접 테스트해 보십시오.
인라인툴바는 기본적으로 HTTP 앵커 <a> 태그를 지원하지 않는데요.
anchor 플러그인을 설치해야 합니다.
npm install @draft-js-plugins/anchor그리고 코드에서 아래와 같이 anchor와 CSS를 불러오면 됩니다.
import createLinkPlugin from '@draft-js-plugins/anchor'
import '@draft-js-plugins/anchor/lib/plugin.css'
그리고 useMemo 훅 부분에 anchor 플러그인을 적용하면 됩니다.
const [plugins, InlineToolbar, LinkButton] = useMemo(() => {
  const linkPlugin = createLinkPlugin()
  const inlineToolbarPlugin = createInlineToolbarPlugin()
  return [
    [inlineToolbarPlugin, linkPlugin],
    inlineToolbarPlugin.InlineToolbar,
    linkPlugin.LinkButton,
  ]
}, [])
useMemo 에서 리턴하는 거에 LinkButton이 추가되었네요.
이걸 UI 부분에는 아래와 같이 넣어주면 됩니다.
<InlineToolbar>
  {externalProps => (
    <>
      <ItalicButton {...externalProps} />
      <BoldButton {...externalProps} />
      <UnderlineButton {...externalProps} />
      <Separator {...externalProps} />
      <HeadlineOneButton {...externalProps} />
      <HeadlineTwoButton {...externalProps} />
      <HeadlineThreeButton {...externalProps} />
      <LinkButton {...externalProps} />
    </>
  )}
</InlineToolbar>
이제 테스트를 위해 아래처럼 해볼까요?
위와 같이 인라인 툴바 부분에 마지막에 앵커 링크 버튼이 보입니다.
그리고 아래처럼 URL을 넣으라고 나오네요.
일단 테스트를 위해 아래와 같이 주소창에 제 블로그 주소를 넣었습니다.
마지막으로 엔터키를 치면 아래와 같이 나오는데요.
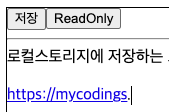
여기서 우리가 링크로 지정한 부분을 클릭하면 앵커태그가 작동해서 원하는 주소로 이동해야 하는데요.
실제로는 작동하지 않습니다.
왜냐하면 현재 Editor는 편집상태이기 때문이죠.
Editor 컴포넌트의 readOnly Props를 true로 설정하면 앵커태그가 작동합니다.
<Editor
  editorState={editorState}
  onChange={setEditorState}
  placeholder='여기에 입력하십시요...'
  plugins={plugins}
  readOnly={true}
/>
그렇다고 위와 같이 코드를 변경하면 브라우저는 새로고침되고, Editor는 편집이 불가해지는데요.
이 부분도 ‘저장’버튼 같은 걸로 버튼을 추가해 보겠습니다.
const [readonly, setReadOnly] = useState(false);

...
...
...

<button onClick={() => setReadOnly(true)}>ReadOnly</button>

...
...
...

<Editor
  editorState={editorState}
  onChange={onChange}
  plugins={plugins}
  readOnly={readonly}
/>
각각의 코드는 어디에 위치하는지 아시겠죠.
이제 ReadOnly 버튼을 누르고 나면 아래 그림처럼 링크를 클릭할 수 있게 됩니다.
참고로, 앵커 태그의 placeholder 세팅은 아래와 같이 하면 됩니다.
const linkPlugin = createLinkPlugin({ placeholder: 'http://...' })요즘 웹 페이지는 다크 모드를 지원해 주는데요.
그래서 이런 테마 적용은 요즘 웹페이지 제작에서 가장 기본이 됩니다.
그러면 Draft.js에서 테마 설정하는 방법을 알아봅시다.
우리가 CSS 파일로 불러온 게 바로 @draft-js-plugins/inline-toolbar/lib/plugin.css 파일인데요.
이 파일을 실제 ’node_modules’ 폴더에서 찾아볼까요?
위 그림과 같이 나오는데요.
코드를 Prettier로 깔끔하게 다시 정렬해 보면 아래와 같이 나옵니다.
.bpsgbes {
  display: inline-block;
}
.b181v2oy {
  background: #fbfbfb;
  color: #888;
  font-size: 18px;
  border: 0;
  padding-top: 5px;
  vertical-align: bottom;
  height: 34px;
  width: 36px;
}
.b181v2oy:hover,
.b181v2oy:focus {
  background: #f3f3f3;
  outline: 0;
}
.b181v2oy svg {
  fill: #888;
}
.a9immln {
  background: #efefef;
  color: #444;
}
.a9immln svg {
  fill: #444;
}
.tukdd6b {
  left: 50%;
  -webkit-transform: translate(-50%) scale(0);
  -ms-transform: translate(-50%) scale(0);
  transform: translate(-50%) scale(0);
  position: absolute;
  border: 1px solid #ddd;
  background: #fff;
  border-radius: 2px;
  box-shadow: 0px 1px 3px 0px rgba(220, 220, 220, 1);
  z-index: 2;
  box-sizing: border-box;
}
.tukdd6b:after,
.tukdd6b:before {
  top: 100%;
  left: 50%;
  border: solid transparent;
  content: ' ';
  height: 0;
  width: 0;
  position: absolute;
  pointer-events: none;
}
.tukdd6b:after {
  border-color: rgba(255, 255, 255, 0);
  border-top-color: #fff;
  border-width: 4px;
  margin-left: -4px;
}
.tukdd6b:before {
  border-color: rgba(221, 221, 221, 0);
  border-top-color: #ddd;
  border-width: 6px;
  margin-left: -6px;
}
.s1o2cezu {
  display: inline-block;
  border-right: 1px solid #ddd;
  height: 24px;
  margin: 0 0.5em;
}
이제 전체 CSS 파일을 복사해서 우리의 React 앱에 있던 App.css 파일에 복사해서 붙여 넣어주십시오.
그리고 import 문구에서
import "@draft-js-plugins/inline-toolbar/lib/plugin.css"; 문구를 지우고
import "../App.css";
위와 같이 App.css 파일을 import 하시면 됩니다.
다시 브라우저에서 테스트해 보면 실제 변한 게 없는데요.
plugin.css 파일 그대로 가져왔기 때문입니다.
이제 테마를 변경해 볼까요?
b181v2oy 클래스가 핵심입니다.
이제 이 b181v2oy 클래스에서 background를 바꿔 보겠습니다.
.b181v2oy {
  background: black; // 원래는 #fbfbfb 입니다.
  color: #888;
  font-size: 18px;
  border: 0;
  padding-top: 5px;
  vertical-align: bottom;
  height: 34px;
  width: 36px;
}
이제 테스트해 볼까요?
위 그림과 같이 배경색이 블랙으로 바뀐 게 보일 겁니다.
결론적으로 Draft.js에서는 이런 식으로 테마를 수정할 수 있는데요.
실제로는 테마 설정할 수 있는 코드를 제공해 줍니다.
App.css에 원하는 CSS 클래스를 만들고 해당 CSS 클래스를 지정하면 됩니다.
const [plugins, InlineToolbar, LinkButton] = useMemo(() => {
  const linkPlugin = createLinkPlugin({ placeholder: 'http://...' })
  const inlineToolbarPlugin = createInlineToolbarPlugin({
    theme: {
      toolbarStyles: {
        toolbar: 'inline-toolbar',
      },
      buttonStyles: {
        button: 'inline-toolbar-button',
        buttonWrapper: 'inline-toolbar-button-wrapper',
        active: 'inline-toolbar-button-active',
      },
    },
  })
  return [
    [inlineToolbarPlugin, linkPlugin],
    inlineToolbarPlugin.InlineToolbar,
    linkPlugin.LinkButton,
  ]
}, [])
위 코드에서 보시면 theme 부분에 toolbarStyles 부분에 있는 ’toolbar’에 있는 ‘inline-toolbar’는 CSS 클래스입니다.
그리고 buttonStyles에 있는 각각의 항목인 ‘button’, ‘buttonWrapper’, ‘active’ 부분도 CSS 클래스입니다.
CSS 클래스는 원하는 이름으로 작성한 다음 위와 같이 코드에 추가하면 되는 거죠.
한번 테스트해 보십시오.
링크 버튼에 유용한 플러그인으로 linkify 플러그인이 있습니다
일단 설치해 볼까요?
npm install @draft-js-plugins/linkify그리고 useMemo 부분에 linkify 부분을 추가하시면 됩니다.
const [plugins, InlineToolbar, LinkButton] = useMemo(() => {
  const linkPlugin = createLinkPlugin({ placeholder: 'https://...' })
  const imagePlugin = createImagePlugin()
  const linkifyPlugin = createLinkifyPlugin()
  const inlineToolbarPlugin = createInlineToolbarPlugin()
  return [
    [inlineToolbarPlugin, linkPlugin, imagePlugin, linkifyPlugin],
    inlineToolbarPlugin.InlineToolbar,
    linkPlugin.LinkButton,
  ]
}, [])
이제 링크 버튼을 누르지 않고 그냥 텍스트 입력칸에 ‘https://‘라고 치면 linkify가 이게 웹 주소라고 인식해서 바로 링크 태그 즉, 앵커(a) 태그로 변환해 줍니다.
위 그림처럼 https로 시작하는 텍스트는 자동으로 링크 태그로 변환해 줍니다.
위지위그 에디터에는 이미지를 드롭하면 해당 이미지가 화면에 표시되는데요.
Draft.js에서는 플러그인으로 image 플러그인을 지원합니다.
일단 설치해 봅시다.
npm install @draft-js-plugins/image그리고 useMemo 훅 부분에 image 플러그인도 추가해 봅시다.
import createImagePlugin from '@draft-js-plugins/image'
import '@draft-js-plugins/image/lib/plugin.css'

const [plugins, InlineToolbar, LinkButton] = useMemo(() => {
  const linkPlugin = createLinkPlugin()
  const imagePlugin = createImagePlugin()
  const inlineToolbarPlugin = createInlineToolbarPlugin()
  return [
    [inlineToolbarPlugin, linkPlugin, imagePlugin],
    inlineToolbarPlugin.InlineToolbar,
    linkPlugin.LinkButton,
  ]
}, [])
위와 같이 createImagePlugin 패키지와 image 관련 CSS도 import 했습니다.
이제 코드를 변경해 볼까요?
Draft.js에서도 드래그 앤 드롭을 지원합니다.
<Editor
  editorState={editorState}
  onChange={onChange}
  plugins={plugins}
  readOnly={readonly}
  handleDroppedFiles={handleDroppedFiles}
/>
위와 같이 handleDroppedFiles props에 handleDroppedFiles 함수를 지정하고 handleDroppedFiles 함수만 작성하면 됩니다.
const handleDroppedFiles = (selection, files) => {
  console.log(files)
}
일단 위와 같이 해당 files을 콘솔 로그만 해보겠습니다.
이미지를 드래그 앤 드롭하면 위와 같이 브라우저 콘솔창에 보일 겁니다.
파일이름 사이즈, 타입 정보 등이 아주 자세히 보이네요.
그러면 실제 이 파일을 Editor에 보이게 해야 하는데요.
여기서 생각해 볼 문제가 있습니다.
바로 우리가 작성하는 곳은 로컬 디스크가 아니라 웹이 건든요.
그래서 웹에서는 이미지를 실제 DB 같은 곳에 저장해야 합니다.
아마존이나 구글 클라우드 서비스에서는 이미지 저장을 위한 클라우드 서비스를 제공하는데요.
이 부분은 오늘 주제에서 벗어 나는 코드라서 생략하고 일단 클라우드에 이미지를 저장하는 코드는 생략하겠습니다.
테스트를 위해 React 앱의 public 폴더에 넣어 두겠습니다.
public 폴더에 넣어두면 실제 서버상에 위치한 이미지처럼 보이기 때문입니다.
위와 같이 저장하고 브라우저에서 확인해 볼까요?
http://localhost:5173/twice_image.jpeg 로 가시면 됩니다.
이제 테스트로 돌아와서, handleDroppedFiles 함수에서 files를 처리해야 하는데요.
const handleDroppedFiles = (selection, files) => {
  console.log(files)
  // 이 부분에 클라우드에 실제 이미지를 저장하는 코드를 넣으시면 됩니다.
  // 여기서는 생략하겠습니다.
  // 여러분께서 직접 작성해 보십시요.
  insertImage('twice_image.jpeg')
}
위와 같이 insertImage 함수에 직접 파일이름을 넣었습니다.
원래는 클라우드나 DB에 저장된 이미지 주소겠지만 여기서는 생략한 겁니다.
const insertImage = url => {
  const contentState = editorState.getCurrentContent()
  const contentStateWithEntity = contentState.createEntity(
    'image',
    'IMMUTABLE',
    { src: url },
  )
  const entityKey = contentStateWithEntity.getLastCreatedEntityKey()
  const newEditorState = EditorState.set(editorState, {
    currentContent: contentStateWithEntity,
  })
  setEditorState(
    AtomicBlockUtils.insertAtomicBlock(newEditorState, entityKey, ' '),
  )
}
위와 같이 insertImage 함수를 작성하면 됩니다.
위와 같이 작성하고 아무 이미지를 Draft.js 에디터 안에 드래그 앤 드롭해 보면 아래 그림과 같이 트와이스 이미지가 나올 겁니다.
생각보다 트와이스 이미지가 너무 크네요.
아무 이미지를 넣어도 우리가 지정한 twice_image.jpeg 파일이 로드될 겁니다.
지금까지 코드를 너무 조각조각 보여줬는데요.
전체 코드를 보여드리겠습니다.
import { useState, useEffect, useMemo } from 'react'
import {
  EditorState,
  convertToRaw,
  convertFromRaw,
  AtomicBlockUtils,
} from 'draft-js'
import Editor from '@draft-js-plugins/editor'
import createInlineToolbarPlugin, {
  Separator,
} from '@draft-js-plugins/inline-toolbar'
import '@draft-js-plugins/inline-toolbar/lib/plugin.css'
import createLinkifyPlugin from '@draft-js-plugins/linkify'
import createImagePlugin from '@draft-js-plugins/image'
import '@draft-js-plugins/image/lib/plugin.css'

import {
  ItalicButton,
  BoldButton,
  UnderlineButton,
  HeadlineOneButton,
  HeadlineTwoButton,
  HeadlineThreeButton,
} from '@draft-js-plugins/buttons'

import createLinkPlugin from '@draft-js-plugins/anchor'
import '@draft-js-plugins/anchor/lib/plugin.css'

function DraftEditor() {
  const [plugins, InlineToolbar, LinkButton] = useMemo(() => {
    const linkPlugin = createLinkPlugin({ placeholder: 'https://...' })
    const imagePlugin = createImagePlugin()
    const linkifyPlugin = createLinkifyPlugin()
    const inlineToolbarPlugin = createInlineToolbarPlugin()
    return [
      [inlineToolbarPlugin, linkPlugin, imagePlugin, linkifyPlugin],
      inlineToolbarPlugin.InlineToolbar,
      linkPlugin.LinkButton,
    ]
  }, [])

  const [editorState, setEditorState] = useState(() =>
    EditorState.createEmpty(),
  )

  useEffect(() => {
    const raw = localStorage.getItem('my-draft')
    if (raw) {
      const contentState = convertFromRaw(JSON.parse(raw))
      const newEditorState = EditorState.createWithContent(contentState)
      setEditorState(newEditorState)
    }
  }, [])

  const [readonly, setReadOnly] = useState(false)

  const saveContent = () => {
    const contentState = editorState.getCurrentContent()
    const raw = convertToRaw(contentState)
    localStorage.setItem('my-draft', JSON.stringify(raw, null, 2))
  }

  const handleDroppedFiles = (selection, files) => {
    console.log(files)
    // 이 부분에 클라우드에 실제 이미지를 저장하는 코드를 넣으시면 됩니다.
    // 여기서는 생략하겠습니다.
    // 여러분께서 직접 작성해 보십시요.
    insertImage('twice_image.jpeg')
  }

  const insertImage = url => {
    const contentState = editorState.getCurrentContent()
    const contentStateWithEntity = contentState.createEntity(
      'image',
      'IMMUTABLE',
      { src: url },
    )
    const entityKey = contentStateWithEntity.getLastCreatedEntityKey()
    const newEditorState = EditorState.set(editorState, {
      currentContent: contentStateWithEntity,
    })
    setEditorState(
      AtomicBlockUtils.insertAtomicBlock(newEditorState, entityKey, ' '),
    )
  }

  return (
    <div>
      {!readonly && <button onClick={saveContent}>저장</button>}
      {readonly ? (
        <button onClick={() => setReadOnly(false)}>Edit</button>
      ) : (
        <button onClick={() => setReadOnly(true)}>ReadOnly</button>
      )}
      <hr />
      <Editor
        editorState={editorState}
        onChange={setEditorState}
        placeholder='여기에 입력하십시요...'
        plugins={plugins}
        readOnly={readonly}
        handleDroppedFiles={handleDroppedFiles}
      />
      <InlineToolbar>
        {externalProps => (
          <>
            <ItalicButton {...externalProps} />
            <BoldButton {...externalProps} />
            <UnderlineButton {...externalProps} />
            <Separator {...externalProps} />
            <HeadlineOneButton {...externalProps} />
            <HeadlineTwoButton {...externalProps} />
            <HeadlineThreeButton {...externalProps} />
            <LinkButton {...externalProps} />
          </>
        )}
      </InlineToolbar>
    </div>
  )
}
export default DraftEditor지금까지 Draft.js의 많은 기능을 이용해서 에디터를 꾸며 봤는데요.
처음에 잠깐 얘기했던 Block, EntityMap에 대해 자세히 한번 이해하고 넘어가 보겠습니다.
처음에 convertToRaw 함수를 이용해서 콘솔 로그한 자료를 다시 보겠습니다.
위와 같이 콘솔 로그창에 나오는 정보로 볼 때 Block는 우리가 입력한 텍스트의 각 행입니다.
그런데 EntityMap 부분에는 아무 정보도 없는데요.
그러면 이미지를 드래그 앤 드롭해서 넣어 볼까요?
이미지를 넣고 다시 ‘저장’ 버튼을 눌렀을 때의 콘솔창 입니다.
위와 같이 EntityMap이 배열됐네요.
그리고 첫 번째 즉 ‘0’ 부분이 나오는데요.
type이 ‘image’입니다.
즉, Block 부분은 텍스트 관련 부분이고,
EntityMap은 텍스트 외에 이미지나 링크(a 태그) 관련 정보를 저장하는 객체인 거죠.
위 그림처럼 LINK 부분도 EntityMap 부분에서 관리하는 걸 알 수 있습니다.
Draft.js는 Block에 대해 제어하는 코드를 제공해 주는데요.
심지어 우리가 아까 설치한 이미지 플러그인을 직접 구현할 수 있는 로직도 제공해 줍니다.
Editor 컴포넌트에 blockRendererFn props를 넣어주면 되는데요.
일단 image 플러그인을 삭제합시다.
npm uninstall @draft-js-plugins/imageuseMemo 쪽도 아래와 같이 image 부분은 주석 처리합시다.
const [plugins, InlineToolbar, LinkButton] = useMemo(() => {
  const linkPlugin = createLinkPlugin({ placeholder: 'https://...' })
  // const imagePlugin = createImagePlugin();
  const linkifyPlugin = createLinkifyPlugin()
  const inlineToolbarPlugin = createInlineToolbarPlugin()
  return [
    //   [inlineToolbarPlugin, linkPlugin, imagePlugin, linkifyPlugin],
    [inlineToolbarPlugin, linkPlugin, linkifyPlugin],
    inlineToolbarPlugin.InlineToolbar,
    linkPlugin.LinkButton,
  ]
}, [])
이제 Editor 부분에 blockRendererFn Props를 전달하면 됩니다.
<Editor
  editorState={editorState}
  onChange={setEditorState}
  placeholder='여기에 입력하십시요...'
  plugins={plugins}
  readOnly={readonly}
  handleDroppedFiles={handleDroppedFiles}
  blockRendererFn={blockRenderer}
/>
그리고 blockRenderer 함수는 아래와 같이 만듭시다.
const blockRenderer = contentBlock => {
  console.log(contentBlock)

  return null
}
이제 테스트를 위한 준비가 다 끝났네요.
다시 이미지를 드래그 앤 드롭해 볼까요?
콘솔창에는 아래와 같이 ContentBlock2 객체가 계속 표시되고 있습니다.
이제 blockRenderer 함수를 확장해 볼까요?
우리까 아가 Block에 type 부분이 있다고 한 걸 배웠는데요.
const blockRenderer = contentBlock => {
  if (contentBlock.getType() === 'atomic') {
    console.log(contentBlock)
  }
  return null
}
위와 같이 getType 함수를 사용하여 ‘atomic’ 타입만 걸러낼 수 있습니다.
그리고 다시 return 부분을 아래와 같이 고칠 수 있는데요.
const blockRenderer = contentBlock => {
  if (contentBlock.getType() === 'atomic') {
    return {
      component: CustomImageComponent,
      editable: false,
    }
  }
}
여기서 CustomImageComponent는 리액트 컴포넌트입니다.
const CustomImageComponent = () => {
  return <div>그림</div>
}

const blockRenderer = contentBlock => {
  if (contentBlock.getType() === 'atomic') {
    return {
      component: CustomImageComponent,
      editable: false,
    }
  }
}
위 코드처럼 작성하면 됩니다.
이제 다시 브라우저를 새로고침하고 이미지를 드래그 앤 드롭 해볼까요?
아래 그림과 같이 이미지가 위치하는 곳에 CustomImageComponent 가 보일 겁니다.
아래 그림에서는 ‘그림’이라는 글자가 위치한 곳이 바로 CustomImageComponent가 위치하는 곳입니다.
의도한 데로 작동하고 있네요.
코드를 더 확장해 보겠습니다.
그러면 실제 이미지를 출력하려면 어떻게 해야 할까요?
바로 아래처럼 ‘src’ 부분을 취득하면 되는 거죠.
const CustomImageComponent = () => {
  return <img src={src} />
}
그러면 ‘src’ 부분을 취득하는 방법에 대해 알아봅시다.
const blockRenderer = (contentBlock, _ref) => {
  const getEditorState = _ref.getEditorState

  if (contentBlock.getType() === 'atomic') {
    const contentState = getEditorState().getCurrentContent()
    const entity = contentBlock.getEntityAt(0)
    if (!entity) return null
    const type = contentState.getEntity(entity).getType()
    if (type === 'image' || type === 'IMAGE') {
      return {
        component: ImageComponent,
        editable: false,
      }
    }
  }

  return null
}
위와 같이 blockRenderer 함수의 두 번째 인자로 _ref를 전달하고 해당 editorState를 얻어오면 됩니다.
그리고 CustomImageComponent 는 다음과 같이 고치면 되죠.
const CustomImageComponent = ({ block, contentState }) => {
  const data = contentState.getEntity(block.getEntityAt(0)).getData()
  return <img src={data.src} alt={data.src} />
}
CustomImageComponent로 전달되는 기본 Props의 데이터는 Block 정보입니다.
그래서 CustomImageComponent 컴포넌트에서 block와 contentState 정보를 객체 디스트럭쳐링해서 가져오면 됩니다.
테스트해 보면 이미지가 브라우저에 보일 겁니다.
지금까지 Draft.js에 대해 여러 가지를 알아봤는데요.
정말 기능이 많고 사용자가 원하는 방향으로 커스터마이징할 수 있는 강력한 에디터인 거는 틀림없네요.
그럼.