뉴 자바스크립트 런타임 Bun 맛보기
December 18, 20239 minutes
안녕하세요?
오늘은 예전부터 한 번쯤 공부해 보고 싶었던 Bun 런타임에 대해 알아보겠습니다.
Nodejs가 유명한 게 자바스크립트 런타임으로써 서버 사이드에서 실행할 수 있어 인기를 끌었었는데요.
프런트엔드에서 사용하던 자바스크립트로 백엔드 코드를 작성할 수 있어, 개발자 입장에서는 한 가지 언어만으로 풀스택 개발을 할 수 있어 초창기 매우 큰 인기를 끌었습니다.
Nodejs는 크로미움의 V8 자바스크립트 엔진을 이용했고, 반면에 Bun은 WebKit에서 사용하는 JavascriptCore 엔진을 이용하고 있습니다.
Nodejs는 C++로 작성했고, Bun은 Zig라는 Rust보다 더 까다로운 메모리 관리 제약이 따르는 언어로 만들었습니다.
그래서인지 Zig로 만들어서 엄청나게 메모리 효율적인데요. 그래서 엄청 빠릅니다.
패키지 인스톨 시 체감이 안 될 정도로 빠른데요.
Bun은 런타임만이 아니라, 패키지 매니저, 번들러, 테스트 러너 등 All-in-one 기능을 갖춘 만능 런타임입니다.
그리고 Typescript가 자체 내장되어 있어 Nodejs에서 Typescript를 Javascript로 컴파일할 필요가 없습니다.
그럼, 맛보기로써 Bun에 대해 쭉 살펴보겠습니다.
** 목 차 **
1.1 업그레이드
1. 설치
Bun을 맥OS에서 설치하는 방법은 curl, npm, Hombrew 등이 있지만 curl을 이용하겠습니다.
curl -fsSL https://bun.sh/install | bash
######################################################################## 100.0%
bun was installed successfully to ~/.bun/bin/bun

Added "~/.bun/bin" to $PATH in "~/.zshrc"

To get started, run:

  exec /bin/zsh
  bun --help
터미널 창을 끄고 다시 실행해서 bun이라고 치면 아래와 같이 나옵니다.
bun
Bun is a fast JavaScript runtime, package manager, bundler, and test runner. (1.0.18 (36c316a2))

Usage: bun <command> [...flags] [...args]

Commands:
  run       ./my-script.ts       Execute a file with Bun
            lint                 Run a package.json script
  test                           Run unit tests with Bun
  x         next                 Execute a package binary (CLI), installing if needed (bunx)
  repl                           Start a REPL session with Bun

  install                        Install dependencies for a package.json (bun i)
  add       next-app             Add a dependency to package.json (bun a)
  remove    @remix-run/dev       Remove a dependency from package.json (bun rm)
  update    is-array             Update outdated dependencies
  link      [<package>]          Register or link a local npm package
  unlink                         Unregister a local npm package
  pm <subcommand>                Additional package management utilities

  build     ./a.ts ./b.jsx       Bundle TypeScript & JavaScript into a single file

  init                           Start an empty Bun project from a blank template
  create    @evan/duckdb         Create a new project from a template (bun c)
  upgrade                        Upgrade to latest version of Bun.
  <command> --help               Print help text for command.

Learn more about Bun:            https://bun.sh/docs
Join our Discord community:      https://bun.sh/discord
1.1 업그레이드
한번 Bun을 설치했으면 업그레이드는 다음과 같이 쉽게 할 수 있습니다.
bun upgrade
Congrats! You're already on the latest version of Bun (which is v1.0.18)
2. 프로젝트 만들기
Bun으로 새로운 프로젝트를 만드는 방법은 NPM처럼 init 명령어를 사용합니다.
참고로 create 명령어는 템플릿을 이용한 프로젝트 만들기에 쓰입니다.
mkdir bun-test

cd bun-test

bun init

bun init helps you get started with a minimal project and tries to guess sensible defaults. Press ^C anytime to quit

package name (blog): bun-test
entry point (index.ts):

Done! A package.json file was saved in the current directory.
 + index.ts
 + .gitignore
 + tsconfig.json (for editor auto-complete)
 + README.md

To get started, run:
  bun run index.ts
꼭 빈폴더를 만들고 ‘bun init’ 명령어를 입력하십시오.
bun-test tree -L 1
.
├── README.md
├── bun.lockb
├── index.ts
├── node_modules
├── package.json
└── tsconfig.json

2 directories, 5 files
기본적으로 타입스크립트를 지원하기 때문에 index.ts파일이 제공됩니다.
NPM init 명령으로 작성하면 나오는 프로젝트 폴더와 구조가 비슷합니다.
참고로 ‘bun init -y’로 실행하면 대화형 질문 없이 프로젝트를 만들 수 있습니다.
3. Bun 작동 테스트
index.ts 파일에 다음코드를 넣고 bun으로 실행시켜 보겠습니다.
console.log('Hello from Bun!')Bun은 run 명령어로 실행합니다.
bun run index.ts
Hello from Bun!
ts 확장자도 아무런 문제 없이 실행시키고 있네요.
타입스크립트가 제대로 작동하는지 코드를 좀 더 확장해 볼까요?
const hello = (message: string) => {
  console.log(message)
}

hello('Hello')
위와 같이 message에 타입을 추가했습니다.
실행결과를 볼까요?
bun run index.ts
Hello
완벽하게 타입스크립트를 지원하네요.
Nodejs에는 nodemon이라는 패키지가 있는데요.
Bun은 ‘–watch’ 옵션이 있습니다.
bun --watch index.ts위와 같이 Bun은 파일 업데이트 감지기능을 제공합니다.
4. HTTP 서버 만들기
Bun으로 간단한 HTTP 서버를 만들 수 있습니다.
Bun.serve({
  port: 3000,

  fetch(request) {
    return new Response('Bun HTTP Get Request')
  },
})
HTTP 서버를 위해 Bun은 serve라는 함수를 제공하는데요.
serve 함수는 port 지정, 그리고 핸들러를 지정할 수 있습니다.
위에서는 fetch 핸들러이고, error 핸들러도 지정할 수 있습니다.
일단 실행 결과를 볼까요?
bun run index.ts위와 같이 실행하면 아무것도 표시되지 않는데요.
브라우저에서 확인해 볼까요?
위와 같이 아까 작성한 코드가 제대로 작동하고 있습니다.
코드를 조금 더 손 봐서 터미널창에 뭔가가 나오게 바꿔 보겠습니다.
const server = Bun.serve({
  port: 3000,

  fetch(request) {
    return new Response('Bun HTTP Get Request')
  },
})

console.log(`Server running ${server.port}`)
Bun.serve 함수는 Bun 서버를 리턴하는데요.
위와 같이 server라는 Bun 서버의 port를 이용해서 콘솔 창에 표시했습니다.
bun run index.ts
Server running 3000
브라우저에서도 똑같이 나타날 겁니다.
이번에는 라우팅 주소를 ‘/test’로 들어가 볼까요?
위와 같이 똑같이 나오네요.
우리의 HTTP 서버를 조금 확장해 보겠습니다.
const server = Bun.serve({
  port: 3000,

  fetch(request) {
    const url = new URL(request.url)

    if (url.pathname === '/') return new Response('Home')

    if (url.pathname === '/test') return new Response('Test')

    return new Response('404!')
  },
})

console.log(`Server running ${server.port}`)
위와 같이 request.url을 이용해서 강제로 라우팅을 처리하는 코드를 작성했습니다.
실행 결과를 볼까요?
위와 같이 라우팅 ‘/test’가 제대로 작동하네요.
이번에는 오류를 처리하는 코드를 넣어볼까요?
아까 ‘/test’ 라우팅일 때 강제로 Error 객체를 리턴하게끔 코드를 아래와 같이 바꾸겠습니다.
if (url.pathname === '/test') throw new Error('Error')테스트를 위해 브라우저에서 ‘/test’ 라우팅 주소로 이동해 봅시다.
위와 같이 Bun에서 제공해 주는 에러페이지가 나옵니다.
그리고 콘솔창에는 아래와 같이 나오고요.
bun run index.ts
Server running 3000
4 |   fetch(request) {
5 |     const url = new URL(request.url);
6 |
7 |     if(url.pathname === '/') return new Response("Home");
8 |
9 |     if(url.pathname === '/test') throw new Error('Error');
                                           ^
error: Error
      at fetch (/Users/cpro95/Codings/Javascript/blog/bun-test/index.ts:9:40)
GET - /test failed
이제 커스텀 에러 페이지를 만들어 볼까요?
아까 Bun.serve 함수에서 fetch 부분이 핸들러라고 했었는데요.
error라는 이름의 핸들러를 추가하겠습니다.
const server = Bun.serve({
  port: 3000,

  fetch(request) {
    const url = new URL(request.url)

    if (url.pathname === '/') return new Response('Home')

    if (url.pathname === '/test') throw new Error('Error')

    return new Response('404!')
  },

  error(error) {
    return new Response(`<pre>${error}\n${error.stack}</pre>`, {
      headers: {
        'Content-Type': 'text/html',
      },
    })
  },
})

console.log(`Server running ${server.port}`)
실행결과를 볼까요?
위와 같이 커스텀 에러메시지가 나타나네요.
5. Express로 서버 만들기
Nodejs에서 유명한 Express도 Bun에서도 사용할 수 있는데요.
npm install 처럼 bun install 해서 패키지를 추가할 수 있습니다.
bun add 명령어도 가능합니다.
bun install express
bun add v1.0.18 (36c316a2)

 installed express@4.18.2


 62 packages installed [356.00ms]
진짜 눈 깜짝할 사이에 설치가 완료됐습니다.
타입스크립트 작성을 위한 express type 정보를 추가하겠습니다.
‘–dev’ 옵션을 주면 됩니다.
bun install --dev @types/express
bun add v1.0.18 (36c316a2)

 installed @types/express@4.17.21


 13 packages installed [366.00ms]
package.json 파일 내용을 볼까요?
{
  "name": "bun-test",
  "module": "index.ts",
  "type": "module",
  "devDependencies": {
    "@types/express": "^4.17.21",
    "bun-types": "latest"
  },
  "peerDependencies": {
    "typescript": "^5.0.0"
  },
  "dependencies": {
    "express": "^4.18.2"
  }
}
dependencies 형식으로 express 패키지가 제대로 설치되었네요.
이제 express 서버를 만들어 보겠습니다.
index.ts 파일을 아래와 같이 수정해 볼까요?
import express from 'express'

const app = express()

const port = 3000

app.get('/', (req, res) => res.send('Hello from express'))

app.listen(port, () => console.log(`server running ${port}`))
실행해 보면 아래와 같이 나오고 브라우저에서도 아래와 같이 나옵니다.
bun run index.ts
server running 3000
위와 같이 제대로 나옵니다.
위에서는 import 문을 사용했지만 Bun은 require 문도 사용할 수 있습니다.
즉, Bun은 ES Modules와 CommonJS Modules 모두를 지원합니다.
// import express from 'express';
const express = require('express')
6. 환경 변수 설정
Nodejs에서 환경 변수는 dotenv 라이브러리를 사용했는데요.
Bun은 자체 지원합니다.
그냥 ‘.env’ 파일만 만들면 됩니다.
아래처럼 ‘.env’ 파일을 만듭시다.
PORT=3000그리고 사용하는 방법은 Nodejs와 비슷한 방법이 있고, Bun 만의 방식이 있습니다.
const port = process.env.PORT또는
const port = Bun.env.PORT즉, process.env 이외에도 Bun.env 방식을 사용할 수 있습니다.
7. 파일 입출력
Bun에서 파일에 글을 써볼까요?
const message = 'Hello World'

await Bun.write('test.txt', message)
Bun 자체적으로 write 함수를 제공해 줍니다.
심지어 Nodejs의 핵심 API인 fs 모듈도 지원합니다.
import fs from 'fs'

const content = 'Hello World by fs Modules'

fs.writeFile('test2.txt', content, err => {
  if (err) {
    console.error(err)
  }
})
그러면 파일에서 읽어오는 걸 해볼까요?
const file = Bun.file('text.txt')

const message = await file.text()

console.log(message)
Bun.file 함수와 그리고 file.text() 함수를 await 방식으로 사용하면 됩니다.
Bun 런타임이 자체적으로 async 방식이기 때문에 await를 붙이기만 하면 됩니다.
그리고 Bun.file이 돌려주는 Bunfile 인스턴스에도 유용한 정보가 있는데요.
import { BunFile } from 'bun';

const file = Bun.file('test.txt') as BunFile;

console.log(await file.exists());
console.log(file.type);
console.log(file.name);

// Result
true
text/plain;charset=utf-8
text.txt
따라서 Bun은 자체 API 뿐만 아니라 Nodejs의 핵심 API도 제공해 줍니다.
8. Sqlite3
Bun에서는 Sqlite3도 자체 지원해 주는데요.
아래와 같이 테스트해봅시다.
import { Database } from 'bun:sqlite'

const db = new Database('mydb.sqlite', { create: true })

db.run(
  `CREATE TABLE IF NOT EXISTS users (id Integer Primary Key Autoincrement, name Text, email Text Unique)`,
)

const insertUser = db.prepare('INSERT INTO users (name, email) VALUES (?, ?)')
insertUser.run('John Doe', 'john@example.com')

const getUsers = db.prepare('SELECT * from users')

console.log(getUsers.all())
사용방법은 예전에 올렸던 Drizzle ORM 방식과 비슷합니다.
테스트 결과를 볼까요?
bun run index.ts
[
  {
    id: 1,
    name: "John Doe",
    email: "john@example.com",
  }
]
Sqlite3도 아주 잘 작동하네요.
9. React 사용 및 빌드
React 라이브러리를 사용할 수도 있습니다.
Bun은 자체 번들러도 포함하고 있어 webpack, esbuild 같은 패키지를 따로 설치할 필요가 없습니다.
일단 React를 위해 react와 react-dom을 추가하겠습니다.
bun install react react-dom
bun add v1.0.18 (36c316a2)

 installed react@18.2.0
 installed react-dom@18.2.0


 5 packages installed [244.00ms]
설치 시간은 정말 빠르네요.
타입스크립트를 사용하기 때문에 react, react-dom의 타입 정보도 인스톨하겠습니다.
bun install --dev @types/react @types/react-dom
bun add v1.0.18 (36c316a2)

 installed @types/react@18.2.45
 installed @types/react-dom@18.2.18


 5 packages installed [174.00ms]
역시나 정말 빠릅니다.
이제 React 코드 작성을 위해 index.tsx 파일과 App.tsx 파일을 만들겠습니다.
먼저, index.tsx 파일입니다.
import ReactDOM from 'react-dom/client'
import App from './App'

ReactDOM.createRoot(document.getElementById('root')).render(<App />)
그리고 App.jsx 파일입니다.
import { useEffect } from 'react'

const App = () => {
  useEffect(() => {
    console.log('test')
  }, [])

  return <h1>Hello World</h1>
}

export default App
이제 실행을 위해 bun build 명령을 실행해 볼까요?
bun build ./index.tsx --outdir ./out

  ./index.js  962.17 KB

[119ms] bundle 11 modules
성공적으로 빌드되고 out 폴더 밑에 index.js 파일이 빌드가 되었네요.
이제 엔트리 포인트인 index.html 파일을 만들겠습니다.
<!DOCTYPE html>
<html lang="ja">
  <head>
    <meta charset="utf-8" />
    <title>React App</title>
    <script type="module" src="./out/index.js" defer></script>
  </head>
  <body>
    <noscript>You need to enable JavaScript to run this app.</noscript>
    <div id="root"></div>
  </body>
</html>
이제 로컬 파일을 HTTP Serving 하기 위해 아래와 같이 ‘bunx serve’라고 입력하면 됩니다.
bunx는 npx 같은 거라 보시면 됩니다.
물론 ‘serve’라는 패키지를 이용해도 됩니다.
bunx serve

   ┌────────────────────────────────────────────┐
   │                                            │
   │   Serving!                                 │
   │                                            │
   │   - Local:    http://localhost:3000        │
   │   - Network:  http://192.168.29.145:3000   │
   │                                            │
   │   Copied local address to clipboard!       │
   │                                            │
   └────────────────────────────────────────────┘
실행결과를 볼까요?
위와 같이 React 코드가 정상적으로 작동하네요.
9.1 bun create 명령어로 React 템플릿 작성
bun은 create 명령어를 지원한다고 처음에 말했었는데요.
아래 명령은 CREATE-REACT-APP을 이용한 방식이고요.
bun create react-app아래 명령은 Vite를 이용해서 React 템플릿을 만드는 방식입니다.
bun create vite당연히 Vite를 이용해야겠죠.
bun create vite
✔ Project name: … bun-react
✔ Select a framework: › React
✔ Select a variant: › TypeScript

Scaffolding project in /Users/cpro95/Codings/Javascript/blog/bun-test2/bun-react...

Done. Now run:

  cd bun-react
  bun install
  bun run dev
실제 bun install 해보고, dev 서버를 돌려보시면 작동되는 걸 볼 수 있을 겁니다.
10. 테스트
Bun은 Jest, Vitest 등의 추가 패키지 없이 자체적으로 테스트도 지원합니다.
아래처럼 math.test.ts 파일을 만듭니다.
import { expect, test } from 'bun:test'

test('2 + 3', () => {
  expect(2 + 3).toBe(5)
})
실제 테스트는 단순하게 ‘bun test’라고 하면 됩니다.
그러면 확장자가 ‘.test.ts’ 파일을 테스트하게 됩니다.
bun test
bun test v1.0.18 (36c316a2)

math.test.ts:
✓ 2 + 3 [0.84ms]

 1 pass
 0 fail
 1 expect() calls
Ran 1 tests across 1 files. [146.00ms]
어떤가요?
한 번쯤 Bun을 사용해서 서버를 만들고 싶지 않나요?
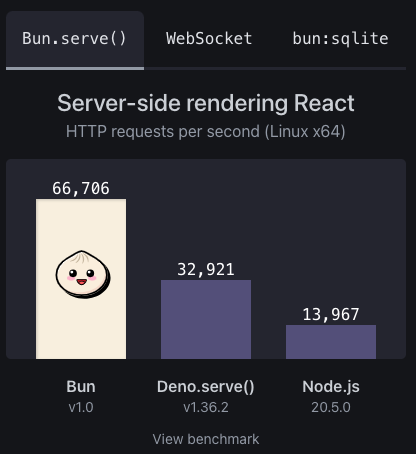
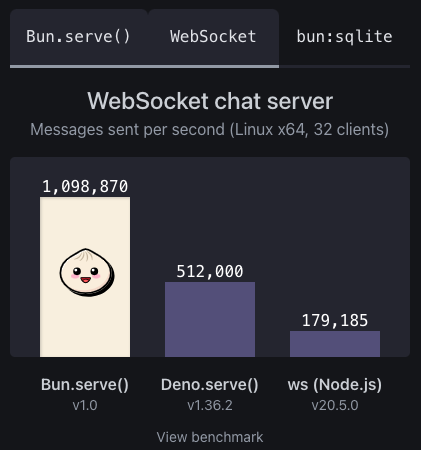
아래 그림은 Bun 홈페이지에 있는 Bun의 속도인데요.
정말 빠릅니다.
참고 바랍니다.


