Title here
Summary here
October 7, 202311 minutes
전체 astrojs 강좌 목록입니다.
** 목차 **
안녕하세요?
오늘은 제가 최근에 Next.js와 Remix Framework을 뒤로하고 가장 공을 들이고 있는 astrojs인데요.
먼저, astrojs를 설명한 홈페이지의 내용을 요약해 봤습니다.
“astrojs"는 최신 웹 개발 프로젝트를 위한 혁신적인 JavaScript 프레임워크로, 강력한 기능과 직관적인 문법을 결합하여 개발자들에게 탁월한 경험을 제공합니다. 다양한 특징들이 “astrojs"를 독특하게 만들어 냅니다.
성능 최적화: “astrojs"는 가벼운 런타임과 효율적인 렌더링 엔진을 통해 웹 페이지의 성능을 극대화합니다. 빠른 초기 로딩과 부드러운 사용자 경험을 지원하여 사용자들에게 최상의 성능을 제공합니다.
단순하고 직관적인 문법: 간결하면서도 효과적인 문법을 제공하여 개발자들이 코드를 빠르게 작성하고 이해할 수 있도록 합니다. “astrojs"는 생산성을 높이기 위해 노력하며, 간단한 구문으로 복잡한 작업을 수행할 수 있습니다.
모듈화와 컴포넌트 기반 개발: “astrojs"는 강력한 모듈 시스템과 컴포넌트 기반 아키텍처를 지원하여 코드를 구조화하고 재사용성을 극대화합니다. 이로써 대규모 애플리케이션의 개발과 유지보수가 용이해집니다.
진보적인 빌드 시스템: 현대적인 빌드 시스템을 적용하여 코드 번들링, 최적화, 자동화된 테스트, 그리고 배포를 간편하게 수행할 수 있습니다. “astrojs"는 개발자들이 생산적으로 작업할 수 있도록 도구와 환경을 향상 시킵니다.
생태계 지원: 다양한 플러그인과 확장 기능을 제공하여 “astrojs"를 다양한 프로젝트에 유연하게 적용할 수 있습니다. 풍부한 생태계는 더 많은 기능과 도구를 활용할 수 있게 합니다.
“astrojs"는 현대적인 웹 개발 요구에 부합하는 도구로, 새로운 프로젝트를 시작하거나 기존 프로젝트를 혁신하고자 하는 개발자들에게 새로운 차원의 경험을 제공합니다.
제가 써 본 결과 블로그 같은 컨텐츠 중심의 웹페이지 제작에 가장 좋은 자바스크립트 프레임워크 같습니다.
그리고, 기본적으로 자바스크립트를 최대한 자제하기 때문에 웹페이지 속도가 가장 빠른데요.
실제 그냥 HTML 파일로 컴파일해주기 때문에 그렇습니다.
Next.js의 SSG(Static Site Generation) 방식에서는 데이터를 다루는 자바스크립트 코드가 그대로 들어가 있는데요.
astrojs에서는 실제 자바스크립트 코드가 없고 순수 HTML 파일만 남습니다.
물론, React 컴포넌트나 Svelte, VueJS 등 여러 가지 Client UI 툴을 이용해서 Astro 페이지를 만들 수 있는데요.
이 때는 astrojs의 Islands 기법으로 자바스크립트를 특정 부분에만 로딩하는 방식입니다.
astrojs를 처음 실행해 보면 그냥 HTML 페이지를 작성하는 것 같은데요.
기본적인 사용법은 홈페이지를 보시면 쉽게 이해할 수 있을 겁니다.
오늘은 astrojs에서 데이터를 다루는 방법에 대해 알아볼 계획인데요.
테스트를 위해 astrojs 템플릿을 만들어야 하는데요.
다음과 같이 하면 쉽게 설정할 수 있습니다.
npm create astro@latest astro-test

cd astro-test

➜>  astro-test tree -L 1
.
├── README.md
├── astro.config.mjs
├── node_modules
├── package-lock.json
├── package.json
├── public
├── src
└── tsconfig.json

4 directories, 5 files
➜  astro-test cd src
➜>  src tree -L 2
.
├── env.d.ts
└── pages
    └── index.astro

2 directories, 2 files
astrojs 전체적인 구조는 위처럼 단순합니다.
그리고 src 폴더의 pages라는 폴더가 가장 중요한데요.
Next.js 12 버전의 pages 폴더의 역할과 같은 역할을 합니다.
astrojs는 폴더 + 파일 방식의 라우팅을 제공해 주는데요.
Remix V1과 같은 방식입니다.
Remix V2의 flat 라우팅 방식이 좀 더 세련된 방식인 거 같은데요.
아직 astrojs 3.0까지도 flat 방식은 지원하지 않고 있네요.
즉, ‘/about’라는 라우팅을 만들려면 ‘src/pages/about.astro’ 페이지를 만들거나,
‘src/pages/about/index.astro’ 페이지를 만들면 됩니다.
단, Nested Routing은 지원하지 않습니다.
이제, ‘src/pages/index.astro’ 페이지를 수정해서 데이터 가져오기에 대해 알아보겠습니다.
먼저, Astro 컴포넌트에 대해 살펴봐야 하는데요.
---

---

<html lang="en">
  <head>
    <meta charset="utf-8" />
    <link rel="icon" type="image/svg+xml" href="/favicon.svg" />
    <meta name="viewport" content="width=device-width" />
    <meta name="generator" content={Astro.generator} />
    <title>Astro</title>
  </head>
  <body>
    <h1>How to handle data in Astro!</h1>
  </body>
</html>
기존 React 코드와는 사뭇 다른데요.
Astro 컴포넌트는 기본적으로 HTML 파일입니다.
그런데, Astro만의 다른 점은 맨 위에 있는 ‘—‘인데요.
‘—’ 방식은 마크다운의 Frontmatter를 적을 때 쓰는 기호입니다.
Astro 컴포넌트는 이 ‘—’ 표시 사이에 자바스크립트를 작성할 수 있습니다.
물론, <script>를 직접 HTML 코드에 작성해도 작동됩니다.
보통 ‘—’ 사이에 우리가 원하는 코드를 작성하는 방식이 좀 더 보편적입니다.
그럼, 자바스크립트 안에서 직접 데이터를 다루는 방법에 대해 알아볼까요?
---
const data1 = ["astro", "react", "javascript", "typescript", "node"];
---

<html lang="en">
  <head>
    <meta charset="utf-8" />
    <link rel="icon" type="image/svg+xml" href="/favicon.svg" />
    <meta name="viewport" content="width=device-width" />
    <meta name="generator" content={Astro.generator} />
    <title>Astro</title>
  </head>
  <body>
    <h1>How to handle data in Astro!</h1>
    <ul>
      {data1.map((title) => <li>{title}</li>)}
    </ul>
  </body>
</html>
위와 같이 작성하시면 됩니다.
리액트에서는 key 부분을 작성해야 하는데, Astro에서는 그런거 신경 안써도 됩니다.
실제, Dev 서버를 돌려서 볼까요?
위와 같이 잘 나오네요.
그럼, 정적사이트 제조기로써 Astro는 어떻게 빌드하는지 직접 build 해보겠습니다.
npm run build
cd dist

➜ ls -l
total 16
drwxr-xr-x   4 cpro95  staff   128B 10  7 17:04 .
drwxrwxr-x  13 cpro95  staff   416B 10  7 17:03 ..
-rw-r--r--   1 cpro95  staff   749B 10  7 17:04 favicon.svg
-rw-r--r--   1 cpro95  staff   386B 10  7 17:04 index.html

➜  dist cat index.html
<!DOCTYPE html><html lang="en"><head><meta charset="utf-8"><link rel="icon" type="image/svg+xml" href="/favicon.svg"><meta name="viewport" content="width=device-width"><meta name="generator" content="Astro v3.2.3"><title>Astro</title></head><body><h1>How to handle data in Astro!</h1><ul><li>astro</li><li>react</li><li>javascript</li><li>typescript</li><li>node</li></ul></body></html>%
정적 사이트 제조기라서 그런지 완벽한 HTML 코드인데요.
자바스크립트가 없습니다.
Prettier된 코드로 볼까요?
<!DOCTYPE html>
<html lang="en">
  <head>
    <meta charset="utf-8" />
    <link rel="icon" type="image/svg+xml" href="/favicon.svg" />
    <meta name="viewport" content="width=device-width" />
    <meta name="generator" content="Astro v3.2.3" />
    <title>Astro</title>
  </head>
  <body>
    <h1>How to handle data in Astro!</h1>
    <ul>
      <li>astro</li>
      <li>react</li>
      <li>javascript</li>
      <li>typescript</li>
      <li>node</li>
    </ul>
  </body>
</html>
실제 build 된 index.html 파일에 우리가 아까 자바스크립트로 map 시켰던 data1 의 데이터가 HTML 코드로 정확하게 구현되어 있네요.
두 번째는 실제 리액트 코드에서 많이 쓰이는 방식입니다.
외부 API를 fetch 해서 HTML로 보여주는 코드인데요.
jsonplaceholder의 fake user json 데이터를 이용해 보겠습니다.
---
interface User {
	id: number;
	name: string;
	email: string;
	address: {
		street: string;
		suite: string;
		city: string;
		zipcode: string;
		geo: {
			lat: string;
			lng: string;
		}
	}
	phone: string;
	website: string;
	company: {
		name: string;
		catchPhrase: string;
		bs: string;
	}
}
const result = await fetch("https://jsonplaceholder.typicode.com/users");
const users: User[] = await result.json();
---

<html lang="en">
  <head>
    <meta charset="utf-8" />
    <link rel="icon" type="image/svg+xml" href="/favicon.svg" />
    <meta name="viewport" content="width=device-width" />
    <meta name="generator" content={Astro.generator} />
    <title>Astro</title>
  </head>
  <body>
    <h1>How to handle data in Astro!</h1>
    <ul>
      {users.map((user) => <li>{user.name}</li>)}
    </ul>
  </body>
</html>
위 코드에서 fetch하는 부분은 리액트 코드와 비슷한데요.
한 가지 다른 점은 async 함수를 작성하지 않고 바로 await fetch 했다는 점인데요.
이 점이 astrojs의 특징입니다.
즉, astrojs는 자체적으로 async 방식으로 작동하기 때문에 위와 같이 그냥 await 코드를 호출해도 된다는 점입니다.
아주 쉽게 구현되네요.
실행 결과를 볼까요?
위와 같이 잘 나오고 있습니다.
이 결과물도 build 해볼까요?
build 결과물만 HTML 코드로 보겠습니다.
<!DOCTYPE html>
<html lang="en">

<head>
    <meta charset="utf-8">
    <link rel="icon" type="image/svg+xml" href="/favicon.svg">
    <meta name="viewport" content="width=device-width">
    <meta name="generator" content="Astro v3.2.3">
    <title>Astro</title>
</head>

<body>
    <h1>How to handle data in Astro!</h1>
    <ul>
        <li>Leanne Graham</li>
        <li>Ervin Howell</li>
        <li>Clementine Bauch</li>
        <li>Patricia Lebsack</li>
        <li>Chelsey Dietrich</li>
        <li>Mrs. Dennis Schulist</li>
        <li>Kurtis Weissnat</li>
        <li>Nicholas Runolfsdottir V</li>
        <li>Glenna Reichert</li>
        <li>Clementina DuBuque</li>
    </ul>
</body>

</html>
위와 같이 우리가 fetch 했던 API 주소도 보이지 않고, 순수하게 결과물만 보여주는 HTML 코드만 나오는데요.
정말 astrojs가 정적 사이트 제조기로써는 최고의 Tool이라고 생각합니다.
가끔은 실제 코드에서 로컬 파일의 json 파일을 불러올 때가 있는데요.
astrojs는 json 파일뿐만 아니라 자바스크립트, 타입스크립트, 마크다운 파일 등 여러 가지 형식의 파일을 직접 불러올 수 있습니다.
먼저, json 파일을 불러와 보겠습니다.
[
  {
    "userId": 1,
    "id": 1,
    "title": "sunt aut facere repellat provident occaecati excepturi optio reprehenderit",
    "body": "quia et suscipit\nsuscipit recusandae consequuntur expedita et cum\nreprehenderit molestiae ut ut quas totam\nnostrum rerum est autem sunt rem eveniet architecto"
  },
  {
    "userId": 1,
    "id": 2,
    "title": "qui est esse",
    "body": "est rerum tempore vitae\nsequi sint nihil reprehenderit dolor beatae ea dolores neque\nfugiat blanditiis voluptate porro vel nihil molestiae ut reiciendis\nqui aperiam non debitis possimus qui neque nisi nulla"
  },
  ...
  ...
  ...
  {
    "userId": 1,
    "id": 10,
    "title": "optio molestias id quia eum",
    "body": "quo et expedita modi cum officia vel magni\ndoloribus qui repudiandae\nvero nisi sit\nquos veniam quod sed accusamus veritatis error"
  }
]
위와 같이 index.astro 파일과 같은 위치에 post.json 파일이 있다고 합시다.
다음과 같이 코드를 작성하시면 됩니다.
---
interface Post {
	userId: number;
    id: number;
    title: string;
    body: string;
}
import localPostData from './post.json';
---

<html lang="en">
  <head>
    <meta charset="utf-8" />
    <link rel="icon" type="image/svg+xml" href="/favicon.svg" />
    <meta name="viewport" content="width=device-width" />
    <meta name="generator" content={Astro.generator} />
    <title>Astro</title>
  </head>
  <body>
    <h1>How to handle data in Astro!</h1>
    <ul>
      {localPostData.map((post) => <li>{post.title}</li>)}
    </ul>
  </body>
</html>
실제 실행 결과를 볼까요?
위와 같이 잘 작동합니다.
그리고 자바스크립트나 타입스크립트로 작성된 데이터도 불러올 수 있는데요.
이건, 어찌 보면 아주 당연한 겁니다.
postdata.ts 파일을 만들어 볼까요?
const postdata = [
    {
        id: 1,
        name: "ts",
        email: "ts@test.com"
    },
    {
        id: 2,
        name: "js",
        email: "js@test.com"
    },
];

export default postdata;
이제 index.astro 코드에서 아래와 같이 작성하시면 됩니다.
import postdata from './postdata';
console.log(postdata);
그러면 콘솔창에 아래와 같이 나오는데요.
[
  { id: 1, name: 'ts', email: 'ts@test.com' },
  { id: 2, name: 'js', email: 'js@test.com' }
]
마크다운 파일을 읽어 볼까요?
더미 md 파일을 여러 개 만듭시다.
# test md 1

## test md 1
이 방식으로 두 개 정도 만듭시다.
이제 md 파일을 불러오는 코드를 작성해 볼까요?
astrojs는 특별히 마크다운 파일을 로컬에서 전부 불러올 수 있는 함수를 제공해 줍니다.
---
const mdfiles = await Astro.glob("./*.md");
console.log(mdfiles);
---
위와 같이 하면 해당 폴더의 md 확장자를 모두 불러옵니다.
glob 함수를 이용했는데요.
Astro 글로벌 객체에 있는 겁니다.
앞으로 Astro 글로벌 객체를 자주 이용할 텐데요.
astrojs는 이 Astro라는 글로벌 객체 하나만 있으면 다 됩니다.
이제, 그 데이터를 볼까요?
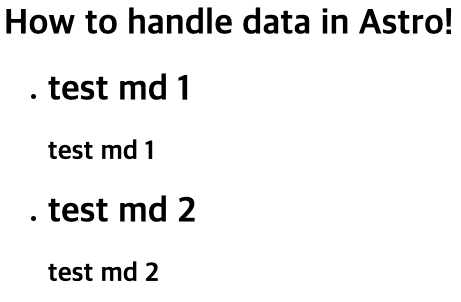
<ul>
  {mdfiles.map((md) => <li>{md.compiledContent()}</li>)}
</ul>
위 그림과 같이 astrojs는 실제 마크다운 파일을 객체로 관리해 주는데요.
위 그림과 같이 여러 항목이 있습니다.
우리가 먼저, 배울 건 바로 compiledContent 함수인데요.
위와 같이 실행하면 화면에는 아래와 같이 나옵니다.
위와 같이 마크다운 파일을 HTML 파일로 컴파일한 상태 그대로 나옵니다.
그래서 astrojs에서는 아래와 같은 방식으로 컴파일된 컨텐츠를 렌더링합니다.
<ul>
  {mdfiles.map((md) => <li><Fragment set:html={md.compiledContent()} /></li>)}
</ul>
위와 같이 Fragment의 set:html 형식을 이용해서 하면 됩니다.
Fragment를 이용한 실제 실행 결과입니다.
Content 객체를 이용해 볼까요?
    <ul>
      {
        mdfiles.map((md) => {
          const Content = md.Content;
          return <li><Content /></li>;
        })
      }
    </ul>
위와 같이 해도 결과는 똑같습니다.
편하신 방법을 사용하시면 되는데요.
astrojs가 버전 업되면서 기존의 glob 함수를 이용한 방식에서 Content Collections 기능을 직접 제공해 주는데요.
실제, zod 패키지를 이용해서 타입스크립트를 이용한 컨텐츠의 데이터 타입을 정확하게 지정할 수 있습니다.
테스트를 위해서 src 폴더 밑에 content 폴더를 만들고 product 폴더를 만들겠습니다.
그리고, 이 폴더에 yaml 파일을 여러 개 만들겠습니다.
# 1.yaml
name: mouse
price : 5

# 2.yaml
name: keyboard
price: 10

# 3.yaml
name: monitor
price: 100
이제 이 데이터를 읽어들이기 전에 Collections에 대한 정의가 필요한데요.
astrojs가 제공하는 defineCollection 함수를 이용하면 됩니다.
‘src/content’ 폴더에 config.ts 파일을 만듭시다.
import { z, defineCollection } from "astro:content";

const product = defineCollection({
  type: "data",
  schema: z.object({
    name: z.string(),
    price: z.number(),
  }),
});

export const collections = {
  product,
};
위와 같이 zod의 z와 defineCollection을 이용해서 스키마를 지정해 주면 됩니다.
defineCollection에서 type 부분이 있는데요.
우리는 yaml 같은 데이터 파일을 만들었기 때문에 ‘data’라고 했고, 만약 마크다운 파일 같은 컨텐츠 위주의 파일이라면 ‘content’라고 하시면 됩니다.
이제, index.astro 파일에서 우리가 만든 콜렉션을 사용해 볼까요?
---
import { getCollection } from "astro:content";

const data = await getCollection("product");
console.log(data);
---
위와 같이 await 방식으로 getCollection 함수를 실행하면 됩니다.
그리고 우리가 config.ts 파일에서 export 했던 product 콜렉션을 고르면 됩니다.
참고로 콜렉션은 여러 개 만들 수 있습니다.
콘솔 창을 볼까요?
[
  { id: '1', collection: 'product', data: { name: 'mouse', price: 5 } },
  {
    id: '2',
    collection: 'product',
    data: { name: 'keyboard', price: 10 }
  },
  {
    id: '3',
    collection: 'product',
    data: { name: 'monitor', price: 100 }
  }
]
getCollection 함수가 완벽하게 작동하고 있네요.
astrojs에서는 EndPoint를 제공해 주는데요.
API를 만들 수 있게 해줍니다.
pages 파일 밑에 js 확장자나 ts 확장자를 이용해서 GET, POST, PUT, DELETE, UPDATE 라는 이름의 함수를 export 해주면 됩니다.
//pages/api/get-product.json.js

import { getCollection } from "astro:content";

const product = await getCollection("product");

export const GET = async () => {
  return new Response(JSON.stringify(product), {
    headers: {
      "content-type": "application/json",
    },
    status: 200,
  });
};
위와 같이 하고 실제 ‘api/get-product.json’ 라우팅으로 브라우저에서 테스트해 볼까요?
아래 그림과 같이 json 서버가 되었네요.
어떤가요?
astrojs를 이용해서 EndPoint를 만들었습니다.
그러면 이 EndPoint는 build 시 어떻게 표현될까요?
바로 정적으로 표현됩니다.
실제 build시 아래와 같이 나옵니다.
➜  dist l
total 16
drwxr-xr-x   7 cpro95  staff   224B 10  7 18:11 .
drwxrwxr-x  14 cpro95  staff   448B 10  7 17:52 ..
drwxr-xr-x   3 cpro95  staff    96B 10  7 18:11 api
-rw-r--r--   1 cpro95  staff   749B 10  7 18:11 favicon.svg
-rw-r--r--   1 cpro95  staff   298B 10  7 18:11 index.html
drwxr-xr-x   3 cpro95  staff    96B 10  7 18:11 test1
drwxr-xr-x   3 cpro95  staff    96B 10  7 18:11 test12
➜  dist cd api
➜  api ls -al
total 8
drwxr-xr-x  3 cpro95  staff   96 10  7 18:11 .
drwxr-xr-x  7 cpro95  staff  224 10  7 18:11 ..
-rw-r--r--  1 cpro95  staff  213 10  7 18:11 get-product.json
➜  api cat get-product.json
[{"id":"1","collection":"product","data":{"name":"mouse","price":5}},{"id":"2","collection":"product","data":{"name":"keyboard","price":10}},{"id":"3","collection":"product","data":{"name":"monitor","price":100}}]%
➜  api
정적 EndPoint를 만든 거죠.
실시간으로 서버 사이드 방식도 가능한데요.
그건 다음 편에 알아보겠습니다.
지금까지 Astro를 이용해서 데이터 가져오는 5가지 방법을 알아봤는데요.
정말 간단하고 데이터가 많을 경우 Astro를 이용해서 홈페이지를 만들면 정말 쉽게 만들 수 있습니다.
그럼.