Title here
Summary here
November 9, 202311 minutes
안녕하세요?
astrojs 강좌가 벌써 9번째네요.
전체 astrojs 강좌 목록입니다.
** 목차 **
위 그림과 같이 Supabase 홈페이지에서 New Project를 설정합니다.
위 그림과 같이 적당한 이름을 적으시고, Region은 한국으로 선택하면 됩니다.
예전에는 한국 지역이 없었는데요.
새로 생겼네요.
이제, 세팅 - API 메뉴를 클릭하면 아래와 같이 API Settings이 보입니다.
위 그림과 같이 Supabase와 Astrojs를 연결하는 URL과 ANON_KEY가 있어야 하는데요.
Project URL과, anon public 부분에 있는 hash 키를 가지고 나중에 astrojs와 연결해야 합니다.
이제 supabase도 준비가 되었으니 astrojs를 준비해 보도록 하겠습니다.
npm create astro@latest --  --template=minimal --yes --skip-houston astro-supabase-auth-example

cd astro-supabase-auth-example

npx astro add node tailwind

npm install @supabase/supabase-js
SSR 구현을 위해 node 어댑터를 설치했고, CSS를 위해 tailwindcss도 설치했습니다.
마지막으로 supabase의 자바스크립트 클라이언트까지 설치 완료했습니다.
이제, UI를 좀 더 멋지게 보이게 하기 위해 Layout.astro 파일과 Header.astro 파일을 src 폴더 밑에 layouts 폴더를 만들고 그 밑에 두도록 하겠습니다.
먼저, Layout.astro 파일입니다.
---
import Header from "./Header.astro";

const { title } = Astro.props;
---

<!doctype html>
<html lang="en">
  <head>
    <meta charset="UTF-8" />
    <link rel="icon" type="image/svg+xml" href="/favicon.svg" />
    <meta name="viewport" content="width=device-width, initial-scale=1.0" />
    <meta name="generator" content={Astro.generator} />
    <title>{title}</title>
  </head>
  <body>
    <div class="container p-8">
      <Header />
      <slot />
    </div>
  </body>
</html>
Header.astro 파일입니다.
<nav>
    <a href="/">Home</a>
    <a href="/dashboard">Dashboard</a>
    <a href="/register">Register</a>
    <a href="/signin">Sign in</a>
    <a href="/api/auth/signout">Sign out</a>
  </nav>

  <style>
    nav {
      @apply flex items-start justify-start space-x-4 pb-4;
    }
    a {
      @apply underline text-gray-800;
    }
  </style>
사실 Layout과 Header는 별거 없습니다.
먼저, .env 파일을 아래와 같이 만듭니다.
SUPABASE_URL=https://bdfctwzjlcne.supabase.co
SUPABASE_ANON_KEY=eyJhbGciOiJIUzI1NiIs...............
그리고 Typescript를 위해 src 폴더에 있는 env.d.ts 파일을 아래와 같이 수정합니다.
/// <reference types="astro/client" />
interface ImportMetaEnv {
    readonly SUPABASE_URL: string
    readonly SUPABASE_ANON_KEY: string
  }

  interface ImportMeta {
    readonly env: ImportMetaEnv
  }
이제 Supabase 클라이언트를 준비해야 합니다.
src 폴더 밑에 lib 폴더를 만들고 다시 supabase.ts 파일을 만듭니다.
import { createClient } from "@supabase/supabase-js";

export const supabase = createClient(
  import.meta.env.SUPABASE_URL,
  import.meta.env.SUPABASE_ANON_KEY,
);
이제 supabase 준비가 끝났네요.
Supabase와의 연결은 바로 API Endpoint를 구현해서 할 건데요.
src/pages/api/auth 폴더를 만들고 그 밑에 우리가 필요한 register.ts 파일과 signin.ts 파일, signout.ts 파일을 만듭니다.
먼저, register.ts 파일부터 만들어 보겠습니다.
UI 부분에서 Form을 submit하면 바로 register.ts 파일이 실행되는 형태입니다.
import type { APIRoute } from "astro";
import { supabase } from "../../../lib/supabase";

export const POST: APIRoute = async ({ request, redirect }) => {
  const formData = await request.formData();
  const email = formData.get("email")?.toString();
  const password = formData.get("password")?.toString();

  if (!email || !password) {
    return new Response("Email and password are required", { status: 400 });
  }

  const { error } = await supabase.auth.signUp({
    email,
    password,
  });

  if (error) {
    return new Response(error.message, { status: 500 });
  }

  return redirect("/signin");
};
UI 부분에서 POST method로 HTTP 리퀘스트가 오면 위의 엔드포인트에서 받아서 처리하는 겁니다.
위 엔드포인트를 잘 보시면 단순하게 supabase.auth.signUp 함수를 실행한게 다입니다.
나머지는 그렇게 어려운 코드가 아니고요.
바로 Supabase의 간결함이 여기에 있는 거죠.
그러면, Register UI 부분을 작성해 봅시다.
UI 부분은 astrojs에서 라우팅이 되야 하는 부분이기 때문에 src/pages 폴더 밑에 놔둡니다.
register.astro 파일을 만들도록 하겠습니다.
---
import Layout from "../layouts/Layout.astro";
---

<Layout title="Register">
  <h1>Register</h1>
  <p>Already have an account? <a href="/signin">Sign in</a></p>
  <form action="/api/auth/register" method="post">
    <label for="email" for="email">Email</label>
    <input type="email" name="email" id="email" />
    <label for="password">Password</label>
    <input type="password" name="password" id="password" />
    <button type="submit">Register</button>
  </form>
</Layout>

<style>
  h1 {
    @apply font-bold text-2xl;
  }
  p {
    @apply text-gray-700 py-4;
  }
  a {
    @apply underline text-blue-500;
  }
  form {
    @apply w-1/2 space-y-4;
  }
  label {
    @apply block mb-2 text-sm font-medium text-green-700 dark:text-green-500;
  }
  input {
    @apply bg-green-50 border border-green-500 text-green-900  placeholder-green-700  text-sm rounded-lg focus:ring-green-500 focus:border-green-500 block w-full p-2.5;
  }
  button {
    @apply text-white bg-blue-700 hover:bg-blue-800 focus:ring-4 focus:ring-blue-300 font-medium rounded-lg text-sm px-5 py-2.5 mr-2 mb-2 focus:outline-none;
  }
</style>
위 그림과 같이 디자인도 멋진 코드가 작성되었는데요.
Tailwind를 위와 같이 사용하면 HTML을 좀 더 명확하게 볼 수 있어 아주 유용합니다.
지금까지 만든 Register 코드는 작동하는데요.
작동시키면 최종적으로 ‘/signin’ 라우팅으로 이동하는데요.
그전에 supabase User 테이블에 사용자 가입정보가 보여야 정상입니다.
한번 테스트해 볼까요?
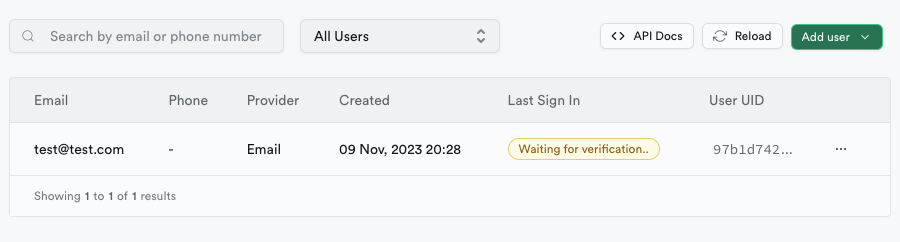
위와 같이 ’test@test.com’으로 가입한 유저 정보가 supabase DB에 잘 등록되네요.
그런데, 위 그림을 잘 보시면 이메일 컨펌을 해야 한다는데요.
테스트를 위해서 먼저, supabase의 이메일 컨펌 기능을 끄도록 하겠습니다.
위 그림과 같이 좌측 메뉴 Authentication을 선택한 다음 Providers를 선택하고 그다음 Email 부분에서 Enabled 부분을 클릭하면 위와 같이 나옵니다.
위와 같이 나오면 Confirm email 부분을 해제시키면 됩니다.
해제시키고 밑에 ‘Save’ 버튼을 눌러 저장시키면 됩니다.
그럼, User 를 클릭하고 아이디 행의 오른쪽에 점 3개를 누른 다음 “Delete user"를 클릭해서 삭제하고 다시 Register 라우팅에서 유저를 생성해 보겠습니다.
삭제하고 다시 유저 가입을 하면 아래와 같이 나옵니다.
지금까지 정상적으로 작동하네요.
유저 등록을 했으니까 이제 등록된 유저 이메일과 패스워드를 가지고 로그인해보겠습니다.
먼저, src/pages/api/auth/signin.ts 파일입니다.
import type { APIRoute } from "astro";
import { supabase } from "../../../lib/supabase";

export const POST: APIRoute = async ({ request, cookies, redirect }) => {
  const formData = await request.formData();
  const email = formData.get("email")?.toString();
  const password = formData.get("password")?.toString();

  if (!email || !password) {
    return new Response("Email and password are required", { status: 400 });
  }

  const { data, error } = await supabase.auth.signInWithPassword({
    email,
    password,
  });

  if (error) {
    return new Response(error.message, { status: 500 });
  }

  const { access_token, refresh_token } = data.session;
  cookies.set("sb-access-token", access_token, {
    path: "/",
  });
  cookies.set("sb-refresh-token", refresh_token, {
    path: "/",
  });
  return redirect("/dashboard");
};
supabase.auth.signInWithPassword 함수를 이용해서 supabase에서 유저 로그인하는 겁니다.
그리고 세션에서 갑자기 access_token과 refresh_token을 가져다가 로컬스토리지에 있는 쿠키에 저장하는데요.
UI 부분 코드를 봅시다.
Sign in UI 코드는 Register 코드와 거의 비슷합니다.
---
import Layout from "../layouts/Layout.astro";

const accessToken = Astro.cookies.get("sb-access-token");
const refreshToken = Astro.cookies.get("sb-refresh-token");

if (accessToken && refreshToken) {
  return Astro.redirect("/dashboard");
}
---

<Layout title="Sign in">
  <h1>Sign in</h1>
  <p>New here? <a href="/register">Create an account</a></p>
  <form action="/api/auth/signin" method="post">
    <label for="email" for="email">Email</label>
    <input type="email" name="email" id="email" />
    <label for="password">Password</label>
    <input type="password" name="password" id="password" />
    <button type="submit">Login</button>
  </form>
</Layout>

<style>
  h1 {
    @apply font-bold text-2xl;
  }
  p {
    @apply text-gray-700 py-4;
  }
  a {
    @apply underline text-blue-500;
  }
  form {
    @apply w-1/2 space-y-4;
  }
  label {
    @apply block mb-2 text-sm font-medium text-green-700 dark:text-green-500;
  }
  input {
    @apply bg-green-50 border border-green-500 text-green-900  placeholder-green-700  text-sm rounded-lg focus:ring-green-500 focus:border-green-500 block w-full p-2.5;
  }
  button {
    @apply text-white bg-blue-700 hover:bg-blue-800 focus:ring-4 focus:ring-blue-300 font-medium rounded-lg text-sm px-5 py-2.5 mr-2 mb-2 focus:outline-none;
  }
</style>
signin UI의 로직은 간단합니다.
이미 로그인되어 있다면 바로 dashboard 라우팅으로 이동하는 겁니다.
바로 cookies의 “sb-access-token”, “sb-refresh-token” 토큰을 이용하는 건데요.
이 토큰들은 아까 signin.ts 파일에서 미리 만들어 놓았던 쿠키입니다.
이 쿠키에 정보가 있다면 로그인된 상태니까 그걸 체크하는 겁니다.
signin.ts 파일을 보시면 끝날 때 보시면 토큰을 저장하고 바로 ‘/dashboard’라는 라우팅으로 보냅니다.
즉, 이 라우팅이 protected 라우팅이 되는 겁니다.
이제, dashboard 라우팅을 만들어야 하는데요.
먼저, signout.ts 파일을 만들어서 로그아웃 기능도 구현해 봅시다.
src 폴더 밑에 pages 폴더 밑에 그리고 signout.ts 파일을 만들면 됩니다.
import type { APIRoute } from "astro";
import { supabase } from "../../../lib/supabase";

export const GET: APIRoute = async ({ cookies, redirect }) => {
  const { error } = await supabase.auth.signOut();
  if (error) {
    return new Response(error.message, { status: 500 });
  }
  cookies.delete("sb-access-token", { path: "/" });
  cookies.delete("sb-refresh-token", { path: "/" });
  return redirect("/signin");
};
위 코드를 보시면 signout은 토큰을 지우고 다시 총선 모드로 들어가는 건데요.
이제 dashboard UI를 꾸며볼까요?
src/pages/dashboard.astro 파일입니다.
---
import Layout from "../layouts/Layout.astro";
import { supabase } from "../lib/supabase";

const accessToken = Astro.cookies.get("sb-access-token");
const refreshToken = Astro.cookies.get("sb-refresh-token");

if (!accessToken || !refreshToken) {
  return Astro.redirect("/signin");
}

const { data, error } = await supabase.auth.setSession({
  refresh_token: refreshToken.value,
  access_token: accessToken.value,
});

if (error) {
  Astro.cookies.delete("sb-access-token", {
    path: "/",
  });
  Astro.cookies.delete("sb-refresh-token", {
    path: "/",
  });

  return Astro.redirect("/signin");
}

const email = data?.user?.email;
---

<Layout title="dashboard">
  <h1>Welcome {email}</h1>
  <p>We are happy to see you here</p>
  <form action="/api/auth/signout">
    <button type="submit">Sign out</button>
  </form>
</Layout>

<style>
  h1 {
    @apply font-bold text-2xl;
  }
  p {
    @apply text-gray-700 py-4;
  }
  form {
    @apply w-1/2 space-y-4;
  }
  button {
    @apply text-white bg-blue-700 hover:bg-blue-800 focus:ring-4 focus:ring-blue-300 font-medium rounded-lg text-sm px-5 py-2.5 mr-2 mb-2 focus:outline-none;
  }
</style>
dashboard에서는 supabase.auth.setSession을 쿠키에 저장된 토큰을 이용해서 세션을 만듭니다.
그리고 만든 세션에서 data 항목만 빼내가지고 그 안에 있는 email 부분만 출력해 주고 있습니다.
위와 같이 dashboard 도 정상 작동하고 있네요.
signout 버튼을 눌러보시면 잘 작동할 겁니다.
signout 한 상태에서 dashboard 라우팅으로는 절대 이동되지 못합니다.
왜냐하면 쿠키를 검사해서 로그인 여부를 판가름하기 때문이죠.
이렇게 하는 게 바로 protected page를 만드는 방식입니다.
OAuth 방식이라고 해서 예를 들어 구글 아이디나, Github 아이디로도 로그인을 구현할 수 있는데요.
우리는 여기서 Github 아이디로 로그인하는 방법을 배워보겠습니다.
먼저, Github 사이트에 가서 Developer Settings 부분에서
위와 같이 Github Apps를 추가해야 합니다.
저번에 next-auth를 이용한 Github App이 그대로 남아있네요.
“New Github App” 버튼을 눌러 추가하도록 합니다.
추가를 다 하면 위와 같이 나오는데요.
가장 중요한 부분이 바로 Client ID와 Client secret입니다.
이 부분을 Supabase에 저장해야 하는데요.
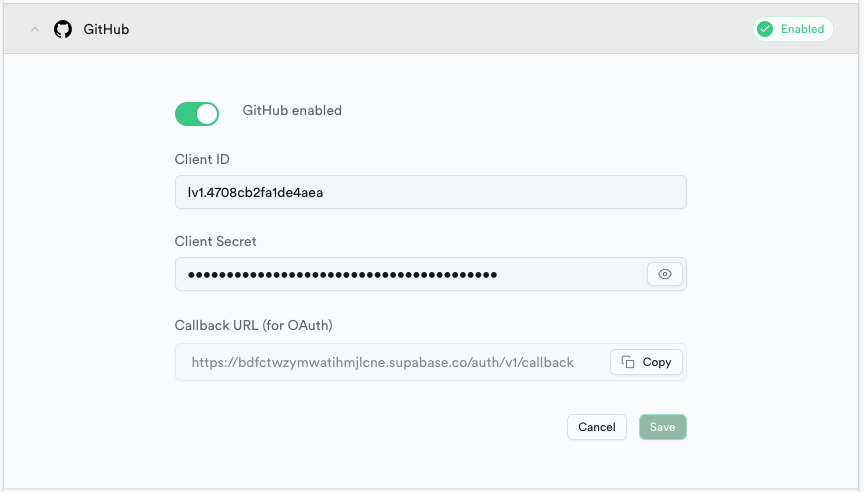
아까 Supabase에서 Providers에서 Email을 선택했던 곳에서 밑으로 이동하셔서 Github을 눌러 아래 그림과 같이 넣으시면 됩니다.
위 그림에서 보듯이 Client ID와 Client Secret는 Github Apps에서 가져와서 넣었는데요.
밑에 보시면 Callback URL 부분은 복사하라고 되어 있네요.
이 부분은 바로 Github Apps에 넣어야 하는 겁니다.
이 Callback URL을 이용해서 Github Apps와 Supabase가 상호작용하는 겁니다.
위와 같이 Github Apps 세팅 부분에 Callback URL 부분에 넣어주시면 됩니다.
이제 준비가 다 됐는데요.
먼저, signin 부분을 고쳐보겠습니다.
<Layout title="Sign in">
  <h1>Sign in</h1>
  <p>New here? <a href="/register">Create an account</a></p>
  <form action="/api/auth/signin" method="post">
    <label for="email" for="email">Email</label>
    <input type="email" name="email" id="email" />
    <label for="password">Password</label>
    <input type="password" name="password" id="password" />
    <button type="submit">Login</button>

    <!-- 아래가 추가된 부분 -->
    <button value="github" name="provider" type="submit">
        Sign in with GitHub
      </button>
  </form>
</Layout>
UI 부분에서 추가된 부분이 있는데요.
바로 button인데 좀 특이합니다.
name은 provider이고 value 값이 github이네요.
이렇게 되어 있으면 button을 클릭했을 때 formData.get 메서드로 provider를 얻을 수 있습니다.
이제, signin.ts 부분을 고쳐볼까요?
import type { APIRoute } from "astro";
import { supabase } from "../../../lib/supabase";

export const POST: APIRoute = async ({ request, cookies, redirect }) => {
  const formData = await request.formData();
  const email = formData.get("email")?.toString();
  const password = formData.get("password")?.toString();

  // 여기서 부터 추가된 부분
  const provider = formData.get("provider")?.toString();

  if (provider) {
    const { data, error } = await supabase.auth.signInWithOAuth({
      provider,
      options: {
        redirectTo: "http://localhost:4321/api/auth/callback",
      },
    });

    if (error) {
      return new Response(error.message, { status: 500 });
    }

    return redirect(data.url);
  }
  // 여기까지가 추가된 부분

  if (!email || !password) {
    return new Response("Email and password are required", { status: 400 });
  }

  const { data, error } = await supabase.auth.signInWithPassword({
    email,
    password,
  });

  if (error) {
    return new Response(error.message, { status: 500 });
  }

  const { access_token, refresh_token } = data.session;
  cookies.set("sb-access-token", access_token, {
    path: "/",
  });
  cookies.set("sb-refresh-token", refresh_token, {
    path: "/",
  });
  return redirect("/dashboard");
};
주석을 보시면 추가된 부분이 보이는데요.
아까 button에서 name이 provider가 되고 value가 github이라서 만약 이 버튼을 눌렀다면 provider가 github인 상태가 되는 거죠.
그래서 supabase.auth.signInWithOAuth 메서드를 수행하게 되는 겁니다.
supabase.auth.signInWithOAuth 메서드는 다음 형식인데요.
supabase.auth.signInWithOAuth({
  provider: 'github',
  options: {
    redirectTo: "http://localhost:4321/api/auth/callback"
  }
})
여기서 redirectTo 옵션이 있는데요.
이 옵션이 가장 중요합니다.
만약 provider형식으로 로그인 요청이 왔다면 바로 redirectTo 주소로 이동하라는 뜻이죠.
이제 api/auth/callback 엔드포인트를 만들겠습니다.
이 엔드포인트에서 실제 로그인이 이루어지는 거죠.
import type { APIRoute } from "astro";
import { supabase } from "../../../lib/supabase";

export const GET: APIRoute = async ({ url, cookies, redirect }) => {
  const authCode = url.searchParams.get("code");

  if (!authCode) {
    return new Response("No code provided", { status: 400 });
  }

  const { data, error } = await supabase.auth.exchangeCodeForSession(authCode);

  if (error) {
    return new Response(error.message, { status: 500 });
  }

  const { access_token, refresh_token } = data.session;

  cookies.set("sb-access-token", access_token, {
    path: "/",
  });
  cookies.set("sb-refresh-token", refresh_token, {
    path: "/",
  });

  return redirect("/dashboard");
};
위 코드를 보시면 바로 upabase.auth.exchangeCodeForSession 이 함수가 가장 중요한데요.
이 함수에 의해 supabase와 provider로 제공된 github이 연결되는 겁니다.
실제 테스트해 볼까요?
위와 같이 login 버튼 옆에 signin with Github 버튼이 보이네요.
이제 이 버튼을 누르면 github 아이디로 로그인하게 됩니다.
위와 같이 Github Apps 연결 표시가 나오게 됩니다.
이제 정상적으로 작동될 거라고 보시면 안 되는데요.
여기서 한 가지 더 추가하고 가야 합니다.
OAuth 방식을 이용하려면, supabase 클라이언트를 만들 때 아래와 같이 만들어야 합니다.
import { createClient } from "@supabase/supabase-js";

export const supabase = createClient(
  import.meta.env.SUPABASE_URL,
  import.meta.env.SUPABASE_ANON_KEY,
  {
    auth: {
      flowType: "pkce",
    },
  },
);
바로 auth 부분에서 flowType을 ‘pkce’ 방식으로 지정해 줘야 합니다.
이걸 지정 안 하면 계속 no code error가 나올 겁니다.
참고로 Github 아이디의 email을 open 하는 부분이 있는데요.
위와 같이 Github Apps 세팅에 들어가서 Account permissions 부분에서 Email Address 부분을 Read-only로 하시면 바로 Email 정보를 astrojs에서 확인할 수 있을 겁니다.
지금까지 AstroJS와 Supabase를 이용해서 유저 로그인을 구현해 봤는데요.
아울러 Protected Page 구현 방법도 알아봤습니다.
이걸 기초로 AstroJS의 FullStack 웹 앱 구현에 많은 도움이 됐으면 합니다.
그럼.